Digsite Deep-Dive
The Digsite team makes a return trip from the vaults and salt mines of Halo development history with a new package of content for analysis and use by Halo: The Master Chief Collection modders!
This release focuses on development maps and prototype single-player levels from the period between the launch of Halo: Combat Evolved in 2001 and Halo 2 dropping onto store shelves in 2004.
We’re joined by Kenneth Peters, Senior Franchise Writer, to delve into the deepest depths of the latest Digsite release. For those who need a reminder: Digsite is an intrepid team of modders who have been working in partnership with 343 Industries to restore old cutting room floor content from Halo’s past.
This issue, we take a very close look at early Milestone content built using a version of the Blam! Engine we refer to as “Halo 1.5.”
Halo 1.5 content is not necessarily compatible with either Halo: CE or Halo 2, as Bungie was continuing to evolve the tag formats and engine ingestion pipelines as they went along. Where we lacked source data that could be re-ingested in the modern Editing Kit tools the old tags needed to be analyzed and ‘decompiled’ to get at the original content. And once we had the levels stood up to work in retail MCC, additional polish was needed so that the maps did not simply crash the game, reference invalid collections (e.g. the AR on Halo 2 maps) or were missing proper gametype support.
As noted above, these maps are mostly from Milestone builds, which meant they were only playable in a developer sense—one step above being a untextured blockout—before the Digsite team rolled up their collective sleeves and put polish on these ancient gems.
DOWNLOAD THE LATEST DIGSITE CONTENT DROP BELOW
Digsite - Halo: CE | Digsite - Halo 2 | Digsite - Halo 3
HALO 2 PRT TOOL
While working on the new maps, we noticed that there were lighting quality issues on some Halo 2 assets that we wanted to address. With the help of Num0005, we now have an updated prt_sim.exe brought to the modern era. This version has some fixes that should help it slot in neatly into MCC workflows. We put the tool download in a separate GitHub repo to make it easier to file bugs and other issues.
The TL;DR is that you use this tool to get nice lighting (such as self-shadowing) on certain render model types, such as the Scarab, moving bridges, and Gondola platforms. Just put the new PRT executable in your H2EK tool root to get started.
Background on Precomputed Radiance Transfer (PRT)
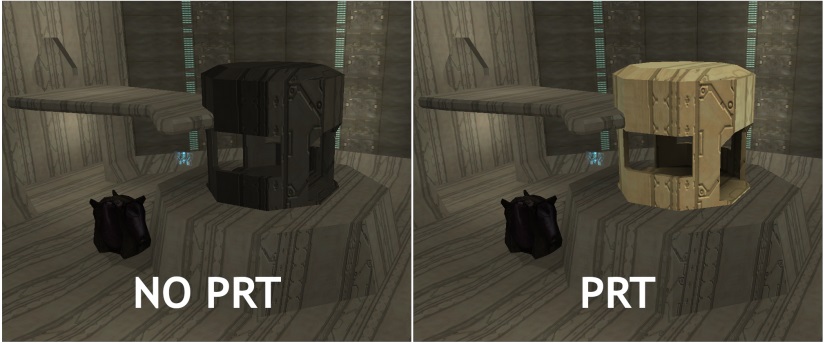
Comparison of standard lighting (no PRT) and PRT-enabled lighting on a M1 – Exploration elevator.
HALO 2 MILESTONE ONE MAPS
These maps are particularly notable for the fact they were demoed behind closed doors to the gaming press in 2002 and 2003, and articles from that period reference them both directly and indirectly, but they never saw the light of day—until now!
Because of how these maps were built, we’ve ported the content to both Halo: CE and Halo 2, with the very strong caveat that the CE versions are presented for modders to work with but will not function as originally intended. Most notably, the M1 maps were created using H2-style squads versus CE encounters. This includes H2-exclusive functionality such as orders and triggers.
M1 - DEFENSIVE
Defend the shield ship and secure a landing zone.
M1 - Defensive showcased Halo 2’s new AI systems and is not really meant to be played as a complete campaign experience, though it did get shown off to Electronic Gaming Monthly. While the map was never finished, we adjusted the map so that modders won’t have to do as much heavy lifting on polishing it further or making gameplay modifications.
For mod teams who would like to take the map to its intended conclusion, we’ve excerpted the original Bungie design docs to provide mission guidance!
Original Design Document Notes for M1 - Defensive
The Covenant are cannibalizing a Forerunner facility without knowing how valuable it is. Human forces are sent to snatch the crown jewel from beneath the Covenant’s nose, and they employ a prototype shield ship to defend against orbital strikes. The player is charged with assisting the task force, and that primarily involves defending the ship against local threats.
Play Themes
- Sally forth to disrupt and destroy attacking forces before they can damage your ship.
- The player is key, reinforcing and coordinating team efforts. A bit of help here, and a bit of help there, and the defense will go smoothly.
- I see them, but can I get there in time? Time pressure without the timer.
Visual Themes
- The cybernetic environment—natural terrain with Forerunner technology exposed like bones, suggesting that all is not as natural as it seems.
- Damage to the shield ship makes you cringe…
- A unique twist on a familiar environment would be cool—forest at sunset instead of midday.
- Can we make a canyon not look like a canyon? A bold experiment.
Defining Moments
- Seeing mortar rounds sighting in and knowing that they’ll eventually strike home.
- Riding to the rescue, saving a team and bolstering a faltering defense.
- Banshees make a bold attack run, diving into the chasm and into the face of your defense.
- Dropships challenge your defenses to drop off a formidable force inside of your defensive perimeter.
- Covenant ships fire from orbit, only to be foiled by the shield.
Mission Objectives
- Secure the landing zone - Objective given at the start of the mission, when the ship lands and the human forces unload and engage the Covenant defenders.
- Prevent the Covenant from damaging the ship - Objective given early in the mission.
- Prevent the Covenant from destroying the ship - Objective given after the ship has taken a certain amount of damage.
- Retreat to the ship for extraction - Objective given at the end of the mission, when you and the Marines retreat to the ship.
WALKTHROUGH
Insertion
Approximately 5 minutes. Events overlap.
Insertion Cinema
Initial Deployment
Initial force deployment, a few moments of frenzied activity. Pelicans flying alongside the shield ship drop turrets into static defensive positions, Marines not already in Warthogs climb in, and snipers head for their posts on their ATVs.
- Shield Ship lands, and Marines deploy.
- Two Snipers, on ATVs, head for hills near the ship.
- Two Marines man turrets near the base (more Marines wait in the ship and will replace these Marines if they die).
- Four Warthogs with a crew of three Marines (two AR, one Shotgun) leave the ship. Two move into cross fire positions to help you root out the defenders. The other two head out to the perimeter. Drivers and passengers jump out to support their gunner.
Initial Defenders
The first resistance comes from Covenant who were already around the entrance of the facility. These Elites and Grunts are poorly organized, frantically radioing for reinforcements, and quickly go to the ground as the player and Warthog crews clean them out.
- Covenant in the vicinity of the landing ship.
- Several Elites supported by Grunts and Shades.
- Covenant retreat into a stronger defensive position quickly.
- Once most of the defenders are dead, the Warthog crews depart for the perimeter points.
Attack from Orbit
There is a flare in the sky, and moments later a blinding glare drowns everything out. Communications become static, and sound is washed out. After a second or two, the glare fades (and everything seems dark for a moment), and communications come back online. “Shields are holding,” reports the shield ship, and radio chatter confirms that everyone is alright. The player now knows why the ship is there and why it’s important.
- If there can be a warning light that casts long shadows, something that the player notices before the actual attack, that would be ideal.
- Warning chatter, followed by horrible static for the duration of the light.
- Ship tech: “We’re being targeted!”
- Ship tech: “We have particle flux! Shields are—”
- As the light fades out, the static fades with it. Post attack chatter:
- Ship tech: “—is holding, we’re safe for now!”
- Ship tech: “—verse flux was huge!”
- Marine CO: “—eck your radiation counts!”
Dropship Overflights
Shortly after the failed attack from orbit, Covenant dropships cruise overhead, as if checking for damage. Seeing none, they proceed hastily for landing zones.
- While the surviving Covenant reinforcements are being beaten back, more dropships begin to fly overhead, bound for the muster points.
Defense
Approximately 10 minutes. Events overlap and don’t consider player transit time.
Banshees
Shortly after the dropships are sighted, Banshees appear on the scene to keep the player busy.
- While the muster points are being set up, Banshees begin to patrol the area.
Ghost Waves
More skirmishes while the player familiarizes himself with the environment and while the main event is prepared.
- The first waves arrive, consisting of two Ghosts apiece.
- Ghosts attempt to harass the Marines while infantry waves advance.
- Marines radio in contact at the chokepoints, but the Ghosts just break through and head for the ship, causing trouble away from the chokepoints.
Infantry Waves
The first big assaults. These target the chokepoints first, and then advance on the ship and the installation it is landed by. These waves originate from the staging grounds, where they can be intercepted by a bold player.
- Mixed groups of Elites and Grunts. (No Fuel Rod Grunts, as they would make short work of the chokepoint defenses.)
- Four to six waves, depending on difficulty.
- Waves head for chokepoints, and if they break through, proceed towards the ship.
- If the player attacks the staging ground, the infantry units will focus on killing him.
- Marines radio in for help as these waves approach the choke points.
- As the player is dealing with these waves, the first UNSC Engineer group returns to the ship.
Snipers
After the last of the infantry waves, a squad of Covenant are dropped on the installations near the ship, from which they conduct quick guerilla raids on the ship. Their main purpose is to keep the player occupied while new waves are set up.
- A mixed group containing sniper Covenant.
- Dropped on a nearby ridge, difficult to root out.
- Provides time for the next waves to ready up.
Human Reinforcements
As the player is dealing with any remaining Covenant, human reinforcements arrive. One or two dropships drop off Marines and vehicles to replenish the player’s allies, if necessary. If possible, one of these dropships should drop off a crate of ammo for use against the Wraiths (rocket launchers, etc.).
- Can we attach items to mobile objects, like an ammo crate? We should be able to (then we can have vehicles with items in them).
- Can we drop a tank? That’d be fun…
- Radio chatter:
- Foxtrot 520: “Foxtrot 520 to Introvert. What is your status?”
- Ship Tech: “In one piece, Foxtrot.”
- Foxtrot 520: “We’re late for the party, but we bear gifts. I hear we missed the fireworks.”
- Ship Tech: “LZ may be hot, so I wouldn’t speak so soon.”
- As the reinforcements are lifting off, the second UNSC Engineer Warthog returns.
Heavy Waves
The Main Event. Waves of Covenant supported by heavy vehicles (or vice versa), with the goal of destroying the shield protecting the ship.
- Mixed groups supported by a heavy (Wraith, Shadow) vehicle.
- Dropped either at the muster points or at the chokepoints (if they have been cleared).
- Wraiths move to bombardment positions, while Shadows move in closer to harass defenders and fire upon the ship.
- As the player is dealing with these waves, the third UNSC Engineer group returns to the ship.
Retreat
Approximately 5 minutes. Events overlap.
Attack from Orbit
The shield ship is again fired upon from orbit, and it is decided that now is a good time to leave. Lots of radio chatter.
- Radio chatter:
- Shield Tech: “We’re pushing our luck here!”
- Shield Tech: “Less particle flux that time.”
Retreat Ordered
Outlying human units (snipers, engineers) are recalled to the ship, and they begin to head back. At this point, the ship stops being a primary target, and the Covenant focus turns to the humans and the player.
- Human vehicles upset along the way are left behind—the passengers return on foot, unless the vehicle is overturned before they get too far away.
- The Covenant ignore approaching vehicles as much as we can get away with. They may shoot at them a bit as they pass by, but they won’t try to upset or stop them.
Final Waves
Two waves of Covenant dropped close to the ship as the defenders retreat. Intended to keep the pressure on the player.
- Well-armed groups of Covenant landed very close to the ship.
- Covenant concentrates on static defenses over defenders.
- Fuel rod grunts may bombard the ship a little bit, providing a priority target.
Ramp Defense
The last offensive against the ship, this is a wave which is intended to force the player back into the ship. It should be vicious enough to give him pause—hopefully, the Hunters will be capable of forcing him back.
- One final effort is all that remains!
- Warthog crews retreat up and into the ship.
- A final wave touches down near the ship, spearheaded by Hunters who move inexorably towards the ship, flanked by Elite squads.
- Hunters knock out the static defenses quickly, then concentrate on the player.
- Elites and Grunts concentrate on the player if they’re engaging the Hunters.
- The last UNSC Engineer team emerges from the installation, bound for the ship.
- If the UNSC Engineers and their vehicle are overturned, a horrible explosion kills everyone (heh). The core component they have is unstable and dependent on external power.
Extraction
General101 put sweat and blood into getting the map running in MCC Halo 2! Alas, some of the mission effects, such as the ship shields are left to enterprising modders! Do what even Bungie could not!
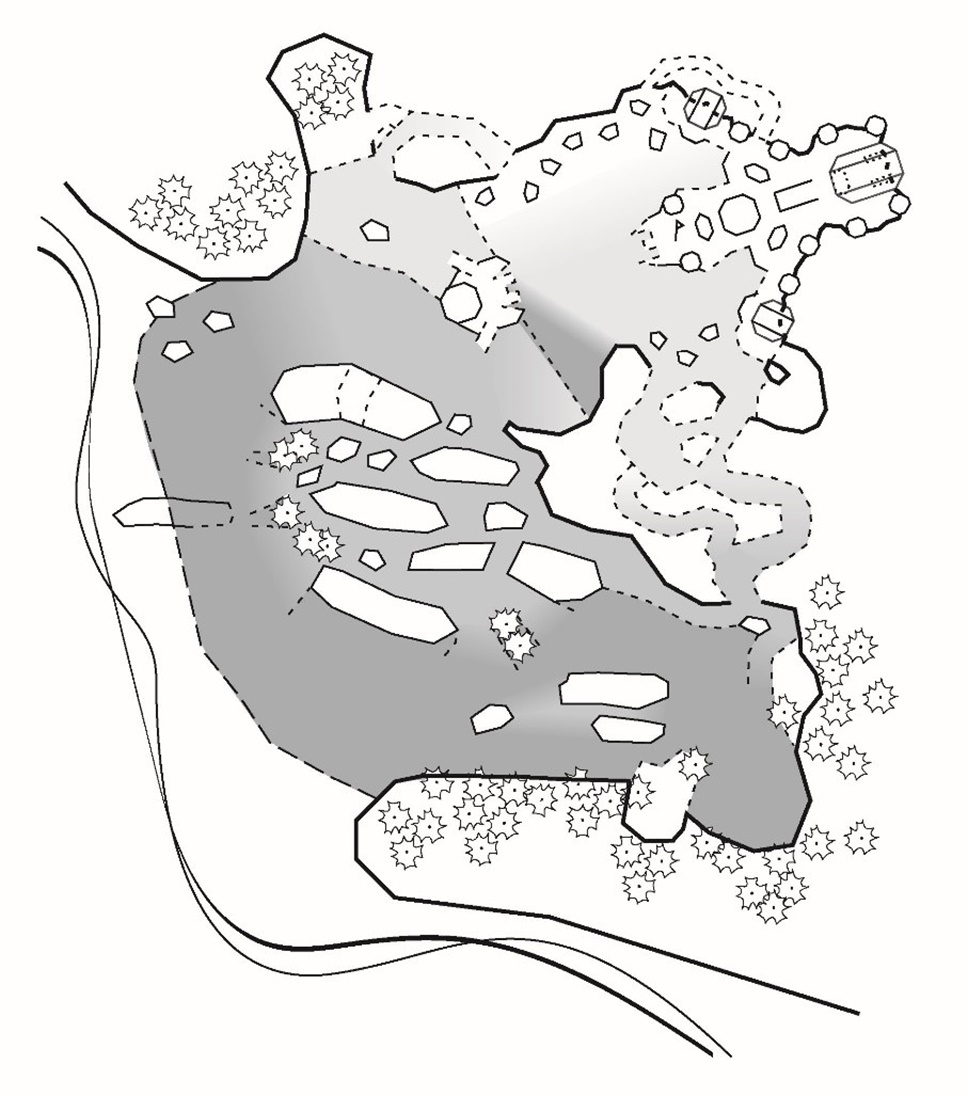
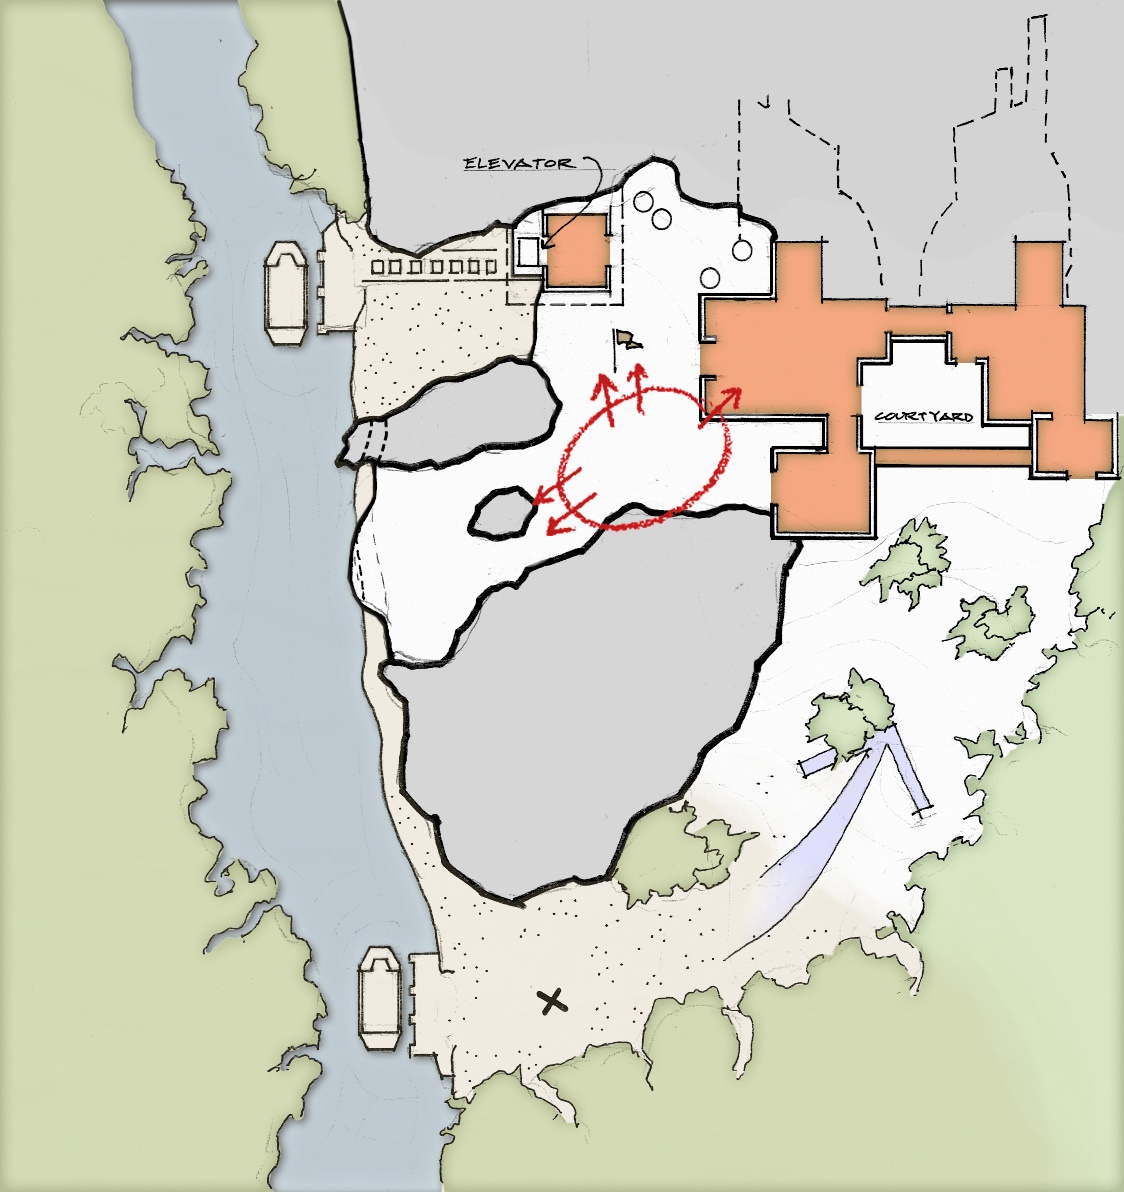
M1 – EXPLORATION
A barren moon conceals a Forerunner sensor array.
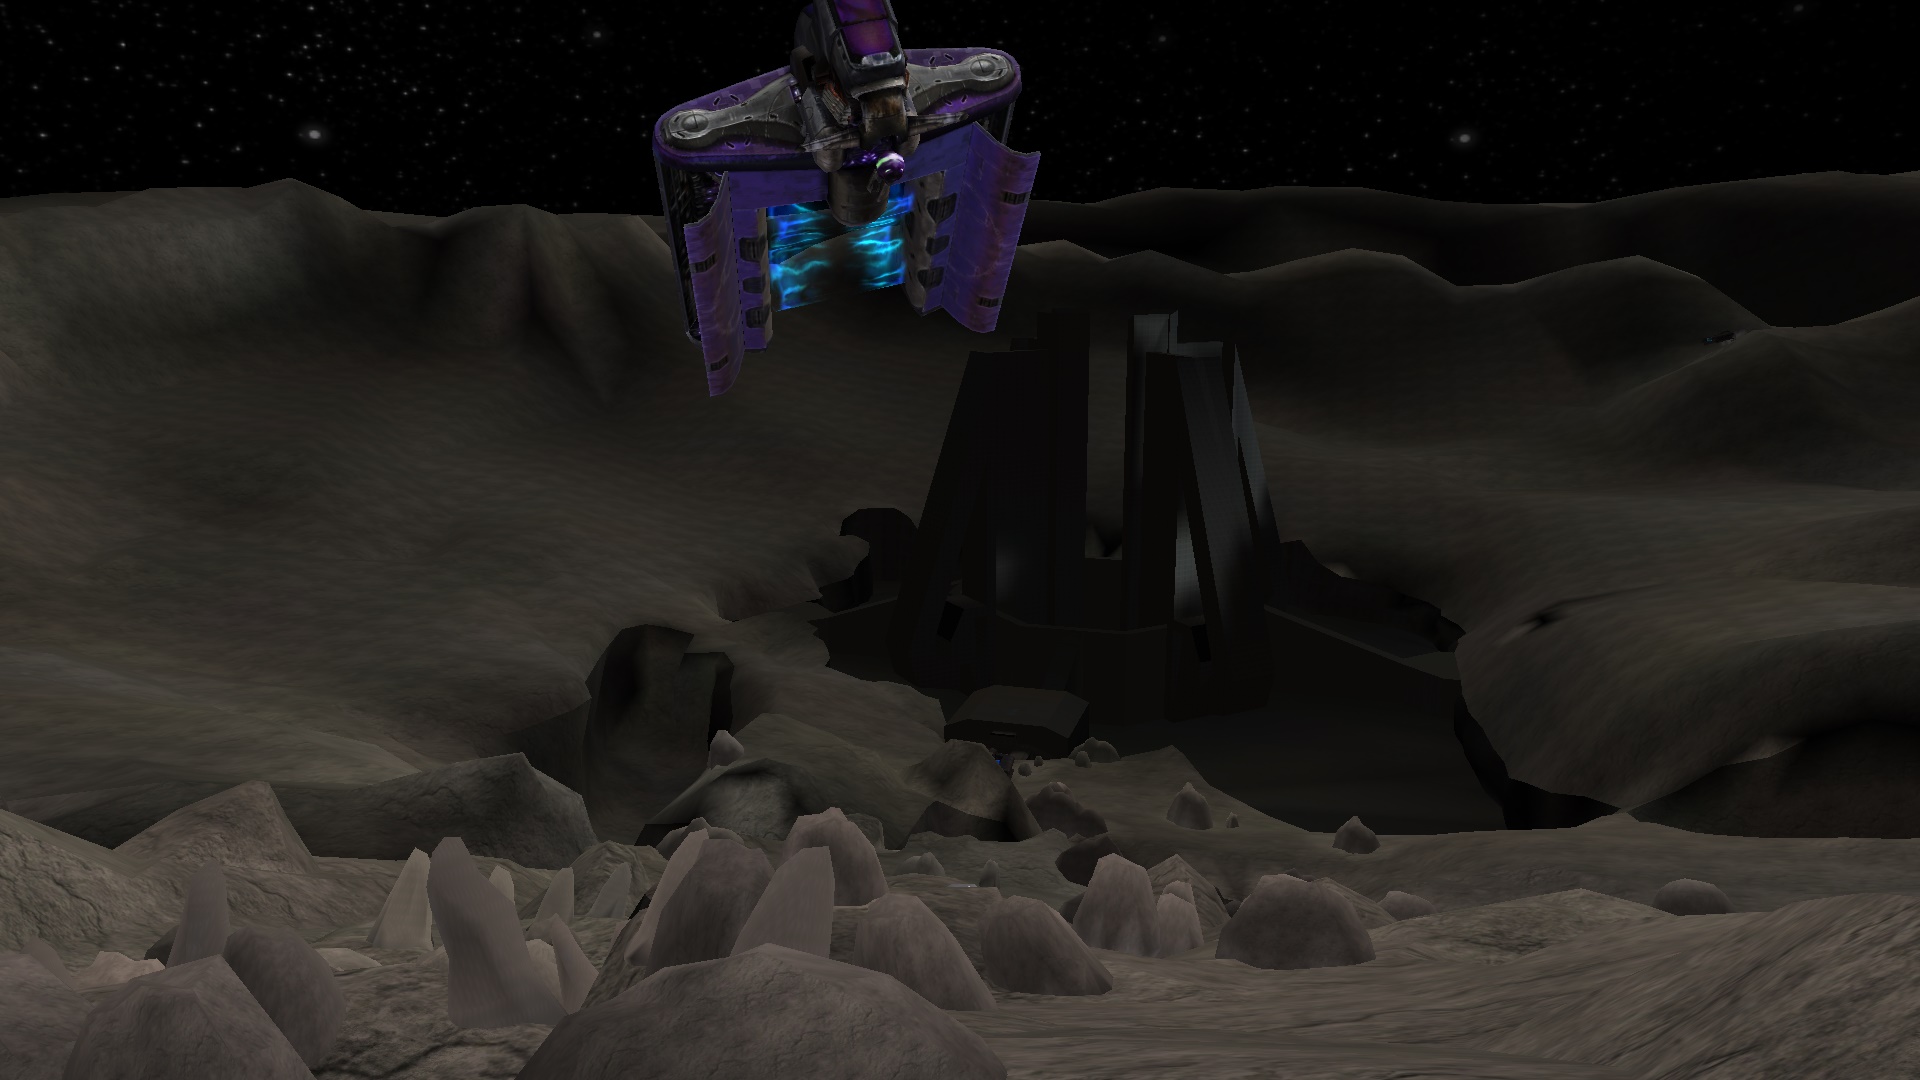
M1 – Exploration was a draft single-player level that served as a testbed for many of the gameplay features used in retail Cairo Station (such as low gravity, airlocks, and moving level geometry). The level would have also featured a rather intricate gameplay mechanic of restoring power to the Forerunner facility to progress in the mission. It had various names over its development, including “Moonbase”, “Fools Moon” and “The Full Moon.”
As with M1 – Defensive, the Digsite team has done a lot of the heavy lifting to get this level polished up to a state where further work can be done more easily in H2EK, with most of the major showstopper bugs (including those Bungie themselves had to deal with) fixed.
You’ll find the following design documentation useful for future mod efforts that want to restore M1 - Exploration to its “as-intended” state. Note that we don’t have any additional information on the “Proto Creature” enemies beyond what is mentioned in the brief, so feel free to let your imagination go wild (or replace with Flood). This mission also explores stealth mechanics that were concepted and worked on early in Halo 2, but that are not supported in the retail game.
General101 converted the map and scenario, as well as did tag surgery to get the map up-and-running in Halo 2. Zeddikins helped fix the dropships and ensure their paths and scripts work.
Original Design Document Notes for M1 - Exploration
<No mission overview or story synopsis provided.>
Play Themes
- Explore dark areas for power “switches” to activate.
- Use environment transformations from power “switch” activation to gain access to new areas.
- Use power veins to guide you throughout level.
- Use dark areas to advantage to outsmart Covenant.
- Using low-G to access areas inaccessible in high-G.
Visual Themes
- Dusty dark abandoned Forerunner Tech environment.
Defining Moments
- Standing at the edge of this giant moon crater looking down on the base after insertion.
- Activating power switch for the first time and seeing everything around slowly power up.
- Opening the outer door into the base and seeing 30 little proto creatures scurry away from the light.
- Ambushing Covenant patrols from the dark.
- Covenant patrols ambushing you from the dark.
Mission Objectives
- Enter base
- Reactivate Power supply
- Rejoin with Marines (?)
- Find secret doohickey
- Escape from base
- Use orbital construction equipment to help Human fleet in orbital battle (?)
WALKTHROUGH
Moon Exterior
- Player lands on moon crater edge.
- Orbital battle between humans and Covenant above moon.
- Giant moon base in center of crater.
- Surface of moon crater like giant lava rock with pits, caves, and extrusions closely packed together.
- While on the surface of the moon the player will be in low gravity.
- Dropships will be flying overhead and landing off in the distance.
- Giant pits and tall rocky protrusions will interfere with players progression towards the base.
- Player will be able to jump giant pit with Ghost.
- Player will reach relatively small structure protruding out of ground which will be an exterior airlock to the moon base.
Gameplay
- As the player progresses toward the moon base, they will engage scattered Covenant scouting parties not directly looking for the player (see encounters).
- The extremely rocky area should give the player and the Covenant significant cover.
- Giant pits and tall rocky protrusions will interfere with player’s progression towards the base. These obstacles will force the player to utilize the low gravity environment by allowing him to jump higher or fall from high places.
- The player will be able to commandeer a Ghost.
- Player will be able to jump giant pit with Ghost.
Moon Exterior Encounters
ENC01 - The first Covenant group will be engaged shortly after the player lands, maybe 40 feet downhill from them. This group will be made up of 2-3 Elites and 4-5 Grunts. They will appear to be surveying the area, not actively looking for the player.
ENC02 - The second encounter will be optional if avoided and will be a small group of Covenant investigating a cave. This survey group will be made up of 1-2 Elites, 2-3 Jackals, and 2-3 Grunts. It will only be seen if the player chooses to enter the cave. Covenant equipment will be littered outside of the cave, hopefully drawing the player in. This cave, if followed, will lead the player to the inside edge of a giant pit near ENC03. The player will have the option of jumping out of the pit or going back into the cave. Jumping out of the pit will lead the player to ENC03.
- Maybe the player will find a Ghost in the cave?
ENC03 - A dropship will deliver the third encounter, perhaps leaving a Ghost. (Later on, the dropship landing zone will be determined dynamically by the AI relative to where the player goes.) This will happen on the south side of a giant pit blocking the path to the Forerunner base. This group will be made up of 1-2 Elites, 3-4 Jackals, and 2-3 Grunts.
ENC04 - The fourth encounter will take place on the north side of the giant pit and will involve Ghosts. This encounter will be in front of the entrance to the moon base and will be unavoidable. This group will be made up of 2-3 Elites in Ghosts and 4 Grunts.
ENC05 - The fifth encounter will be optional and will be delivered by dropship on the south side of the pit. The player will be free to enter the base but if they choose, they can follow a dropship to its landing site where they will have the opportunity to engage a final Covenant search squad. This squad will be made up of 5 Jackals and 3 Grunts.
Base Interior
- Whole moon base is without power and will have low gravity.
- Moon base will be infested with proto creatures.
- Player progress through short industrial air lock section to moon base personnel area.
- Though out all these areas he will be encountering Covenant research teams.
- In moon base residential area player will notice overhangs and balconies.
- The personnel area will be made up of living areas, labs, expedition prep rooms, and personnel work areas.
Gameplay
- Player enters moon base airlock.
- Activating the power in this first interior section will be the player’s main objective.
- Doors will be without power so the player will be forced to manually open doors by repeatedly pressing the action button.
- The moon base air lock will be the first area the player needs to progress through.
- This area will be multileveled and appear to be used for vehicles and personnel.
- In the airlock section there will be a hidden proto creature nesting area in the ceiling of the control room for the airlock doors.
- A short elevator shaft jump at the exit of the airlock will lead the player to a mustering room. This room will have a giant shelving structure that the player will need to jump though.
- At the exit of the mustering room there will be three doors leading the player down separate short shafts to the first explore space.
- In this first explore area the player will have the option of going into three connected rooms that should appear to be computer labs. These rooms will overlook a large, well-lit room where the first encounter will be. From the three connected rooms, the player will not see any sign of the Covenant in the large room until they have entered it. One of these rooms will contain the controls to a massive door that is viewable from all three rooms. Once the power is on, the player will need to come back to this room to switch on the door.
- Out of the first exploring area the player will enter a large, well lit, multileveled room where they will encounter the Covenant for the first time since entering the moon base (see ENC01).
- This encounter will be made up of Covenant investigating and salvaging Forerunner artifacts.
- The player will be able to engage in the encounter stealthily.
- After this encounter the player will progress to another explore space where they will have a very minor encounter with the Covenant in the dark (see ENC02).
- This explore space will also contain the first cool view into the shaft hinting at the true purpose of the moon base.
- From the second explore space, the player will enter the second encounter space where they will fight a larger group of Covenant compared to the first encounter (see ENC03).
- This area will be surrounded by more dark space providing the player with better cover for launching little guerilla strikes against the Covenant from the darkness.
- In the end, the player will need to go through the Covenant force to leave the area.
- The exit of this area will lead the player to a giant shaft filled with dormant Sentinels.
- The player will progress down this shaft using their low gravity ability.
- Below the Sentinel shaft will be the first power “switch” room.
- The Covenant will be occupying the power switch room attempting to restore power (see ENC04).
- A non-interactive cutscene showing the Covenant activating one power switch will clue the player in on how to activate the power switches.
- Player will activate power switches.
- If the player activates the power “switches” before defeating the Covenant, some of the weakened structure could fall on remaining enemies.
-Once the power “switch” is activated:
lifts will activate
power veins will light up
gravity will be restored to first section of base
lights will come on
proto creatures will fall off walls and move slower in higher gravity
weakened structures will fall to the floor
dust will fall off walls
doors will unlock
- After power generator is activated, the player will use lifts in the power generation room to exit the room.
- Back in the dormant Sentinel shaft the player will notice that none of the lights have been activated and the lift that the player needs to use to get out of the shaft isn’t working. This will all be due to the power flow being obstructed by hidden proto creature nests on a power vein.
-The player will hopefully notice a lit power vein going into a recently opened door under the lift used to get out of the shaft.
- When the player enters the dark room, they should see a proto creature nest on the vein that he will destroy. Once destroyed the lift will function and the player will be able to leave the shaft.
- The powered lift in the Sentinel shaft will take the player up to a floor above the second encounter area.
- This alternate route is what the player will progress through until they make their way back to the first explore space which houses the controls to the giant door.
- The Covenant will be actively looking for the player once the power is on.
- From this alternate route the player will be able to rain fire down on Covenant that have come looking for the player in the previously traversed space (see ENC05).
- In the alternate route above the second exploration space, the player will encounter a second power vein puzzle involving the proto creatures. This puzzle will require the player to investigate the area more carefully to find the proto creature nest.
- After the puzzle, the player will go above the first encounter space where they will fight a mandatory battle with Covenant searching for them (see ENC06).
- The alternate route will end above the first explore space and should lead the player right to the controls for the giant door.
- The first explore space will be occupied by a small Covenant force the player will have to engage (see ENC07).
- Once the giant door has been opened, the player will be able to progress to the next section of the base in the center of the moon base.
Encounters
ENC01 - This encounter will be a small Covenant research team in vacuum suits. They will not be searching for the player directly and will be busy studying the Forerunner environment. Because they are preoccupied with their work the player will stealthily move around and choose how they engage the group. This group will probably be made up of 2-3 Elites, 3-4 Grunts, and 2 Engineers.
ENC02 - Only a few of vacuum-suited Covenant will be in this encounter. Again, they will not be actively looking for the player, being busy investigating the environment. The environment will be very dark and these troops will be easily stealth killed.
ENC03 - A large Covenant research team will be in this encounter. They will be in a state similar to the other encounters, busy investigating the Forerunner moon base. The player will be able to engage this encounter in a stealthy manor launching guerilla attacks from the darkness. And there should be plenty of darkness to attack from. The whole outer area around this encounter will be dark. 4-5 Elites, 3-4 Jackals, 4-5 Grunts, and 3 Engineers will make up this encounter.
ENC04 - More Covenant will occupy the first power generator room. These guys will be activating a power switch when the player arrives. This group will be made up of 3 Elites, 3-4 Grunts, and 2 Engineers.
ENC05 - This encounter is basically going be all the Covenant below the player when they’re making their way back up to the big door control room up to the explore space. These Covenant forces will not really have a chance of effectively fighting back against the player due to the player being in this elevated raised and enclosed space. The guys will mainly just be some dudes to torment from above. There will probably be around 6 Elites, 6 Jackals, 8 Grunts, and 4 Engineers spread throughout space between the second encounter to the second explore.
ENC06 - Encounter 6 will take place in the alternate route above the first encounter space. The Covenant will be looking for the player so it will be difficult if not impossible for the player to stealthily engage this group. This group will be made up of 2 Elites, 3-4 Jackals, and 2 Grunts.
ENC07 - The control room to the big door will contain this encounter. These Covenant will be waiting for the player and will be in a defensive posture when the player comes out of the alternate route. The player will need to defeat this group so they can safely open the big door. This group will be made up of 3 Elites, 4-5 Jackals, and 4 Grunts.
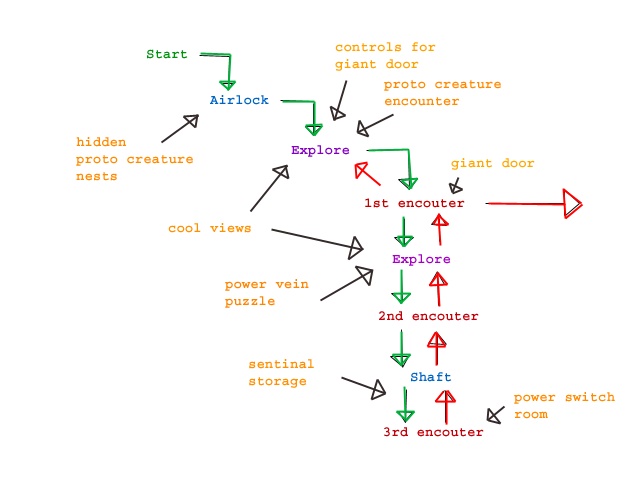
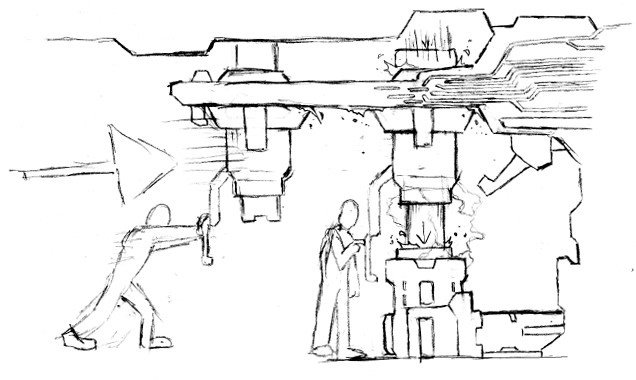
Moon base interior encounter connectivity diagram. (Bungie design sketch)
Center of Moon Base
<Digsite Note: The design documentation trails off at this point and there are no detailed encounter guides or mission objectives for the rest of the mission.>
- This central shaft will be basically a construction area filled with giant machines and raw materials. It should not have a “people friendly” feel, instead it should have a very industrial feel.
- In the center of the moon base, the player will notice that a part of the shaft has been lit up and that machinery is now active. This should hopefully clue the player in that they have just completed a section of the level.
- This central area will serve as a measuring device to let the player know how much they have done and how much they have left.
- Off of this central shaft will be a construction area that the player will have to play through to activate the second power supply.
- While trying to activate the power switch the player will have to clear out proto creature nests clogging up the circuit breakers in the power switch room.
- Activating this power supply will not only allow the player access to the next part of the level but will activate all the Sentinels in the moon base.
- These Sentinels will go into a cleanse mode, basically trying to dispose of all foreign matter contaminating the base. Foreign matter includes the proto creatures, Covenant, and the player.
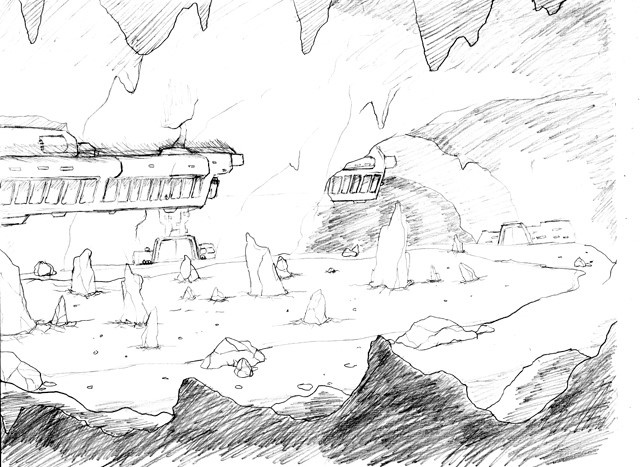
Frozen lake and Forerunner structures beneath the moon surface. Giant shards of rock and ice litter the surface. (Bungie concept sketch).
Moon base power switch/circuit breaker activation. Player pushes circuit breaker rod over giant cable lock. Player then lowers rod down, completing circuit. Power “veins” light up showing player where power is flowing around structure. (Bungie concept sketch).
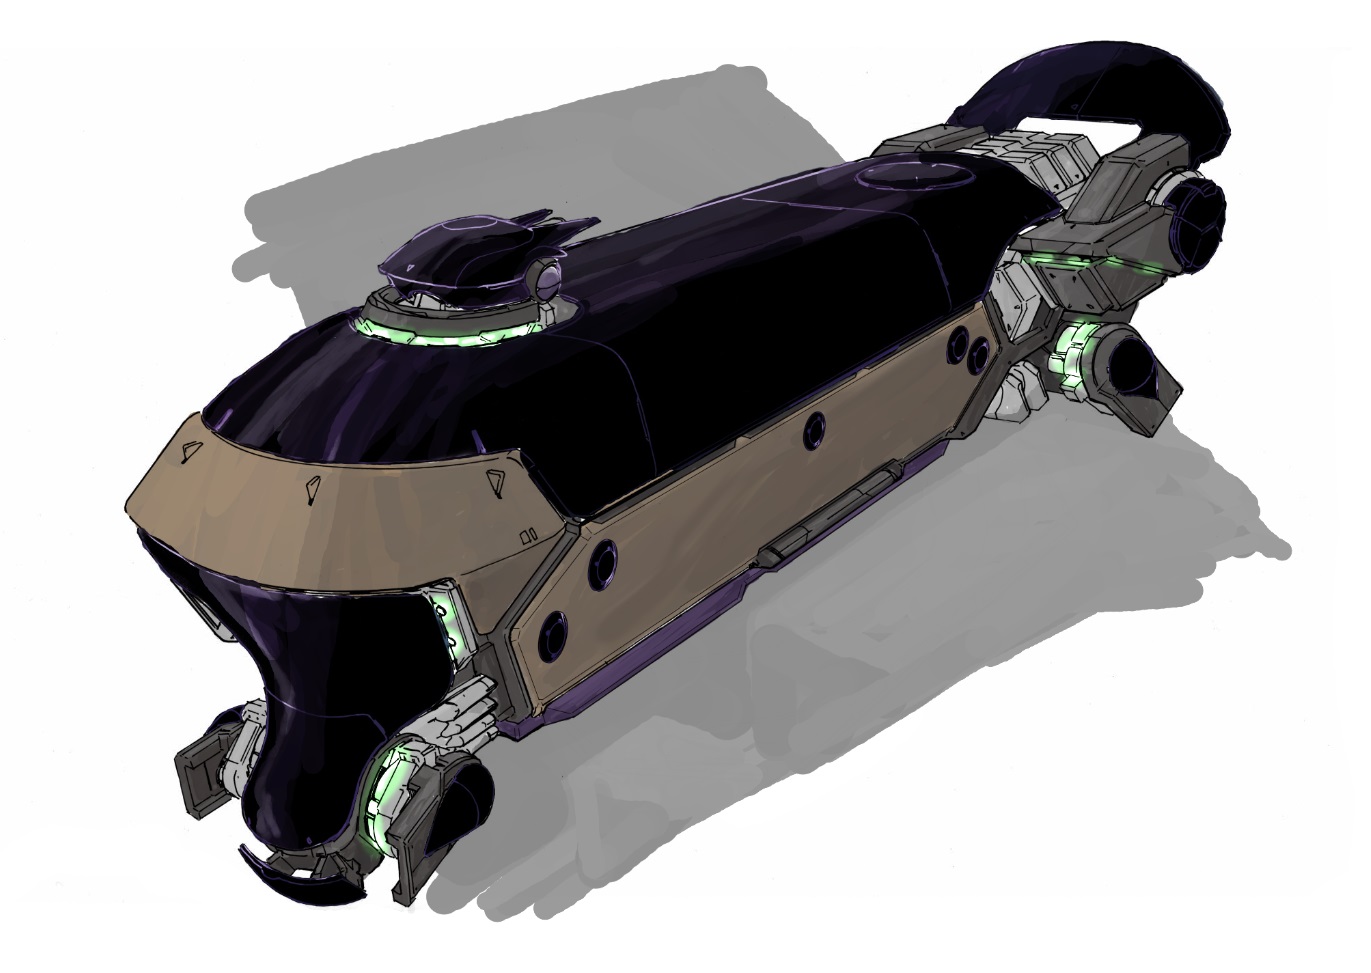
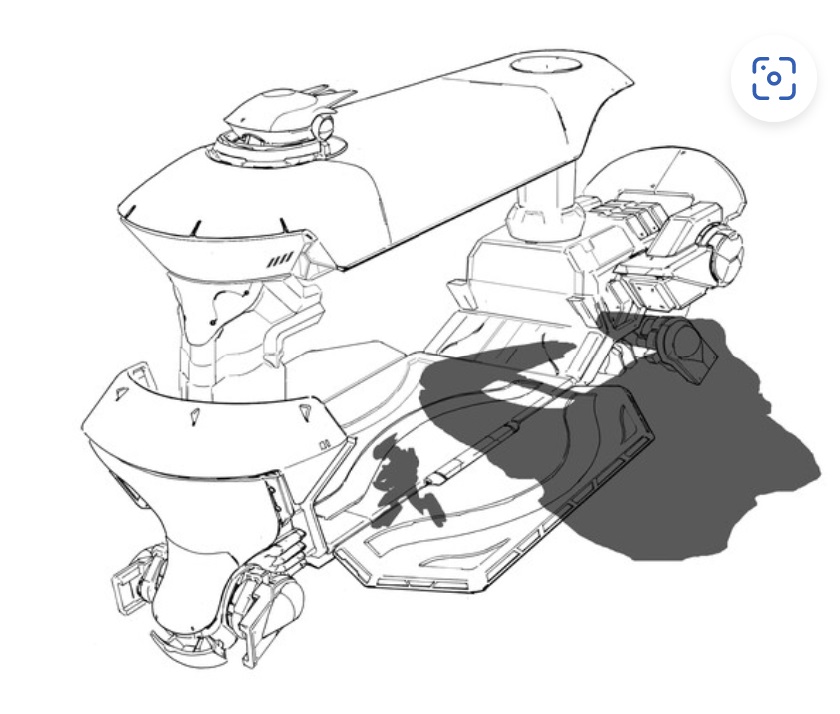
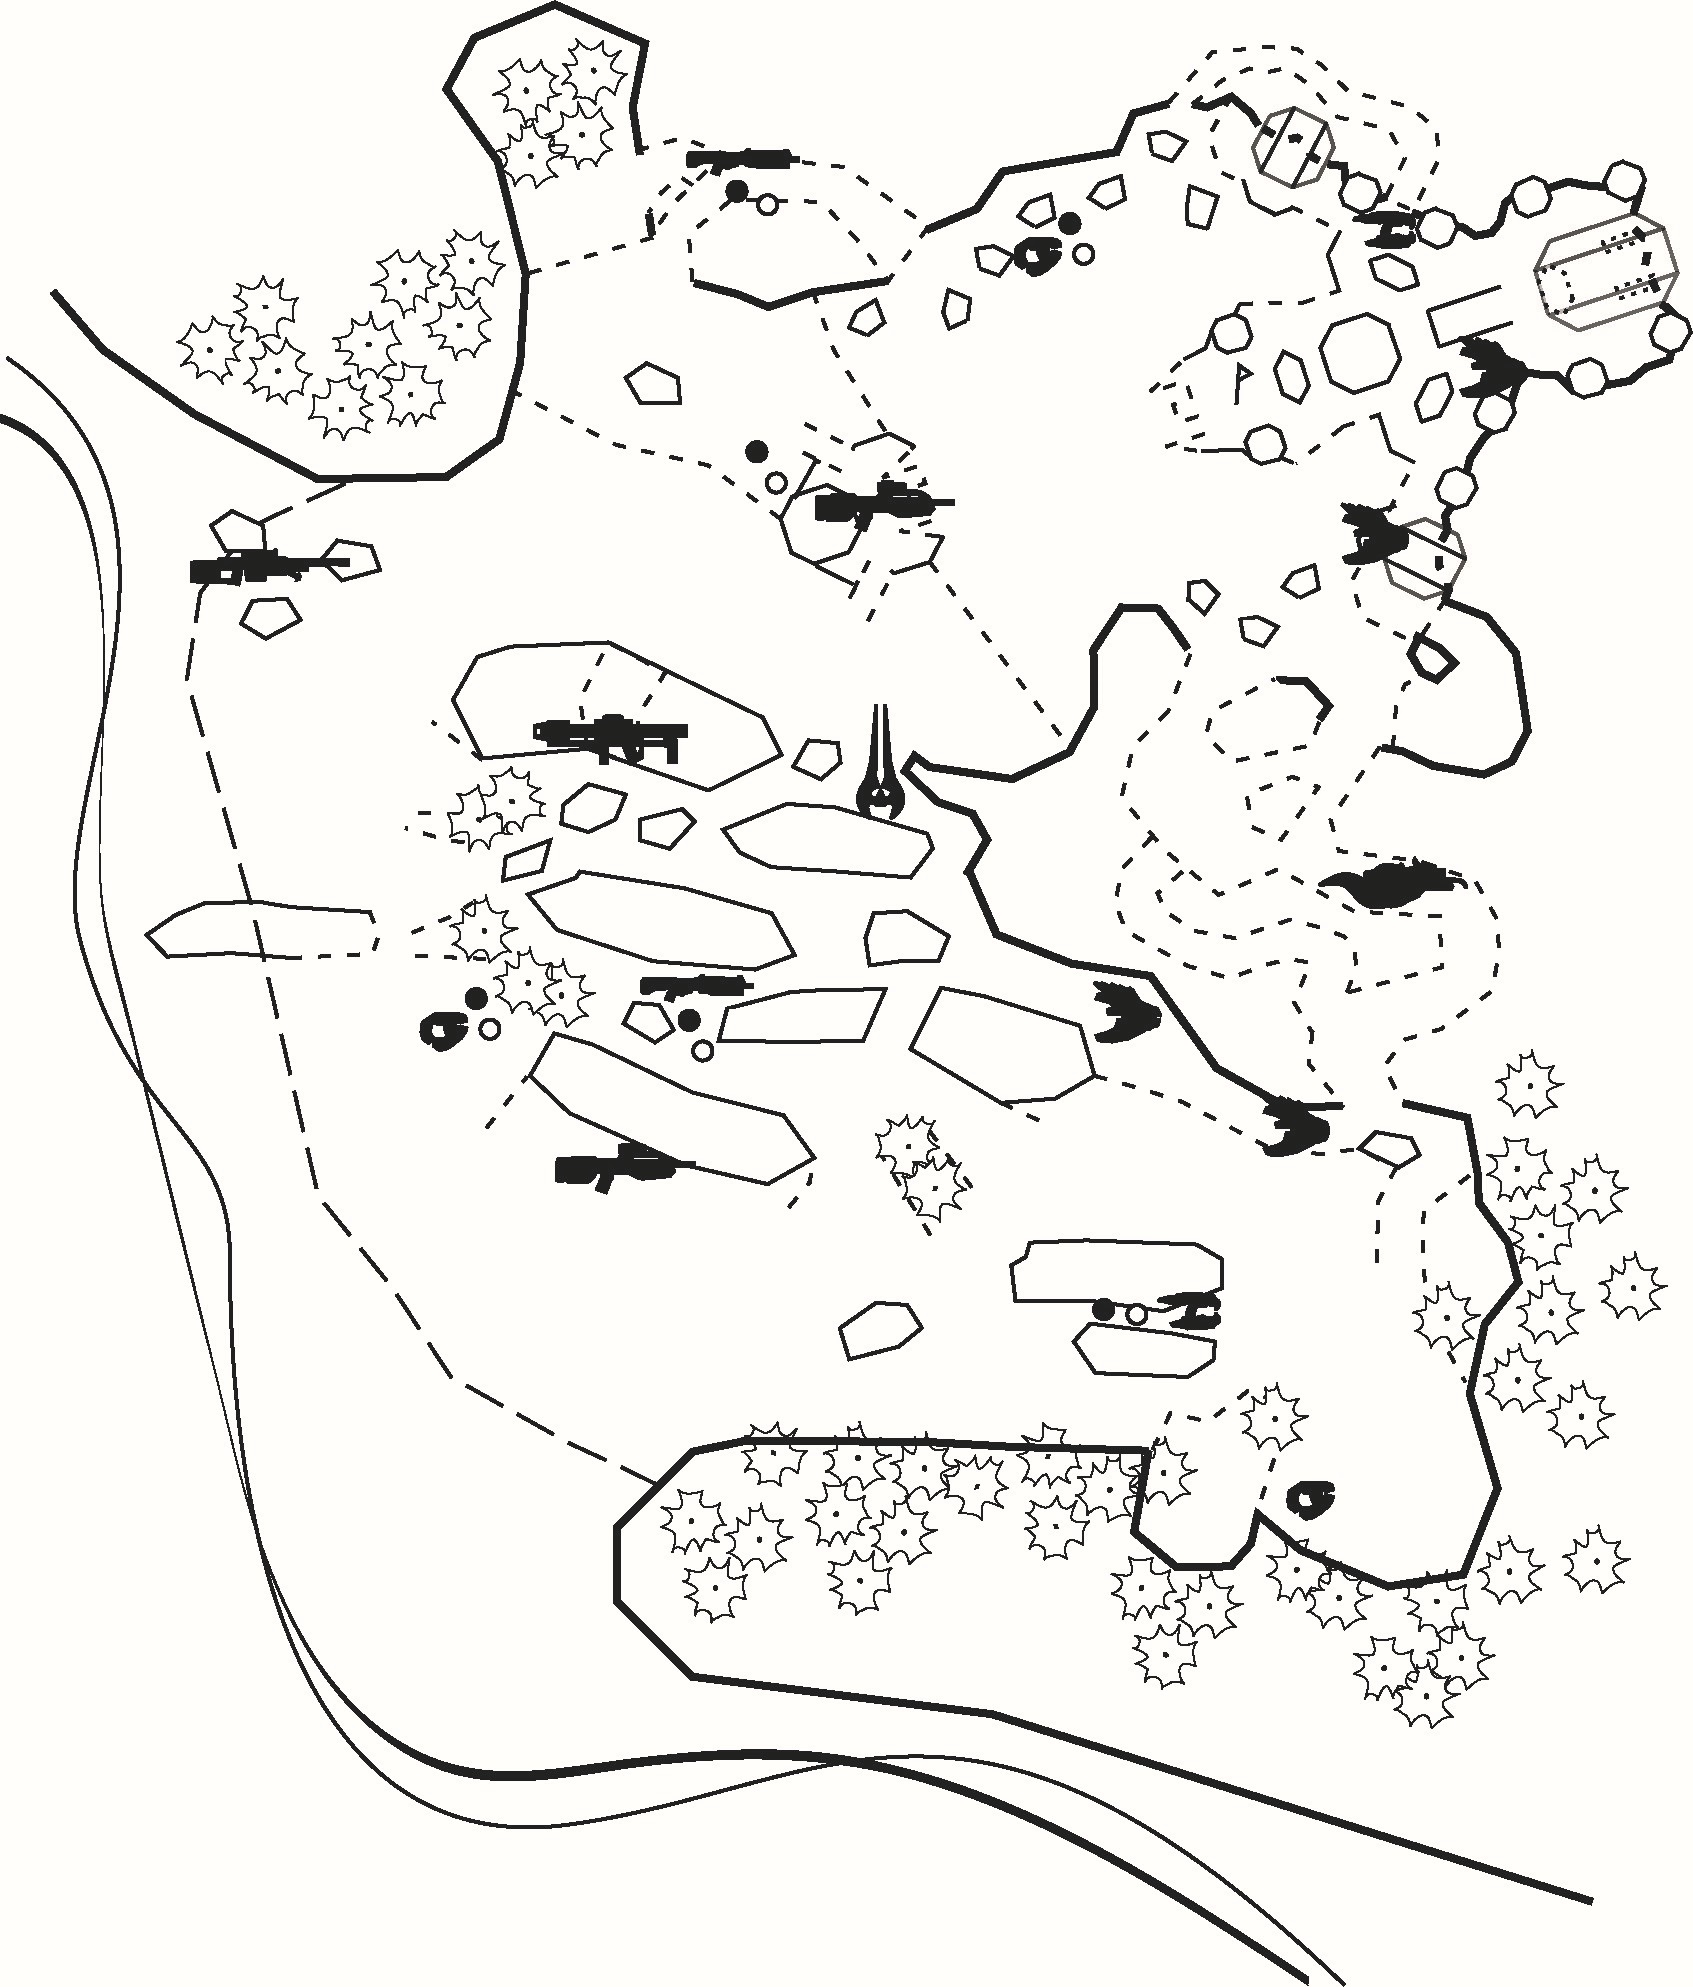
M1 – ASSAULT
Take out the Covenant command shuttle and find out what they were after.
M1 – Assault is a rather straightforward single-player level draft created in the early days of Halo 2’s development. It also explored the use of stealth mechanics and alert levels which ended up not being implemented. However, as with the other two M1 missions, we are providing most of the Bungie design docs for this map.
Original Design Document Notes for M1 - Assault
The Player is dropped behind enemy lines to prepare the way for a human assault. They must wipe out the perimeter defenses, capture the main entrance to the installation, and then secure it by wiping out all resistance.
Play Themes
- Gradually overcoming layer after layer of defense.
- The Player’s early tactics determine the flow of the battle and the Covenant’s tactics.
- Interacting with the Covenant base as a reactive toy “Sim-Covenant.”
Visual Themes
- Tiered Visibility Scheme.
- Steep mountain ranges.
Defining Moments
- Covert insertion behind enemy lines.
- The patrol Banshees joining the battle for the first time.
- Assaulting the Command Shuttle over open ground with a troop of Marines.
- Blowing up the guard tower and opening the doors to the main structure.
- The final holdout of resistance inside the structure where the Covenant have set a trap for the Player involving an ambush and explosives.
Mission Objectives
- Destroy the Covenant Command Shuttle.
- Locate the Command Shuttle under the Forerunner Structure at the Peak.
- Secure the Installation.
Alert Levels
White
- The Player has not been seen.
Blue
- The Player has been seen and recognized.
- The Player has destroyed a Watch Tower.
Green
- The Player is attacking the Bridge.
- The Player is seen on the near side of the Trench.
Yellow:
- The Bridge Guards have been destroyed.
- The Player is attacking an Anti-Aircraft Site.
- The Player is attacking the Ammo Dump.
Orange
- The Player has destroyed both Anti-Aircraft Sites.
- The Player has destroyed the Ammo Dump.
Red:
- The Player has called in an Air Strike on the Command Shuttle.
- The Player is using a Mortar Tank on the Command Shuttle.
- 75% the Command Shuttle Guard are dead.
Broken
- The Command Shuttle has been destroyed.
WALKTHROUGH
M1 – Assault mission connectivity diagram. (Bungie design sketch.)
Covert Insertion
Insertion Cinema
The Player is covertly inserted behind a Covenant picket line by a Pelican.
Loadout
The Player starts with a Battle Rifle, a SMG, and a full complement of Frag Grenades. They also have the ability to call in Air Strikes after removing the two Anti-Aircraft Sites in the Area.
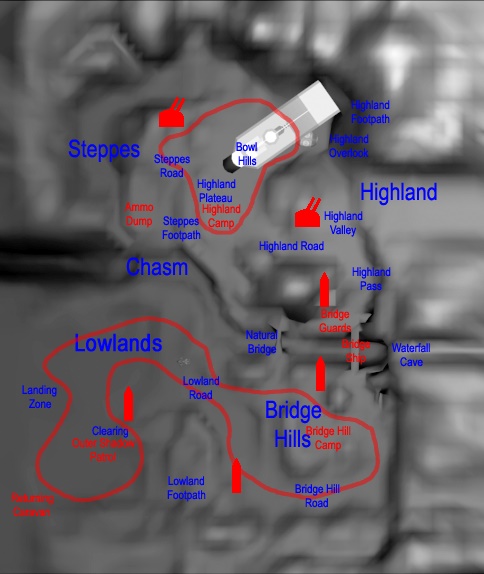
Lowlands
Location: Landing Zone - The Player is dropped off behind enemy lines.
Location: Lowland - The Lowlands are the entire area around the Player’s Landing Zone. It is bordered on the west by a line of Covenant Barbed Laser Wire. It contains the Lowland Clearing. You can leave the Lowland through the Lowland Footpath or the Lowland Road.
Location: Lowland Clearing - Just west of the Player’s Landing Zone is a clearing.
Installation: Lowland Clearing Watch Tower
- White: Visible beyond the hills east of the Player’s landing zone is the first Watch Tower. It is manned by a couple Jackal snipers that are not paying very close attention. They will likely see the Player if they come at them across the Lowland Clearing, but if they are more careful they won’t. If they do see the Player, they will attempt to raise the Covenant to Blue Alert.
- Blue: The Jackal Snipers are actively watching for the Players and will fire on them if they spot them.
Encounter: Outer Shadow Patrol
- White: A Shadow patrol is sitting in the clearing under the Lowland Clearing Watch Tower relatively unaware of their surroundings. As soon as the Player sees the patrol it starts making a circuit between the Lowland Clearing and the Bridge Ship. If the patrol finds a destroyed Watch Tower or sees the Player, it will investigate and then attempt to retreat to the Bridge Ship and raise the Covenant to Blue Alert.
- Blue: The Patrol will limit its patrol circuit to the Bridge Hills around the Bridge Ship, watching for the Player.
- Green: The Patrol will return to defend the Bridge Ship.
Location: Lowland Road - A road leads from the Lowland to the Bridge Hills. It goes through several narrow passes, making it dangerous to use if the Outer Shadow Patrol is still patrolling.
Location: Lowland Footpath - A steep, winding footpath leads from the Lowland to the Bridge Hills and offers much more cover than the Lowland Road.
Installation: Lowland Footpath Watch Tower
- White: Above the Lowland Footpath there is a Watch Tower. The Jackal snipers there are not paying close attention, but they will see the Player if they come up the Lowland Footpath without staying in cover. If they do see the Player, they will attempt to raise the Covenant to Blue Alert.
- Blue: The Jackal Snipers are actively watching for the Players and will fire on them if they spot them.
Encounter: Returning Caravan
- White: A half-full Covenant Troop Bus is returning from exploring the area. It starts out near the Covenant Laser Wire and slowly moves across the Bridge Ship and head toward the Ammo Dump. If they see the Player they will investigate and then attempt to make it to the Bridge Ship and raise the Covenant to Blue Alert.
- Blue: The caravan will continue to the Bridge Ship, watching for the Player.
- Green: The caravan will cross the Bridge Ship and reinforce it.
Bridge Hills
Location: Bridge Hills - The area near the Bridge Ship is covered with numerous, overlapping hills.
Encounter: Bridge Hill Camp
- White: A small group of Covenant with some Blind Wolves is camped in the middle of the Bridge Hills. They are not watching for trouble and the Player should have no trouble avoiding them. If they do see the Player, they will attempt to raise the Covenant to Blue Alert. The Covenant have set minefields to trap the Player, but are just as likely to accidentally blow up themselves.
- Blue: The camp is alerted and assumes a position overlooking the Bridge Hill Road.
- Green: The camp will retreat to the Bridge Ship and defend it.
Installation: Bridge Hill Watch Tower
- White: A watchtower with Jackal snipers in it overlooks the Bridge Hills. Although the snipers are initially lax and unobservant, it will be difficult to for the Player to reach the Natural Bridge without alerting them. If they do see the Player, they will attempt to raise the Covenant to Blue Alert.
- Blue: The Jackal Snipers watch for the Player much more carefully, making the Natural Bridge impassable.
- Green: The Jackal Snipers will help protect the Bridge Ship, but their watch tower makes an excellent place for the Player to attack from.
Location: Natural Bridge - A small natural bridge crossing the Chasm allowing the Player to try to sneak around the Bridge Ship.
Location: Waterfall Cave - This cave provides an alternative method of crossing the Chasm and allows the Player to cross without worrying too much about snipers.
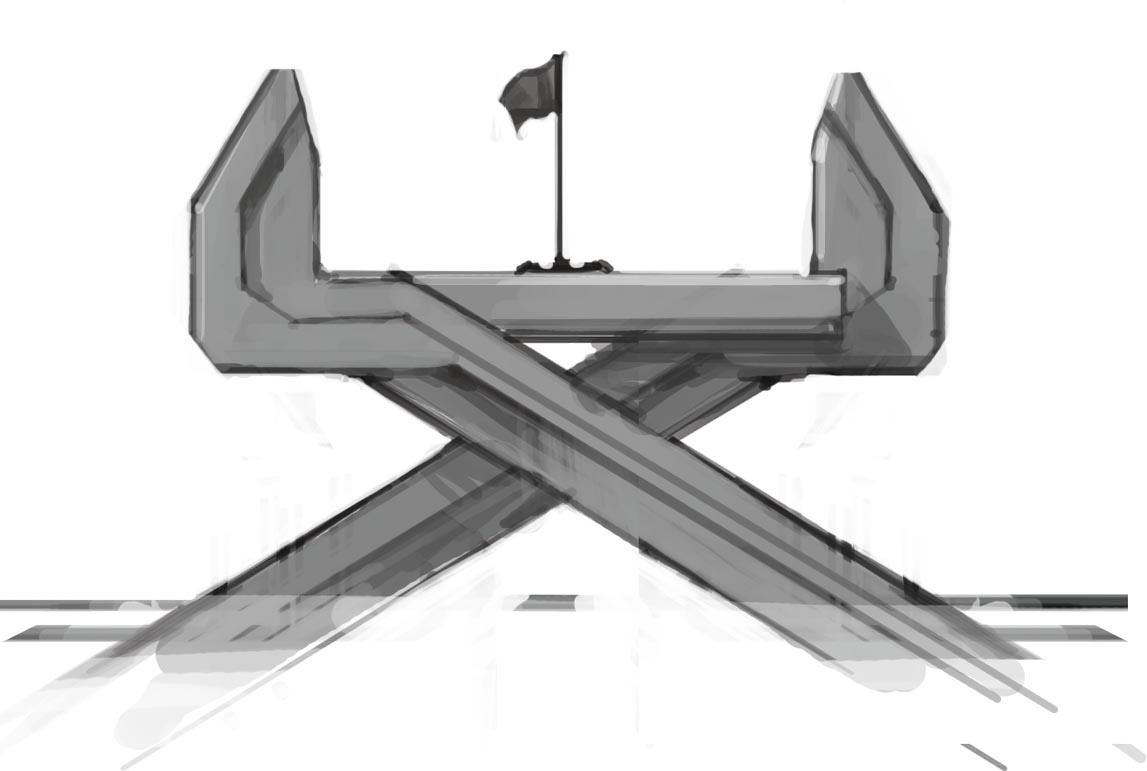
Installation: Bridge Ship
- White: The Bridge Ship is a small Covenant ship floating above the Chasm with two long energy bridges extending from each side, forming a bridge. This ship has minimal defenses, but is guarded by several Covenant troops. After the Player wipes out the Covenant forces they can either use the bridge, enter the ship and depower the light bridges, or blow the ship up, denying it to Covenant reinforcements. Initially the Covenant guards are not paying much attention, allowing the Player to sneak past on the Natural Bridge. If they do see the Player they will use the communication gear in the Bridge Ship to raise the Covenant to Green Alert.
- Blue: The Covenant guards are much more observant, making it difficult for the Player to approach undetected.
- Green: If the Bridge Ship is attacked it automatically raises the Covenant to Green Alert and calls for reinforcements.
Encounter: Bridge Guards
- White: The Bridge Guards are a group of Covenant stationed on the far side of the Chasm that help defend the Bridge Ship from attack. They have two Ghosts which occasionally make patrols across the bridge. Initially they are not too vigilant.
- Blue: The Covenant guards assume that they are under imminent attack and take up defensive positions along both sides of the Chasm.
Installation: Bridge Watch Tower
- White: This watch tower is on the opposite side of the Chasm and it possesses an excellent view of both the Bridge Ship and the Natural Bridge. The snipers in this tower are fairly observant and will raise the Covenant to Green Alert if they see the Player.
- Blue: The Jackal Snipers watch the Natural Bridge much more carefully.
- Green: The Jackal Snipers will help protect the Bridge Ship from the Player, as well as preventing him from using the Natural Bridge.
Highlands
Location: Highland Pass - A pass leads up from the Bridge Ship to the Highland Valley.
Location: Highland Valley - A high altitude valley that houses one of the two Anti-Aircraft Guns in the area.
Installation: Highland Anti-Aircraft Gun
- White: The Covenant have set up two anti-aircraft guns to prevent the Command Ship from being bombed. The crews of these guns are fairly alert, but are watching for aerial attacks, not the Player.
- Green: The ground crew takes up defensive positions and watches for the Player.
- Yellow: The ground crew calls for reinforcements and defends against the Player.
Location: Highland Overlook - Near the rear of the Highland Valley the mountain opens up so the Player can look down on the Forerunner Installation Bowl.
Location: Highland Footpath - A footpath leads down from the Highland Overlook to the Forerunner Installation Bowl.
Location: Highland Road - A vehicle road descends from the Highland Valley to the Highland Plain.
Location: Highland Plain - A large open area which serves as a crossroads for most of the Covenant forces in the area.
Encounter: Highland Camp
- White: The Covenant have established a camp on the Highland Plateau because it serves as a checkpoint for anyone traveling between the Anti-Aircraft Guns, the Bridge Ship and the Command Shuttle. It is a fortified camp, but it has a minimal compliment of guards. Initially they are alert and watching for the Player.
- Yellow: The defenders man their defensive positions and send out scouts to find the Player’s location.
- Orange: The camp defenders abandon the camp and retreat to the Bowl Hills to defend the Command Shuttle.
Installation: Steppes Anti-Aircraft Gun
- White: The second of the two anti-aircraft guns preventing the Command Ship from being bombed is in the Steppes. Again, the gun crew is fairly alert to aerial attack but is not concerned about the Player.
- Green: The ground crew takes up defensive positions and watches for the Player.
- Yellow: The ground crew calls for reinforcements and defends against the Player.
Steppes Road - A road leads down from the Highland Plateau to the Ammo Dump.
Steppes Footpath - A footpath also leads from the Highland Plateau to the Ammo Dump.
Installation: Ammo Dump
- White: The Covenant have created a supply and vehicle storage facility overlooking the Chasm. It contains lots of weapons and vehicles, but relatively few troops, allowing the Player to hijack some heavy artillery to attack the Command Shuttle.
- Green: The guards start to watch carefully for the Player.
- Yellow: The guards are reinforced via dropship to protect the weapons and vehicles stored there.
- Orange: Any remaining guards board vehicles and go to defend the Command Shuttle.
Location: Bowl Hills - The Bowl Hills are a range of small hills that border the Bowl.
Location: Bowl - The Bowl is the area under the Forerunner Mast where the Covenant Command Ship is located. It can be accessed through the Bowl Hills or from the Highland Footpath.
Installation: Command Shuttle
- White: The Command Shuttle serves as the Covenant base of operations in the area. It is heavily fortified and well-guarded.
- Green: The guards send out scouting parties to watch for the Player.
- Yellow: The guards retreat to the Command Shuttle and defend it.
- Red: Any remaining guards retreat inside the Forerunner Mast.
Encounter: Banshee Patrol
- White: Two Banshees sit near the Command Ship while the Pilots wait inside.
- Green: The Banshee pilots scramble the Banshee Patrol and begin to search for the Player.
- Red: The Banshee Patrol flies off into the sunset.
Installation: Forerunner Mast
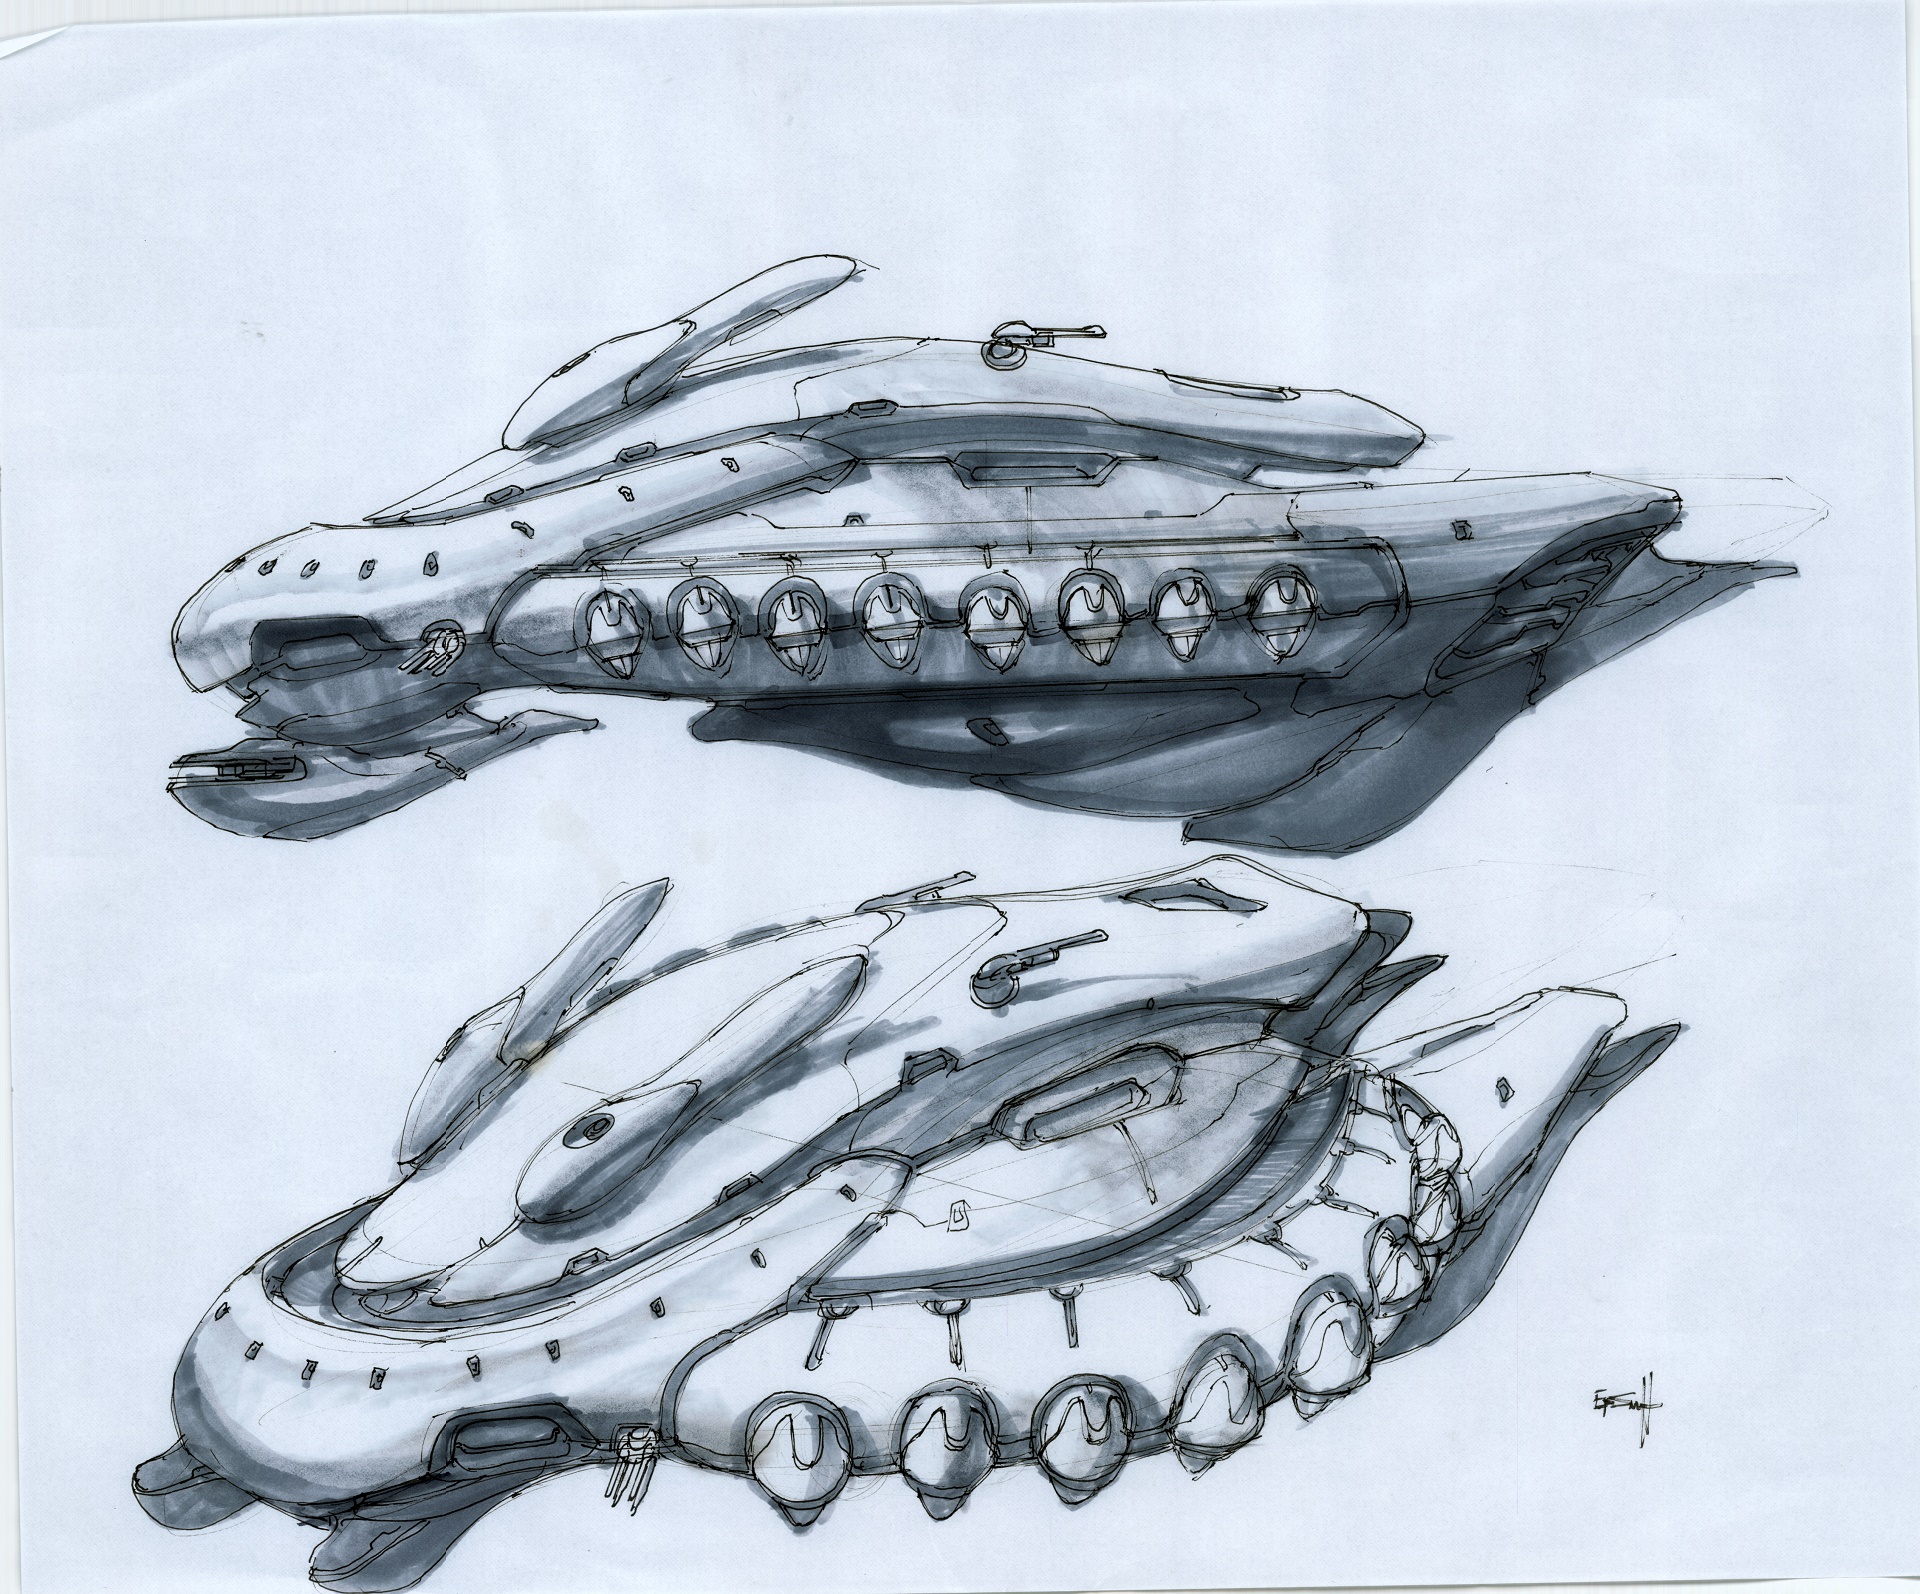
Covenant Command Shuttle with drop pod “cannons” ready to deploy troops. (Bungie concept art by Eddie Smith.)
Lightbridge ship (also known as the “Airbus”) in transit state. (Bungie concept art by Shi Kai Wang.)
Lightbridge ship in deployed state. (Bungie concept art by Shi Kai Wang.)
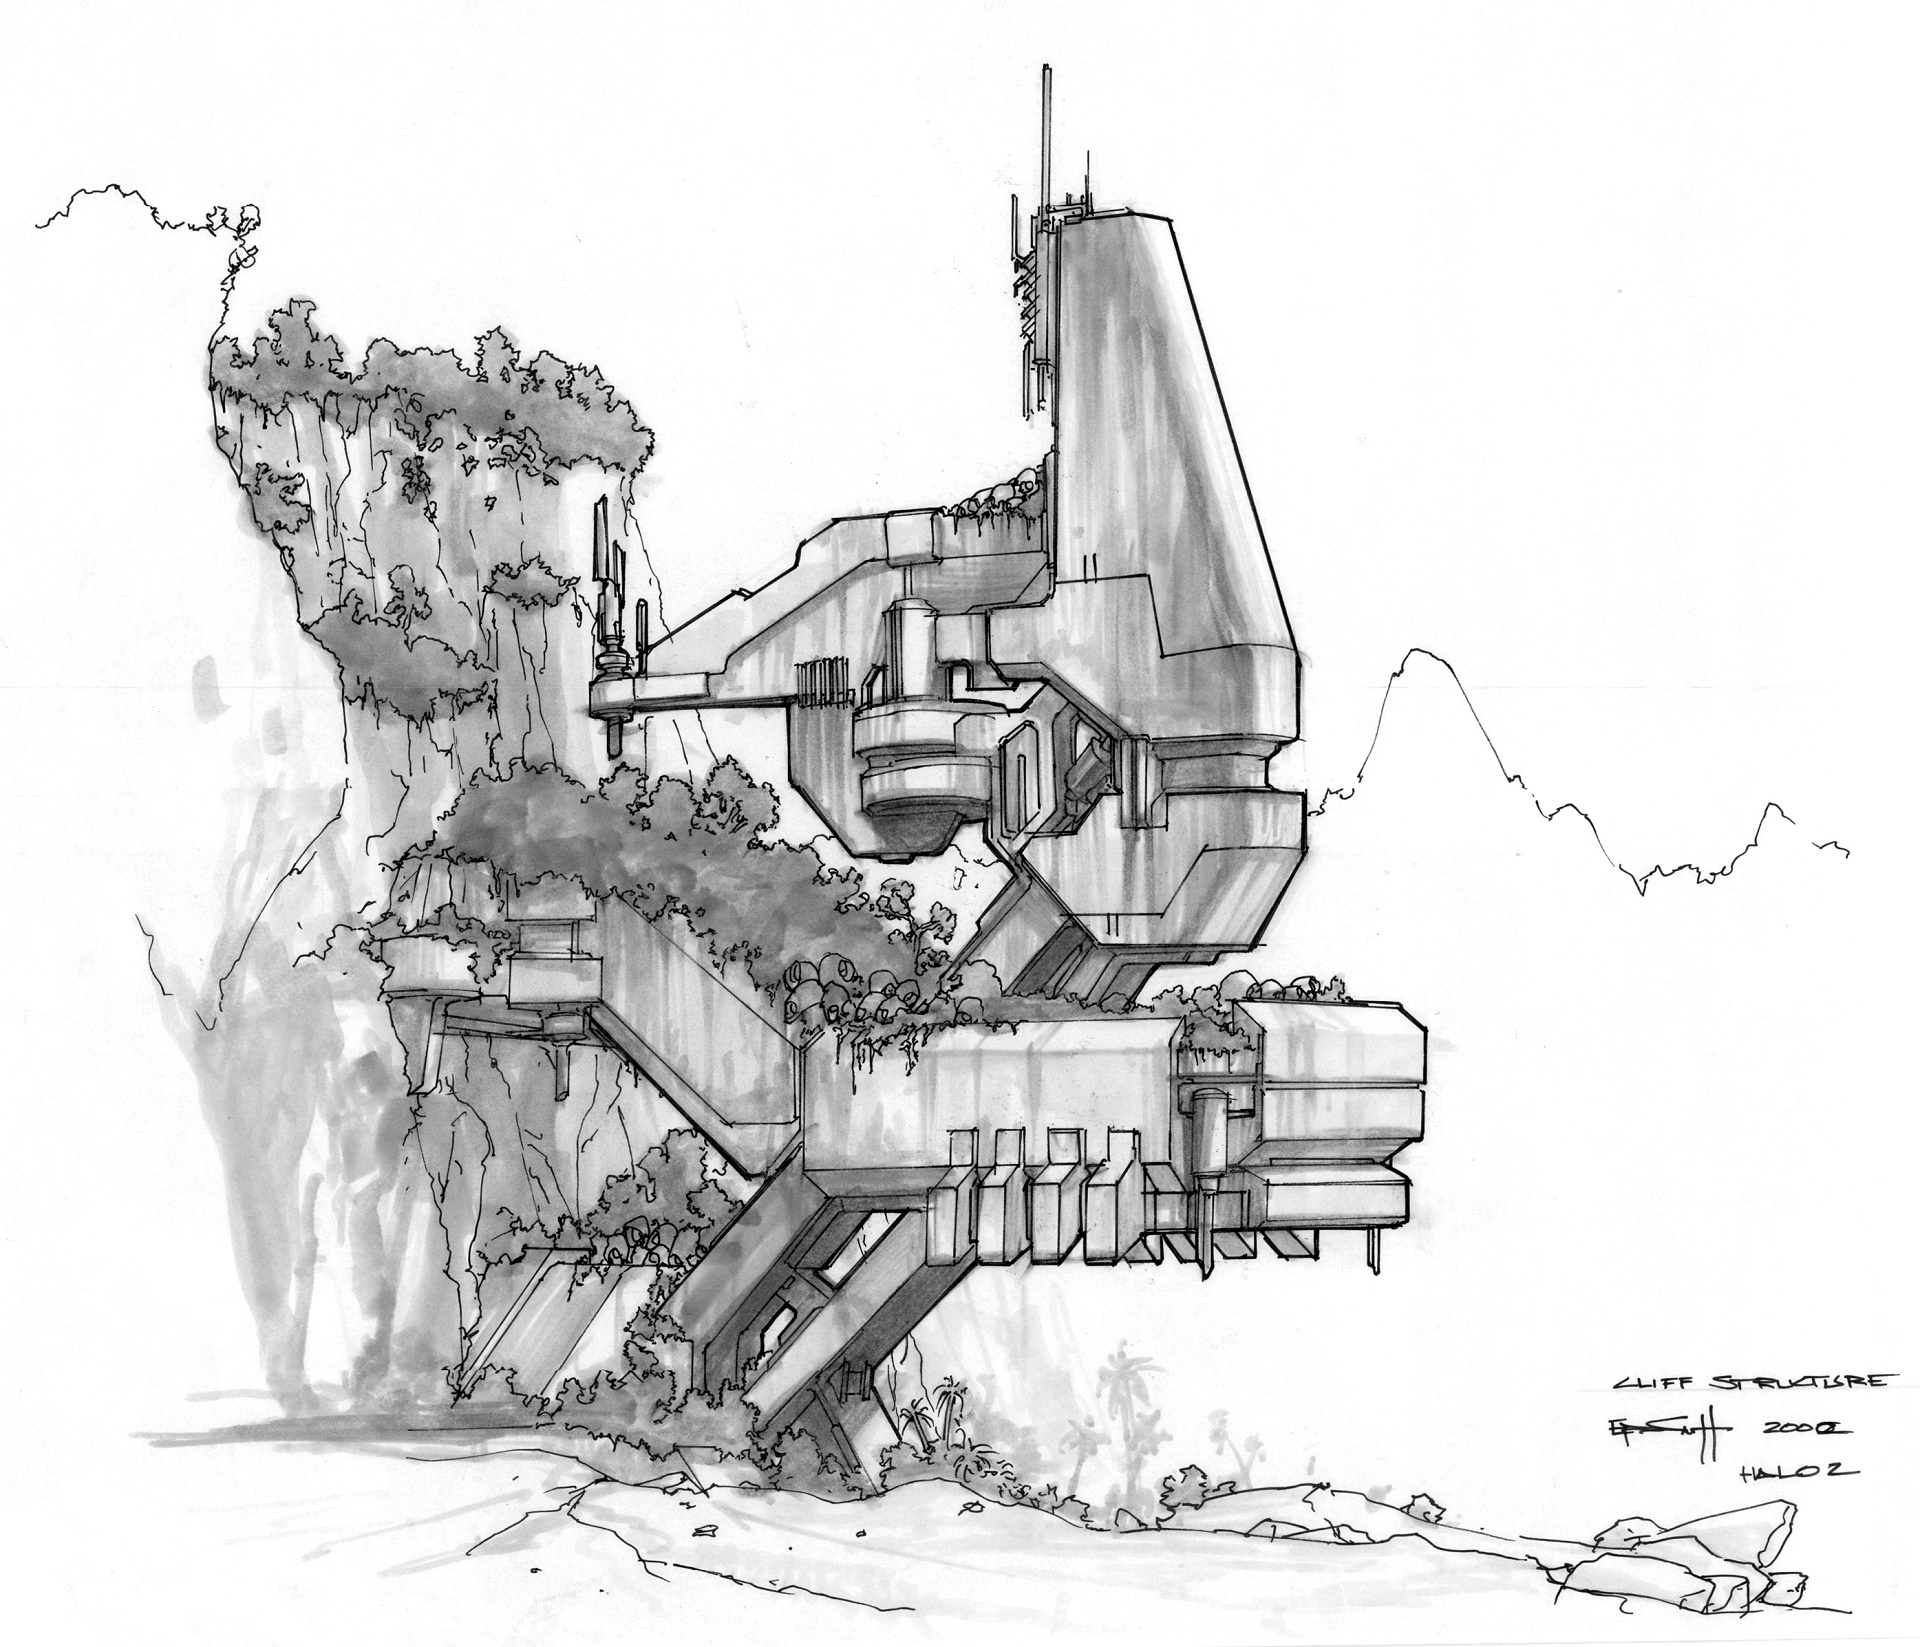
Forerunner tower. (Bungie concept art by Eddie Smith.)
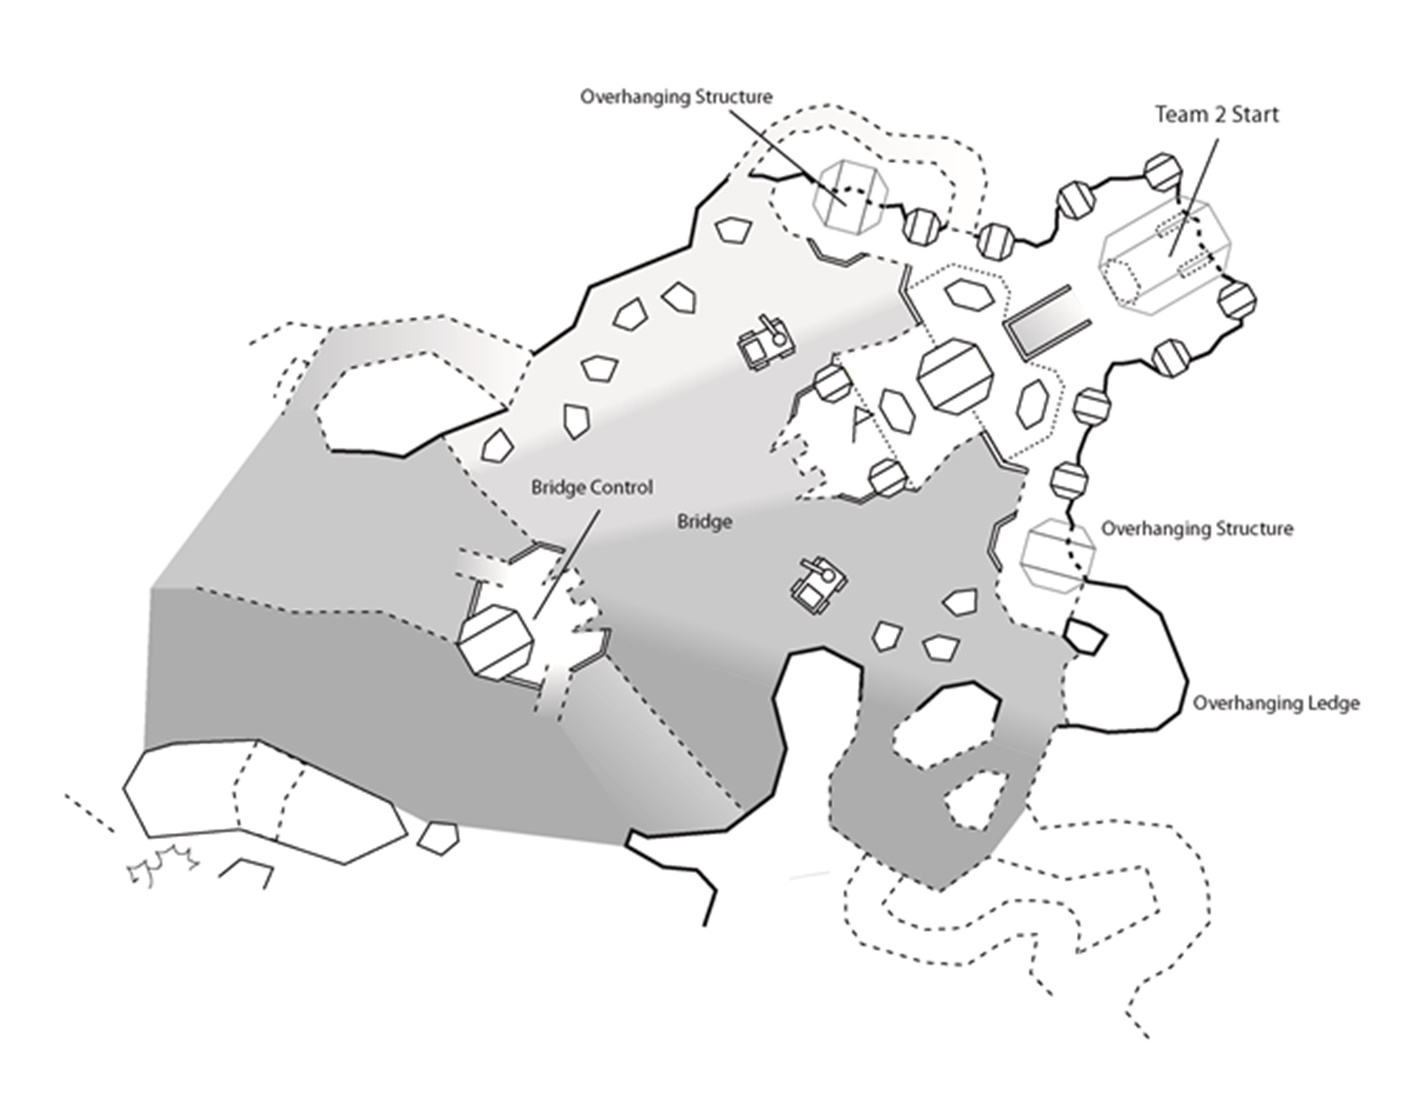
PERMAFROST, UNTHAWED
Permafrost is one of the most notable “Lost Maps” that was being worked on by Certain Affinity in the latter part of the Halo 2 support cycle. Called “Map 3” in many of the original documents and files, the Digsite team took a liking to this map and have poured a lot of work and playtesting to further refine what Mike Clopper, Max Hoberman, and the CA team had started on.
As it had multiple revisions and a good amount of design documentation created, the Digsite team thought it would be a good idea to present some of that work to the community to help with their own efforts and potential ports of the map to later Halo titles by modders.
ORIGINAL CERTAIN AFFINITY DESIGN DOC FOR PERMAFROST 2.0
Author: Mike Clopper
Map Specifications
Map Type: Outdoor, Asymmetric
Default Vehicles: Offense: (1) Ghost, (2) Chain Hogs
Defense: (1) Chain Hog, (1) Ghost
Default Weapons: Brute Shot, SMG, Battle Rifle, Carbine, Plasma Rifle, Sniper Rifle, Beam Rifle, Shotgun, and Rocket Launcher
Preferred Number of Players: 8-12
Preferred Game Types: Single Flag CTF, Team Slayer, Assault
Turrets: Yes (1 for base defense)
Devices: Light Bridge or Mechanical Bridge
Powerups: Active Camo, Overshield, Sniper Ammo
Description
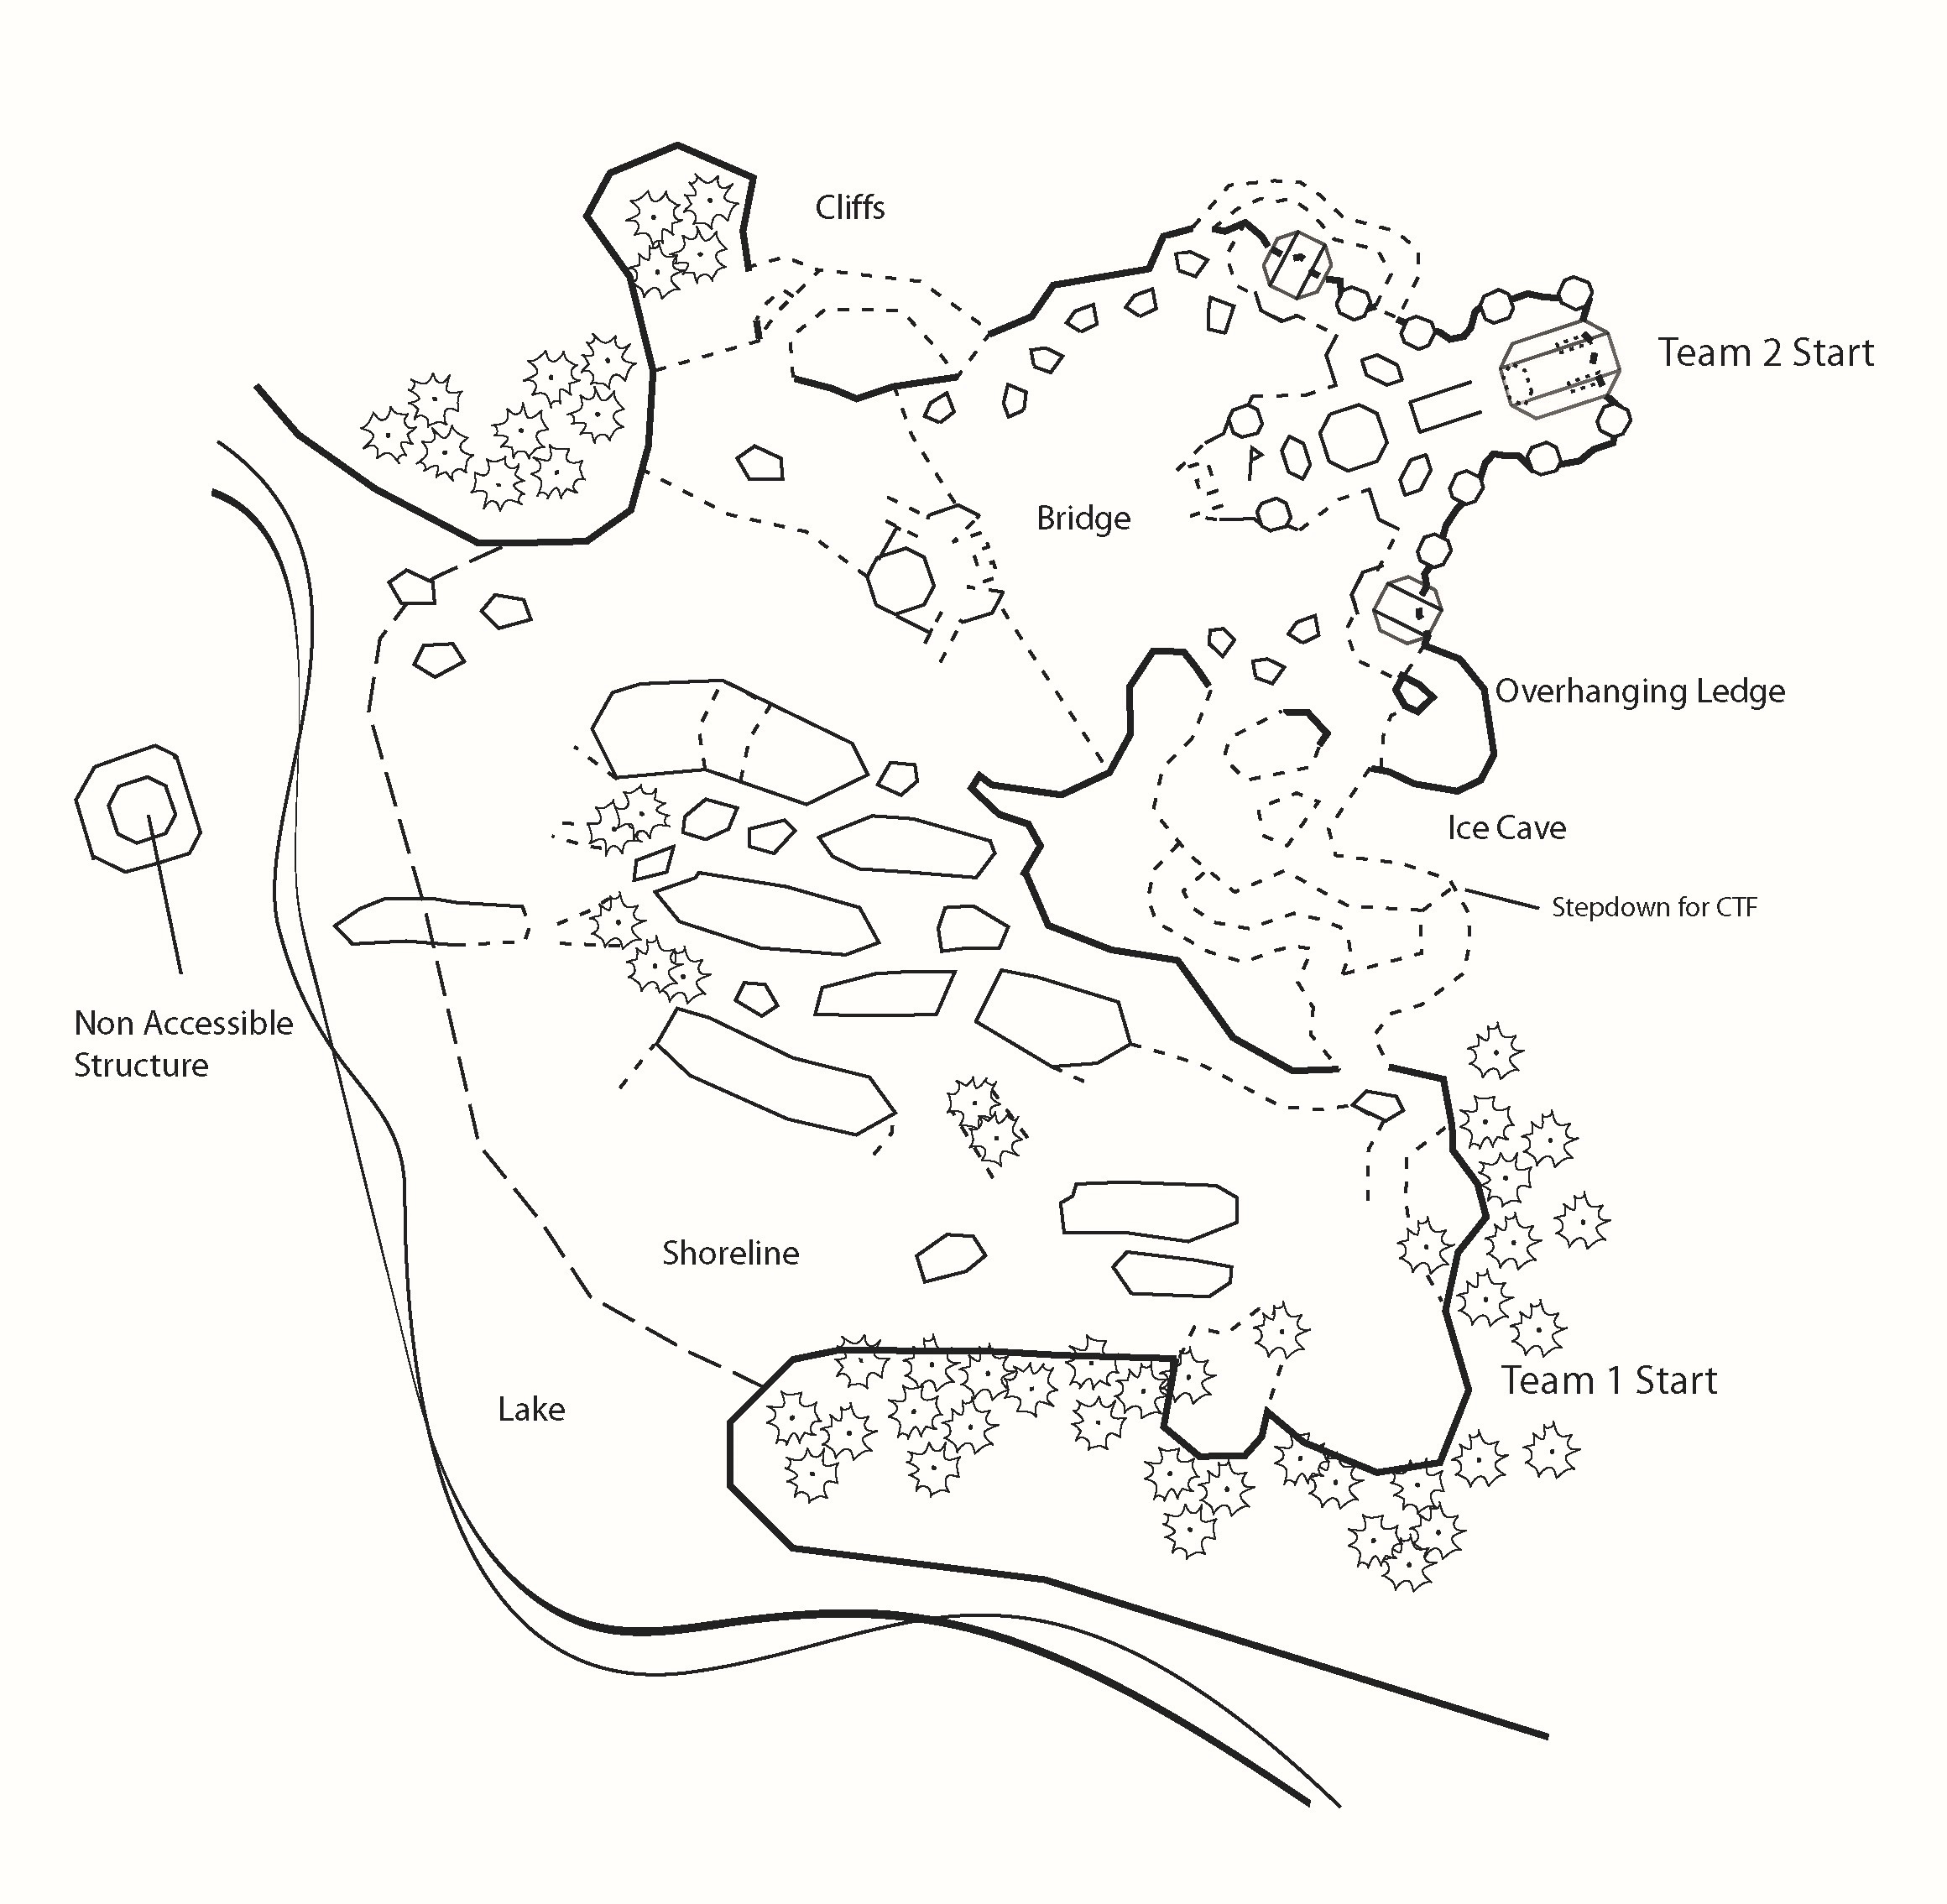
Permafrost is a natural terrain map set near a receding glacier. The glacial landscape lends itself to dramatic ice caverns and canyons interspersed with rock formations. The map has a boomerang shape designed with performance in mind, and is appropriate for faster-paced medium sized games. In team based objective games, the asymmetrical shape starts Team 1 at a low elevation near the shores of a lake. Team 2 spawns in a Forerunner structure at the top of the map that features a large upper level with a significantly smaller lower level.
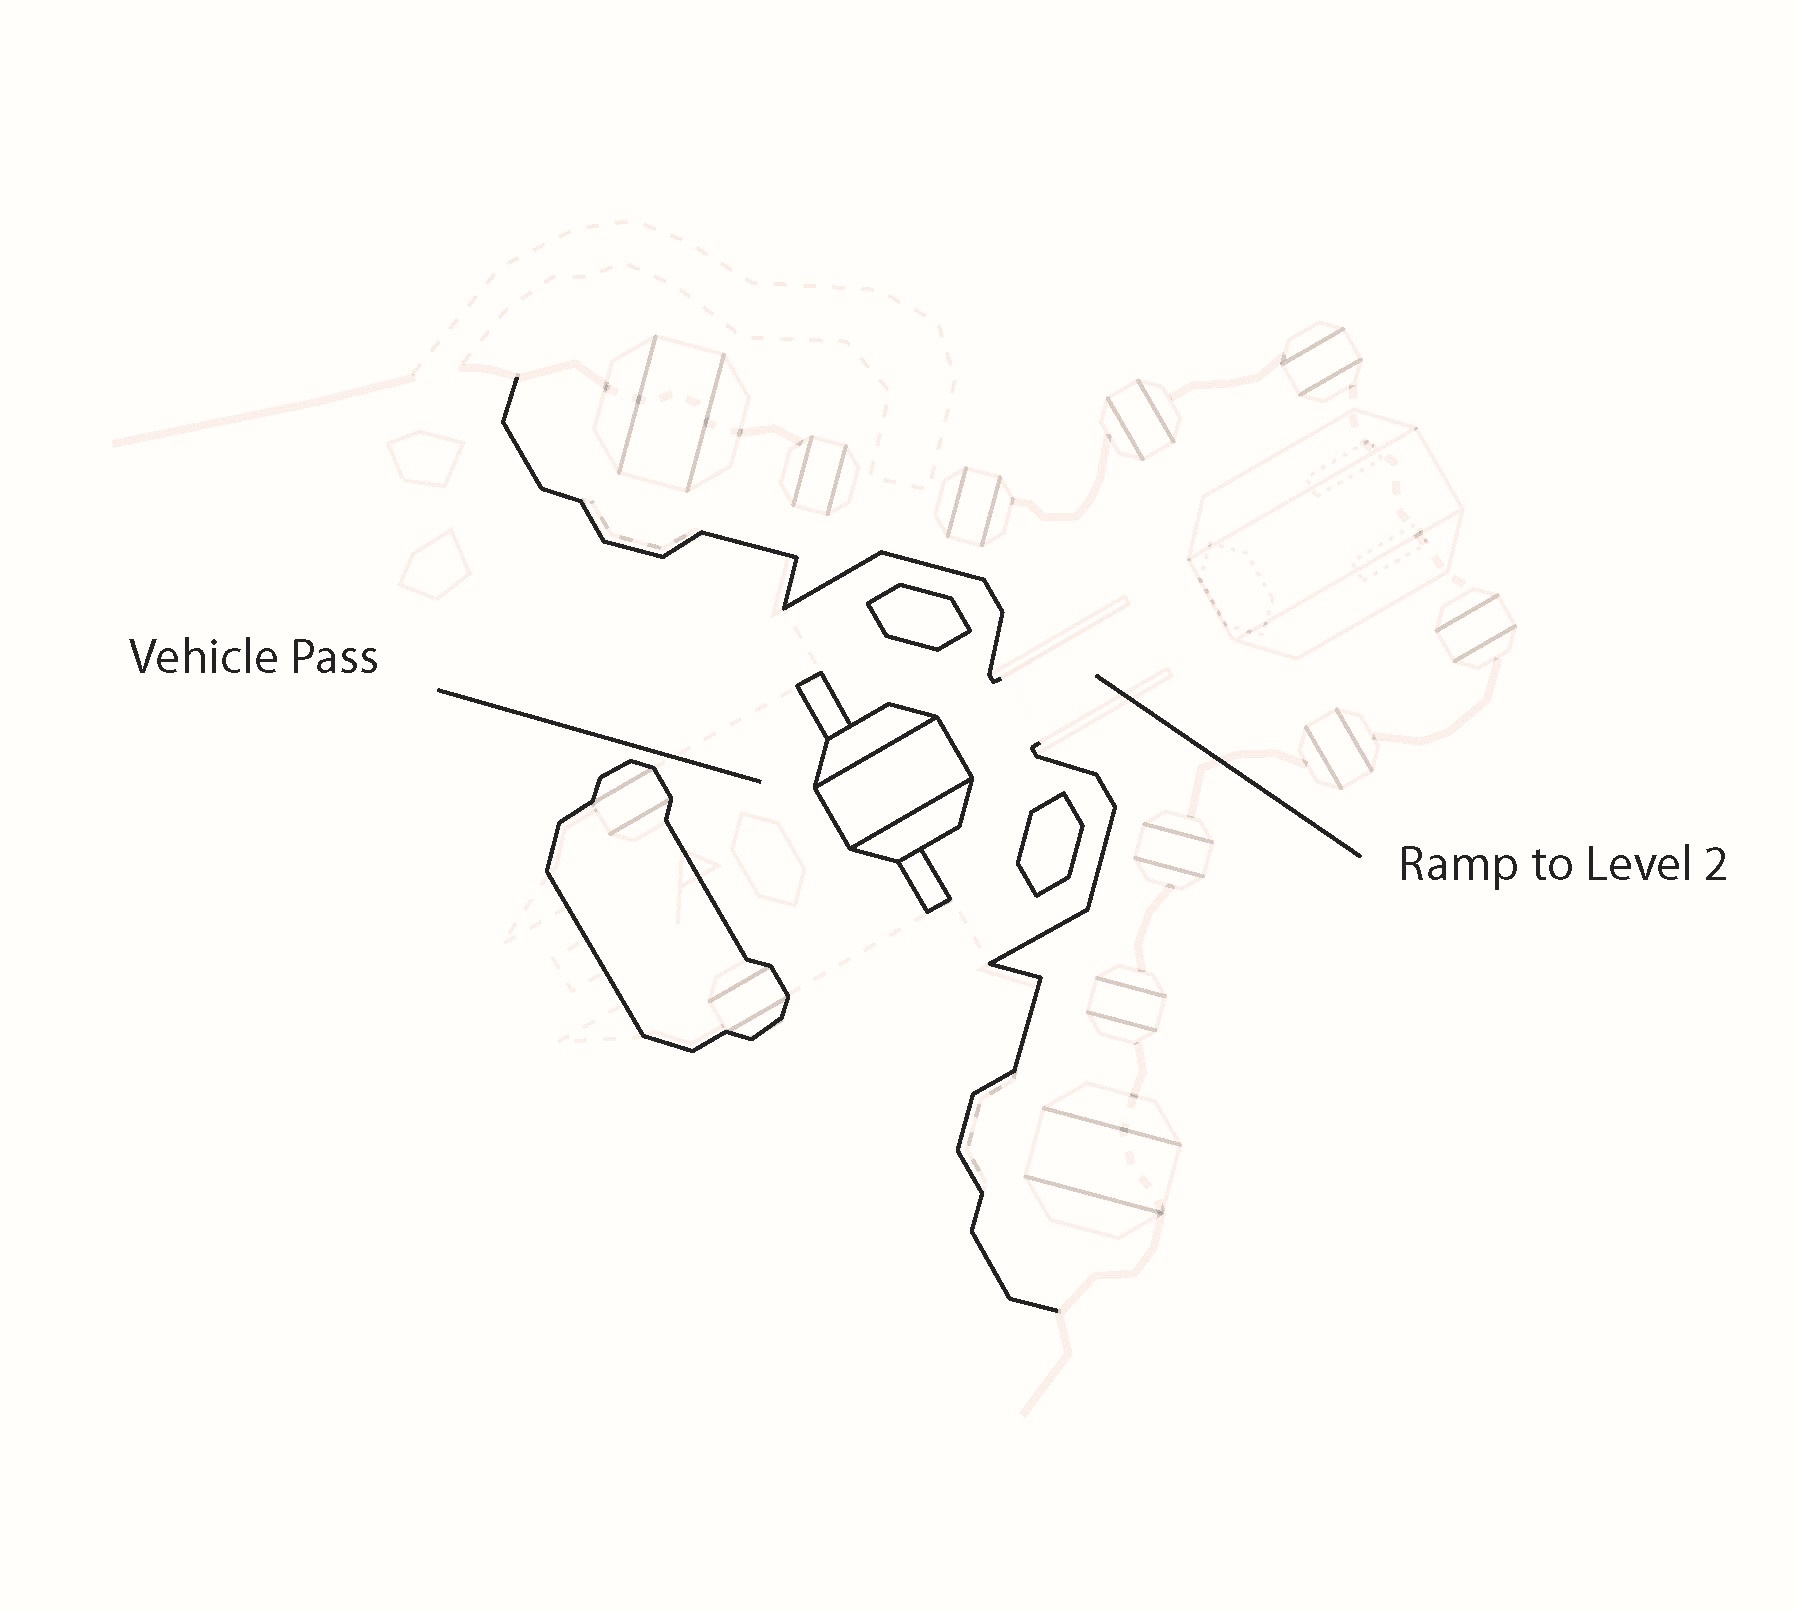
The fastest route for infantry to traverse the map is through an ice cave that snakes its way up the right side of the map. Sharp bends provide for close quarters confrontations and skillfully bounced grenade tosses. Vehicles starting at the Team 1 base have a long straight run punctuated with a jump before winding their way through the infantry only areas in the center of the map. The vehicle path intentionally zigzags in order to create more equitable travel times with infantry.
Permafrost seeks to differentiate itself from Zanzibar through a less campable base and by encouraging the members of Team 2 to foray out of their base with vehicles to obtain high value weapons like the Rocket Launcher and the Sniper Rifle. Team 2 is given a Chain Hog and a Ghost to facilitate this.
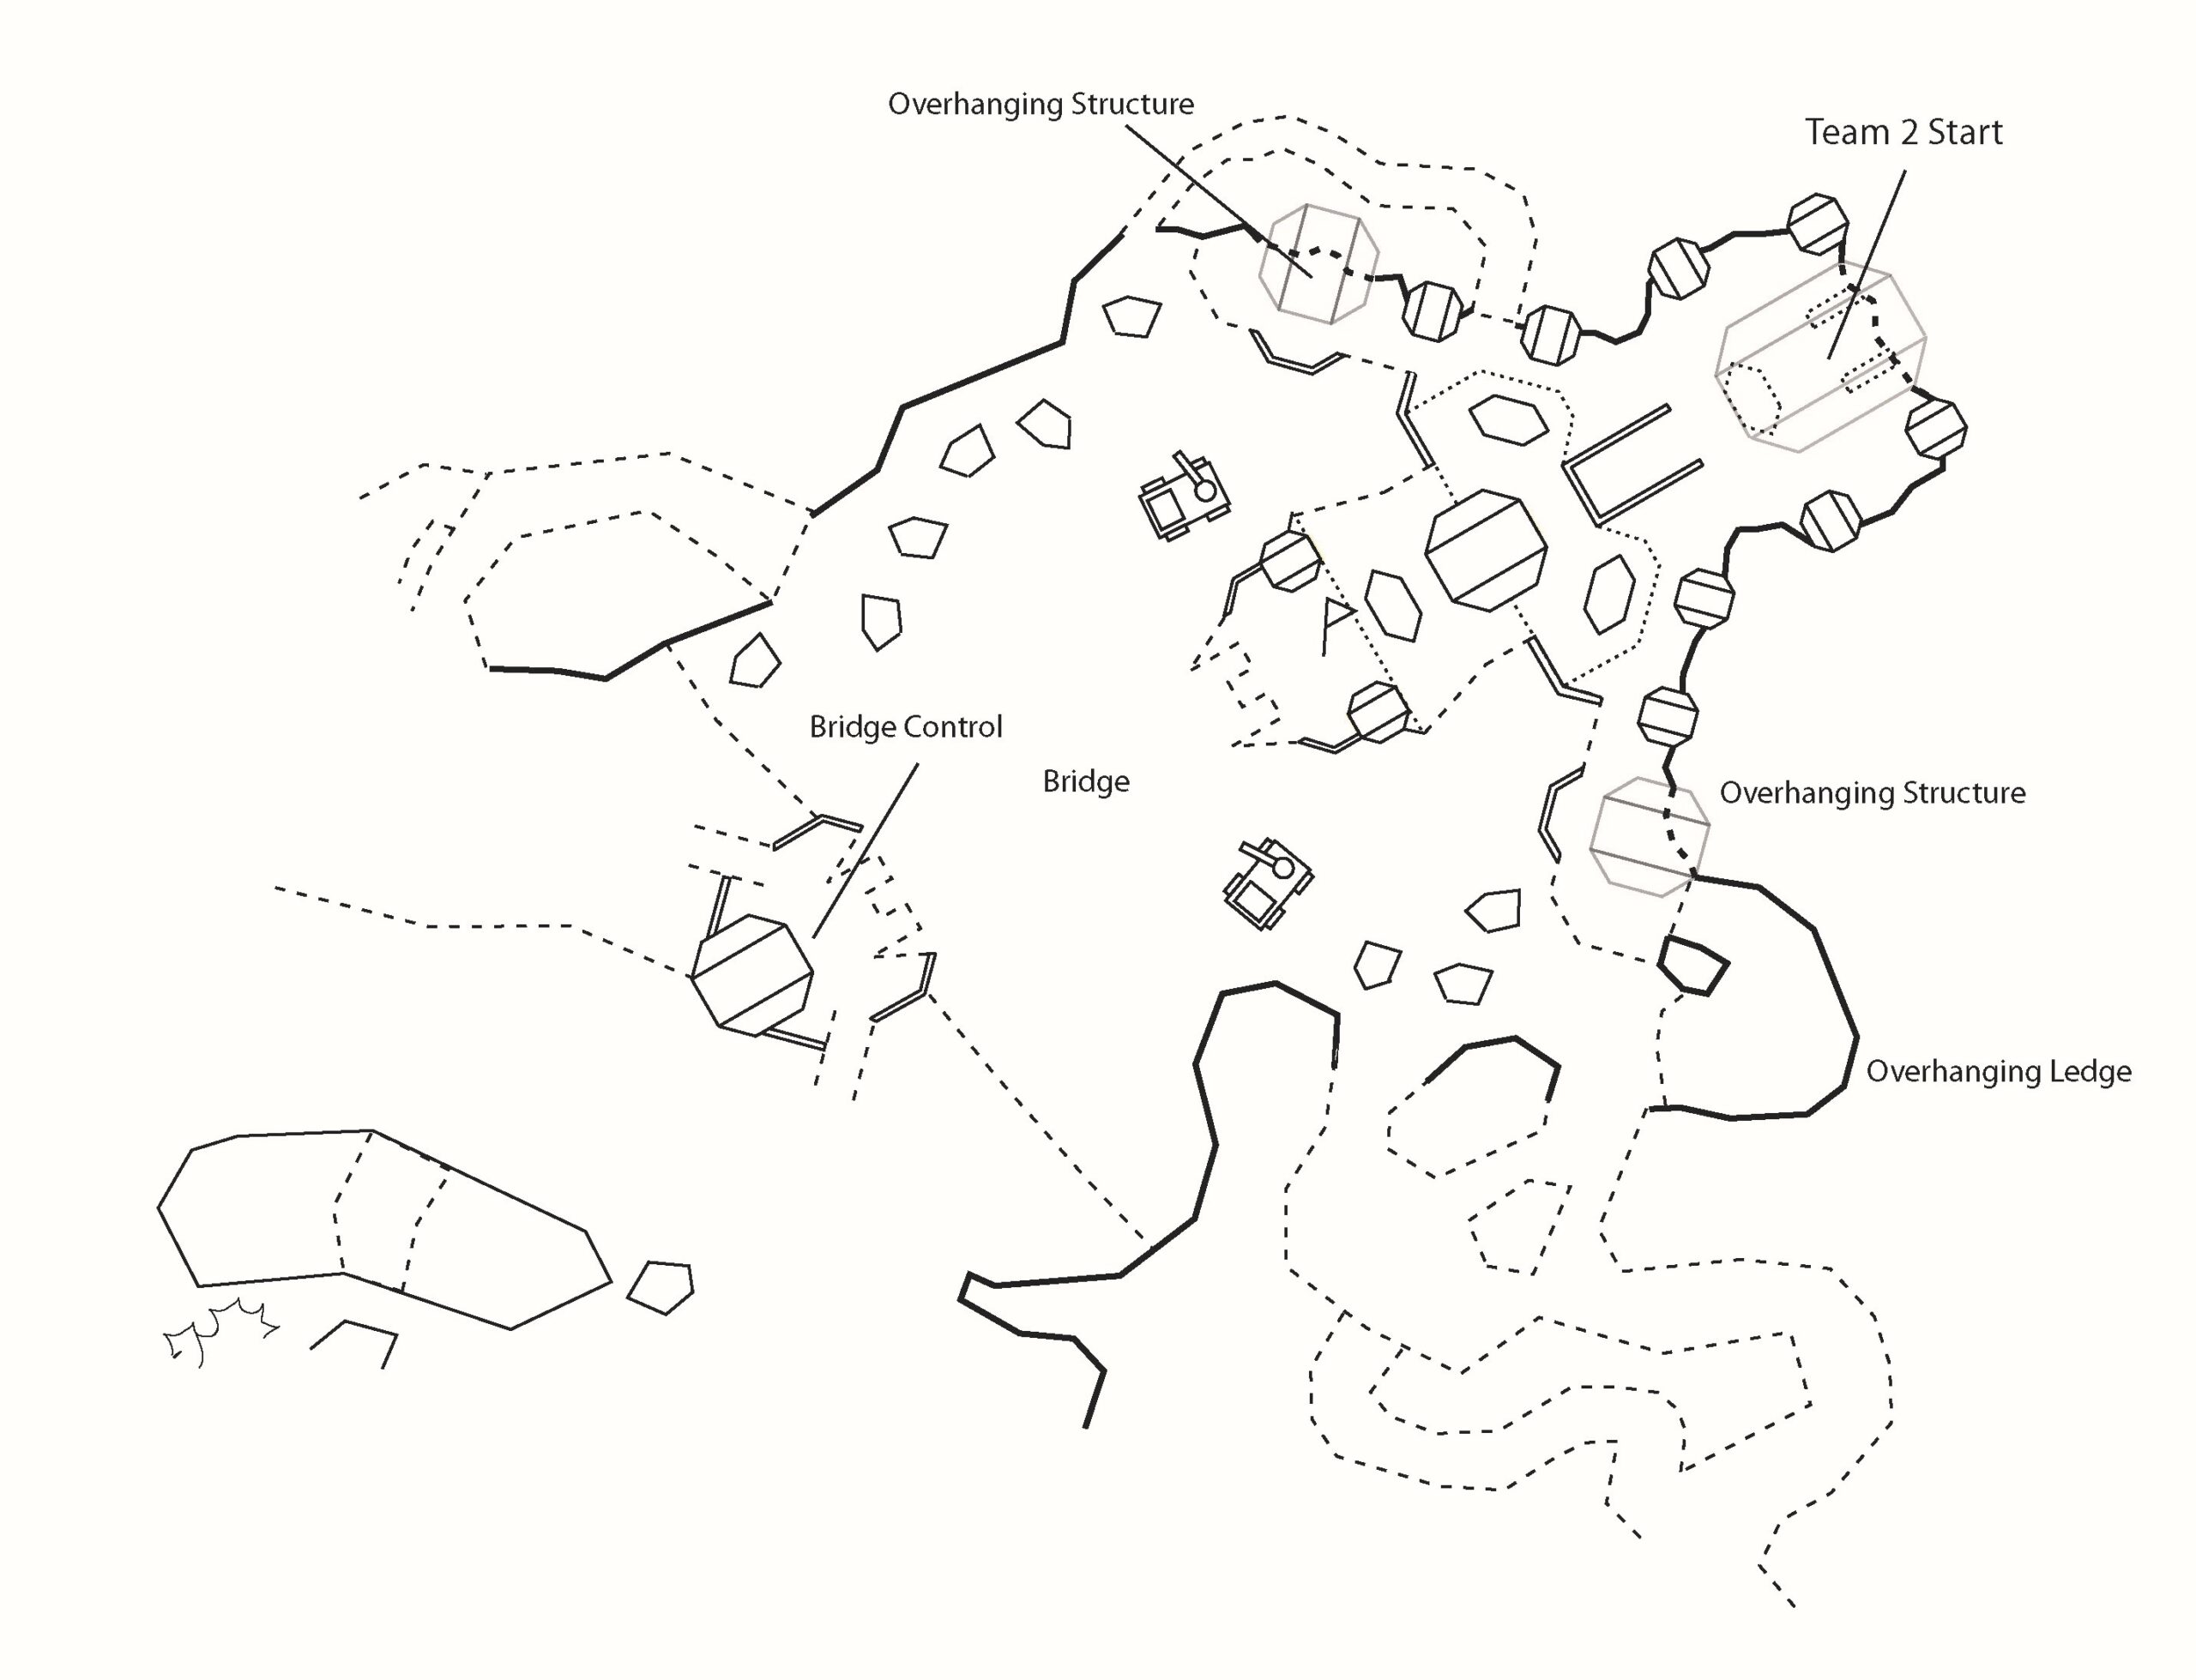
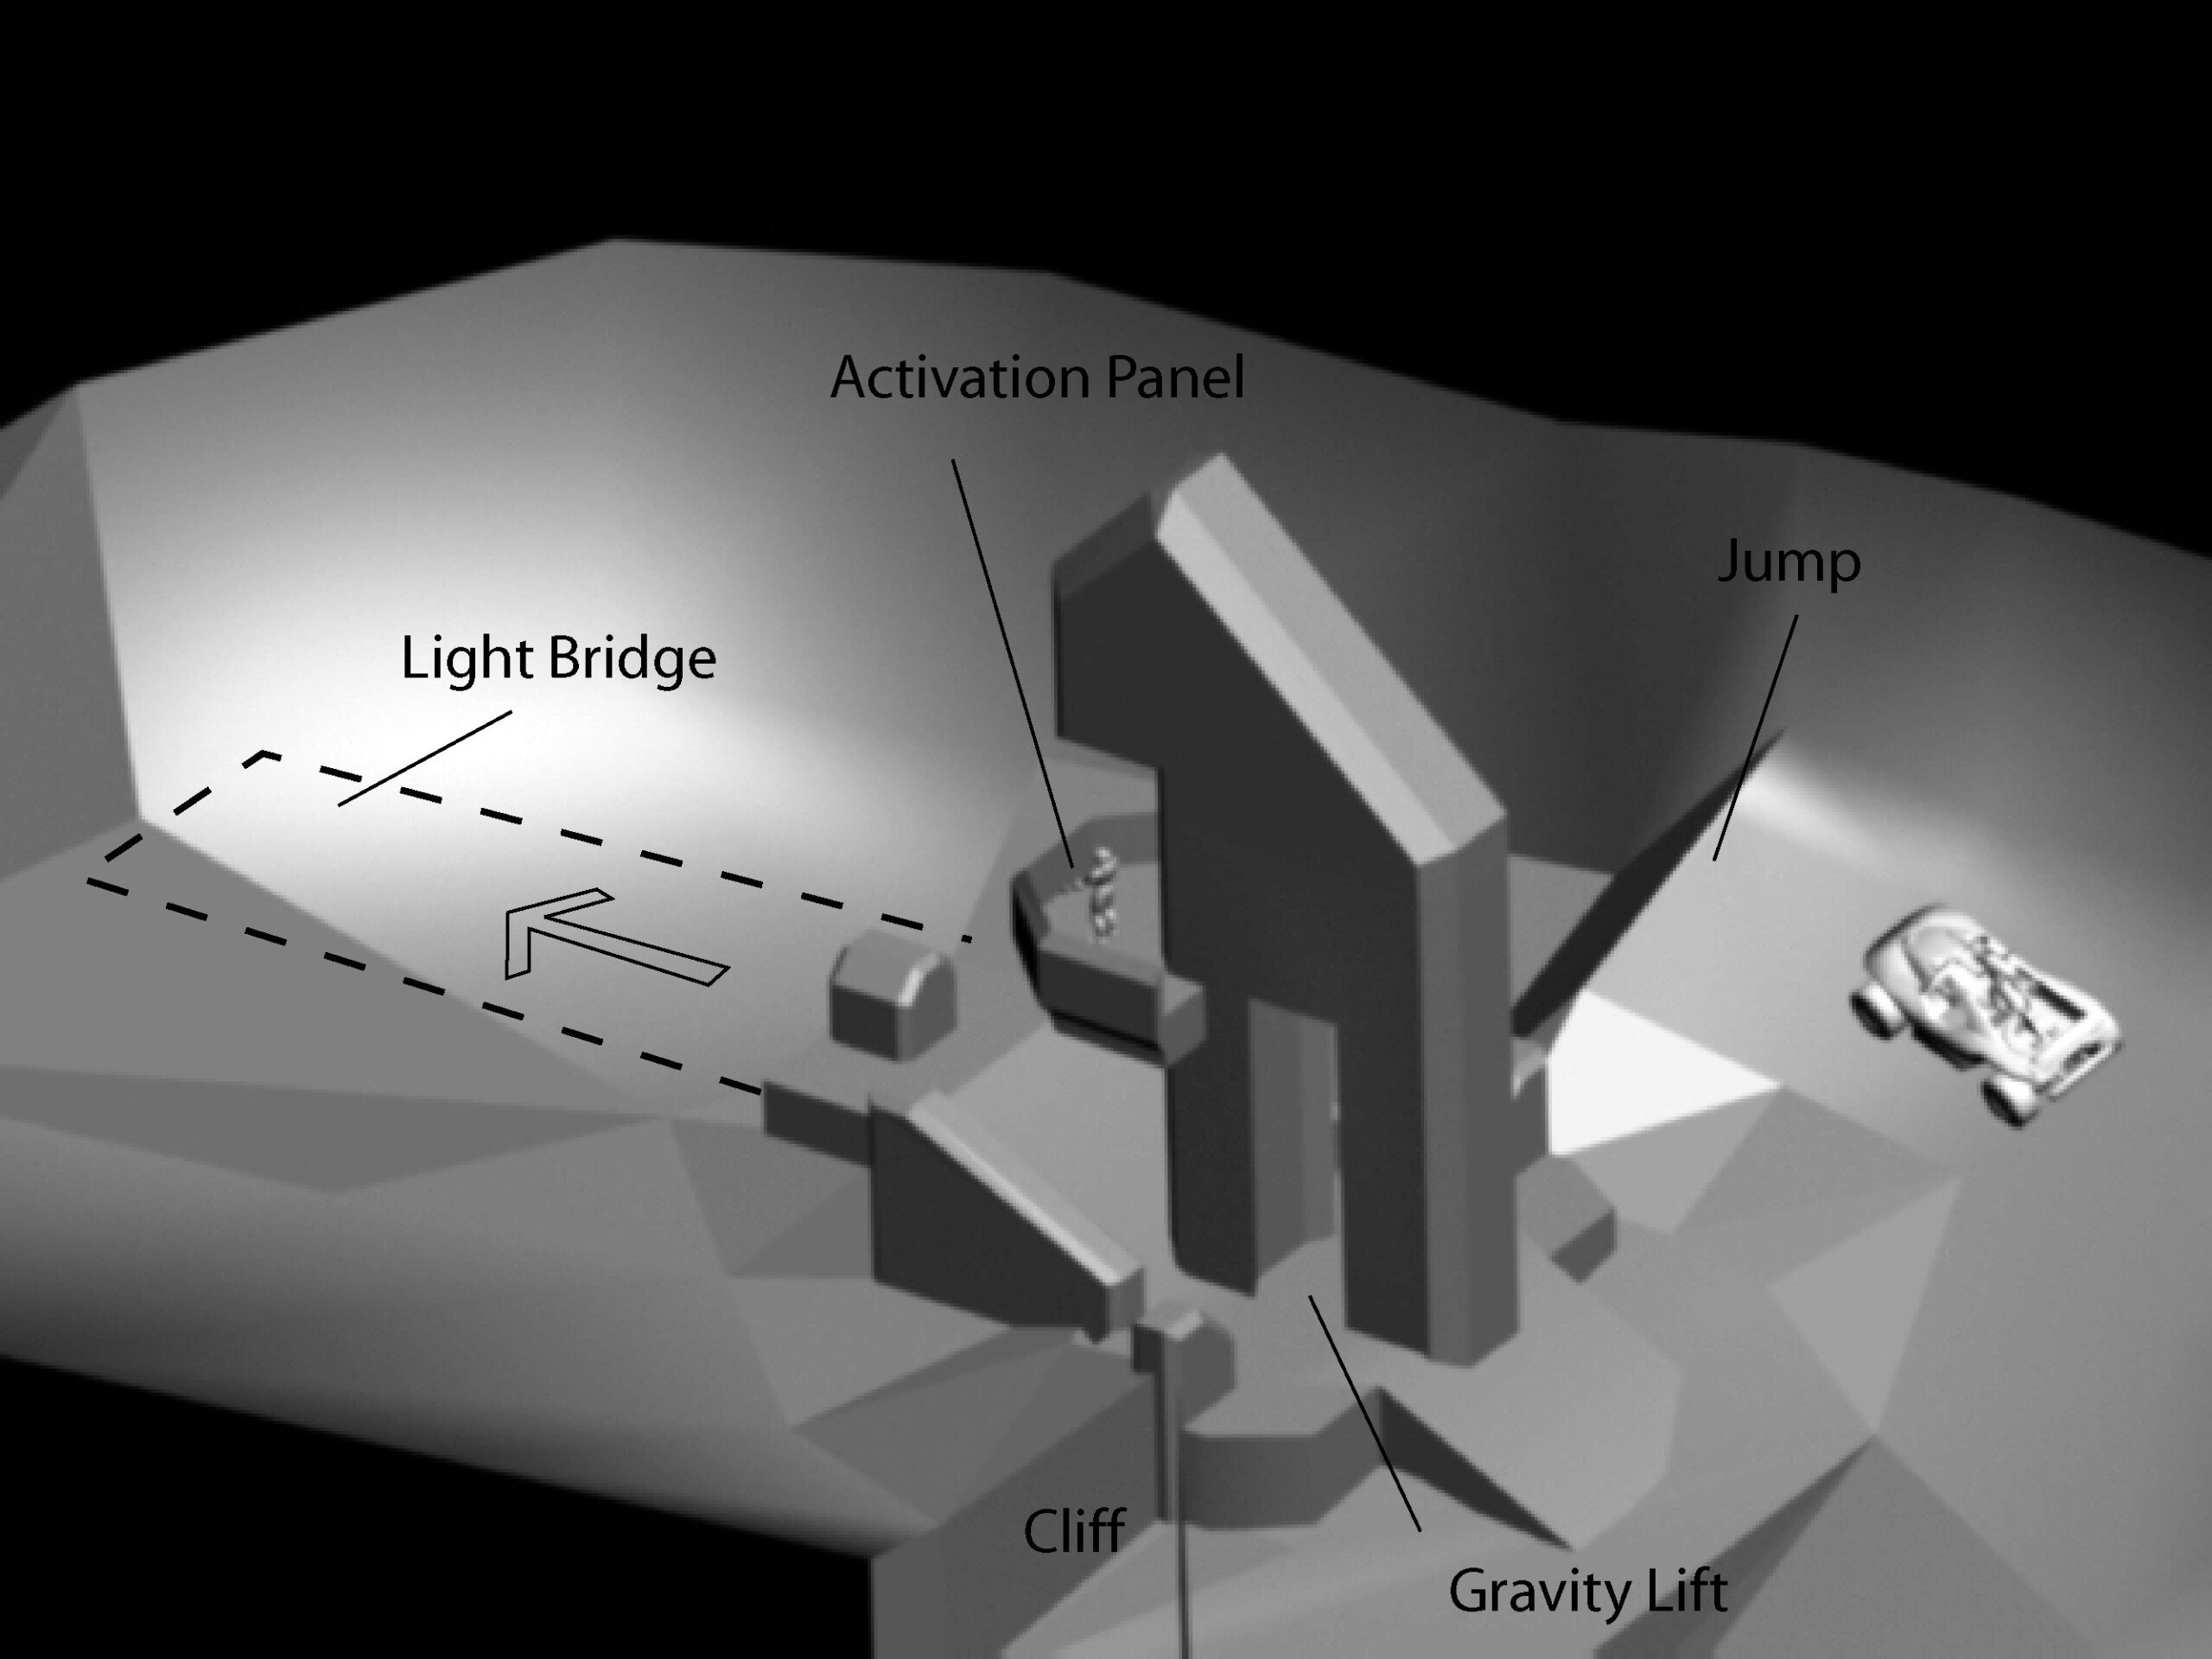
The Team 2 base structure will be a Forerunner gas facility not initially intended for military purposes. The structure furthest from Team 2’s start will have a mechanical or light bridge that can connect it to the main base structure. It is in Team 2’s interest to keep the bridge retracted to facilitate easier defense of the structure. Once the bridge has been deployed it cannot be retracted.
Throughout the map will be gas canisters originally destined for the Forerunner facility at the top. A hasty departure by the delivery vessel for reasons unknown caused them to be jettisoned and scattered. Additional interactive elements planned are breakable ice stalactites and triggerable rockslides.
Visuals
This map’s visuals will be representative of the rugged environments associated with glacial activity. The lower elevations of the map will have more vegetation consisting of fir trees and other hearty evergreens. The middle of the map in the area of the bend will contain ice and rock formations that are high walled narrow canyons with little vegetation. The top of the map will be stark and ice covered with no vegetation.
Team 1’s start location will be surrounded by large stands of firs set atop rocky cliffs. As the team moves forward they will view the expansive lake that will provide them with a strong visual and verbal reference. Team 2’s base will not be visible from this location and vice versa. Team 2’s base will project out from the surrounding cliff walls. At the top of the map Team 2’s base will provide dramatic and distinct points of visual reference.
Permafrost tower. (Certain Affinity concept image.)
Design Maps
A non-accessible structure has been added out in the lake along the extended axis of the base and will provide the player with visual reference. (Certain Affinity design image.)
Team 2 Base Detail Upper Level. (Certain Affinity design image.)
Team 2 Base Detail Lower Level. (Certain Affinity design image.)
Team 2 Tower Detail
It is our intent that a skilled driver would be able to jump from the ramp to the light bridge. The dimensions of the jump and the bridge will have to be tweaked to accommodate this.

Weapon Placement
The Battle Rifle is the default starting weapon. This is intended to allow the players to take advantage of the ample cover of the map and give them a medium to long range means of engagement from the outset. The highly sought-after weapons are placed at the bend in the map forcing Team 1 and 2 to converge on the center space. This is designed for maximizing action and discouraging Team 2 from camping in their base.
Height Maps
Flow
Like Zanzibar, the map seeks to facilitate lots of infantry and vehicle interaction. Vehicles have a wide range over the map allowing them to build up speed for several planned jump areas shown with purple arrows. The arrows below the word “Cliffs” show the steps that allow passage down from above. Vehicles approaching from the bottom are forced to run a narrow gauntlet in the middle of the map to slow their advance to the Team 2 Base.
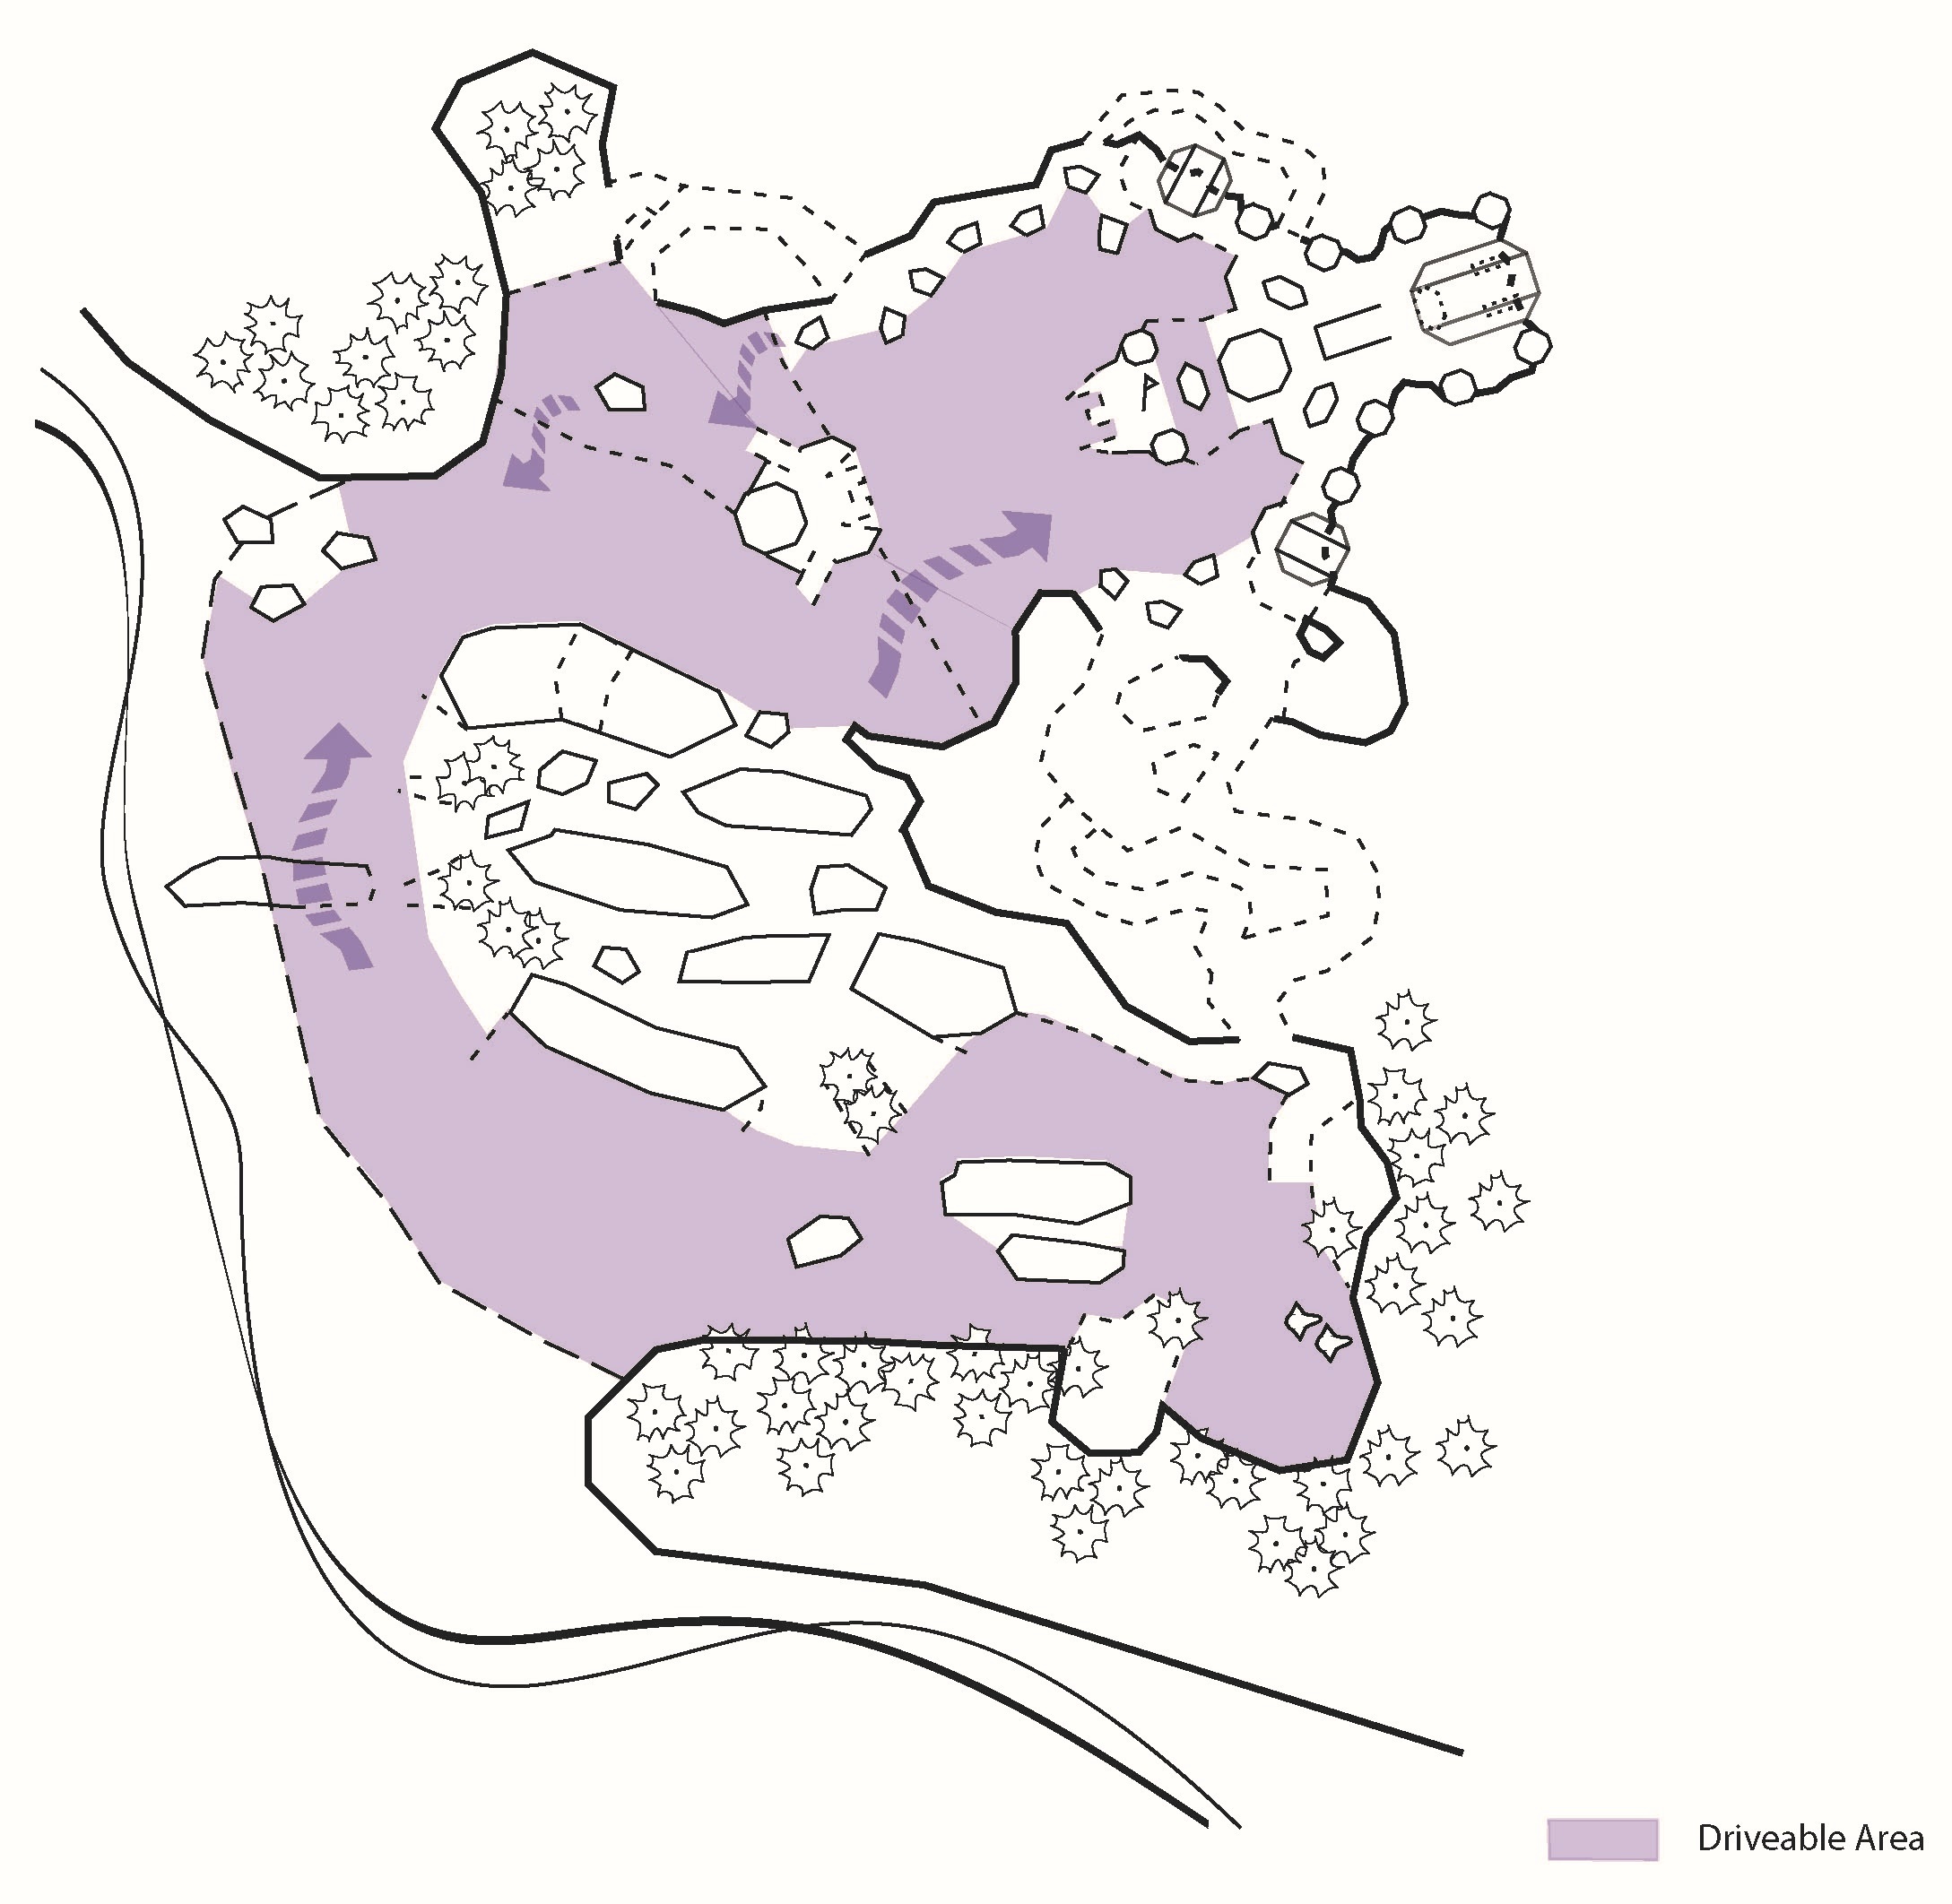
Vehicle flow
For Team CTF matches, planned respawn areas are shown outlined in orange dashed lines. The “hives” would be protected areas cut into the cliffs or trees for respawned players to drop down into the playspace. In addition, the Ice Cave would be one way only allowing the attackers to use the route to go up to the base but not to use the route for escape. This would be achieved by a dropdown. In game types other than CTF, the Ice Cave would be two ways.
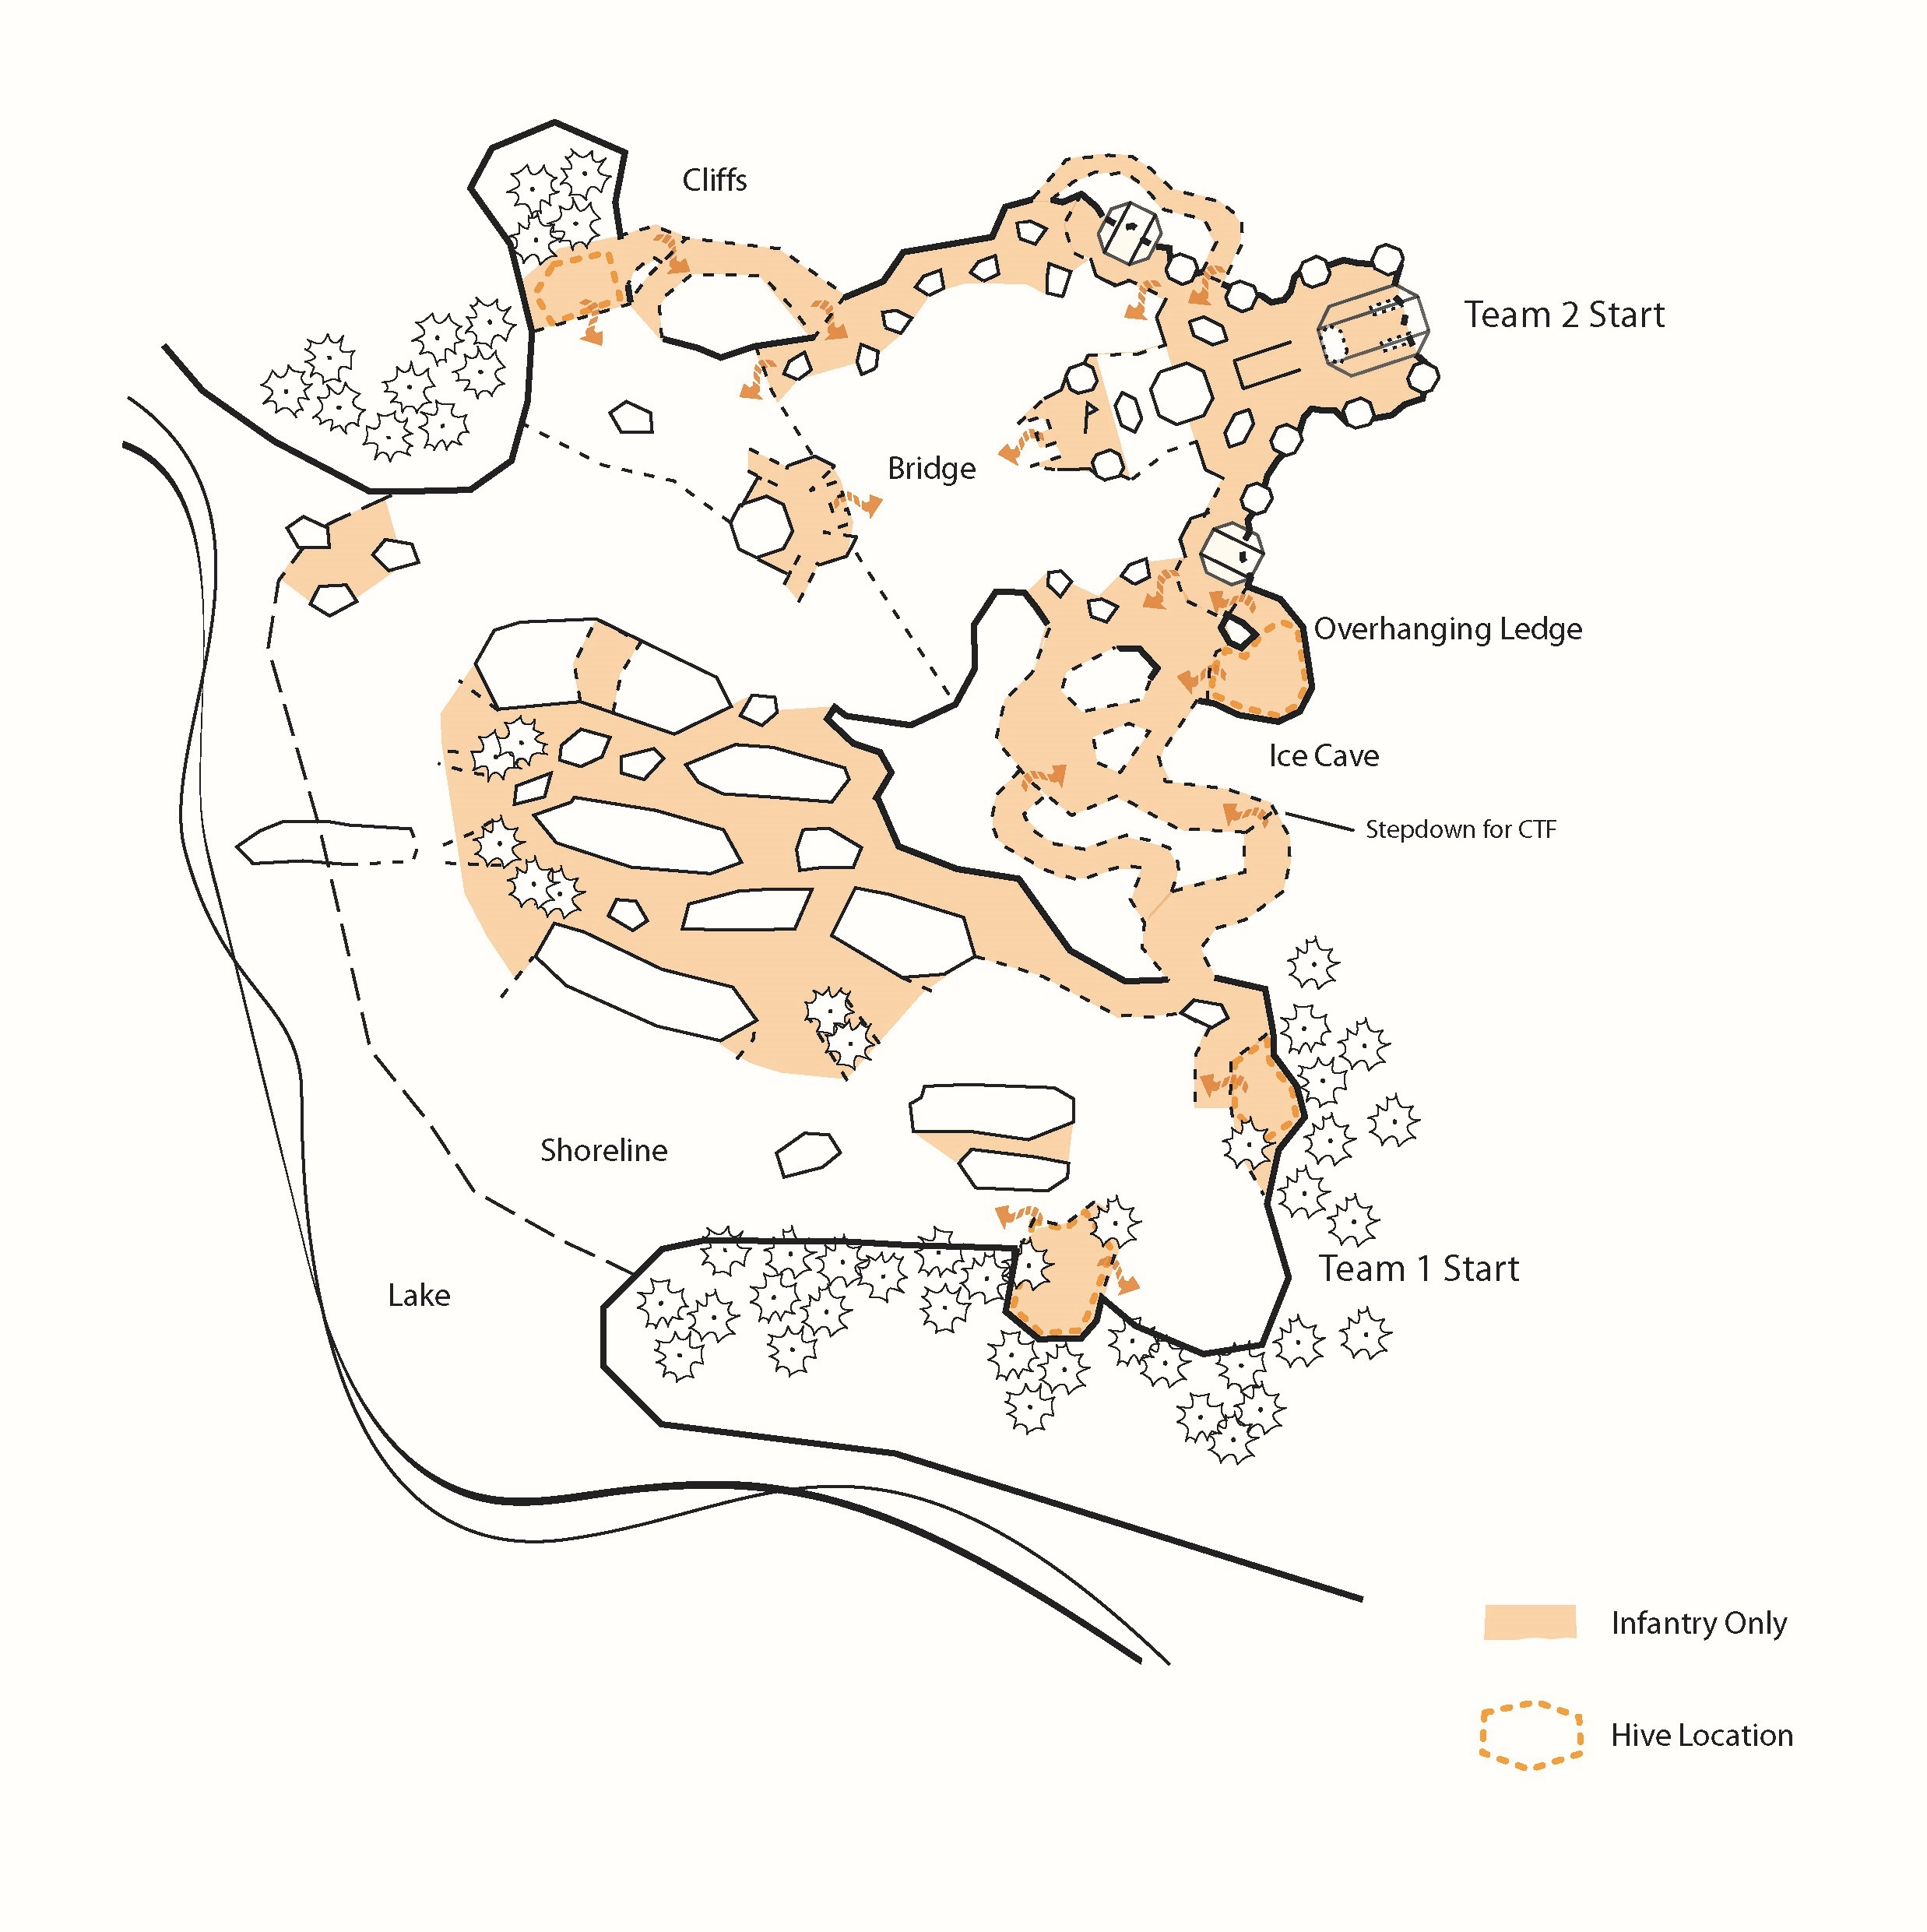
Infantry-only areas.
COMBAT FURTHER EVOLVED
We’ve provided new content for Halo: Combat Evolved modders to enjoy in this release. In addition to the “Halo 1.5” Milestone One maps, we included new scenery objects from prerelease and the H1.5 maps (such as the prototype Covenant Watchtower). And did you want more foliage? Of course you did! So check out \data\digsite\scenery\trees for new options!
Perhaps most interesting to modders and Halo historians is the broken ring seen in 1999 Halo third-person maps!
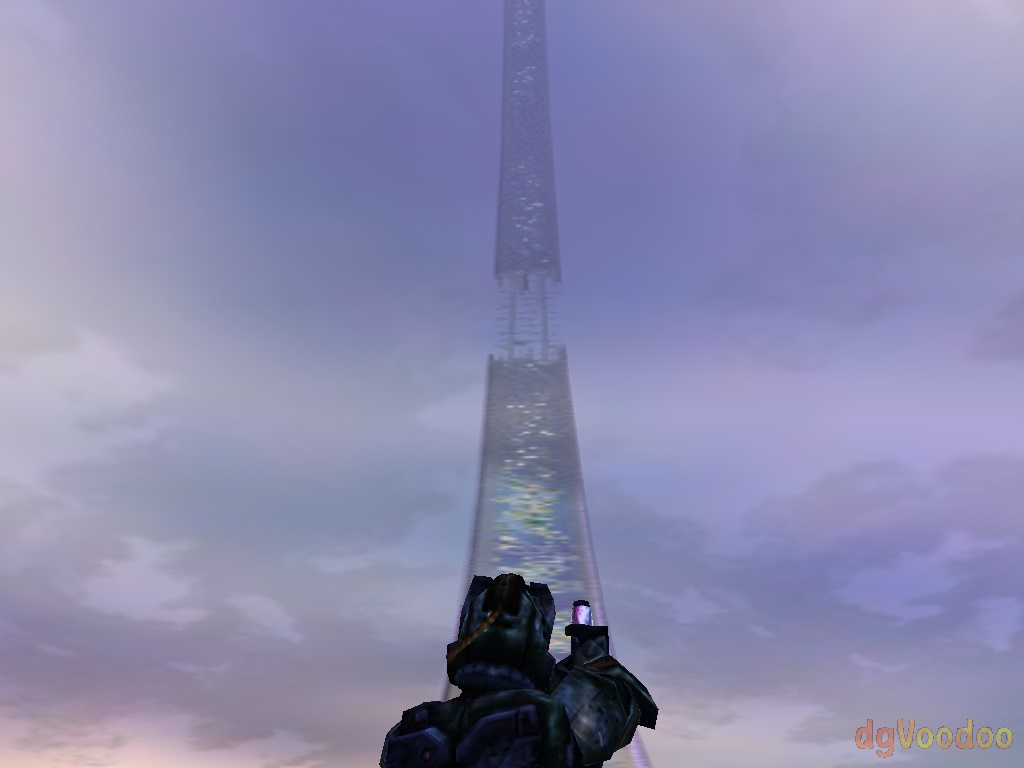
Screenshot from 1999 build showing the broken ring. dgVoodoo was used to help get the build running on modern PCs.
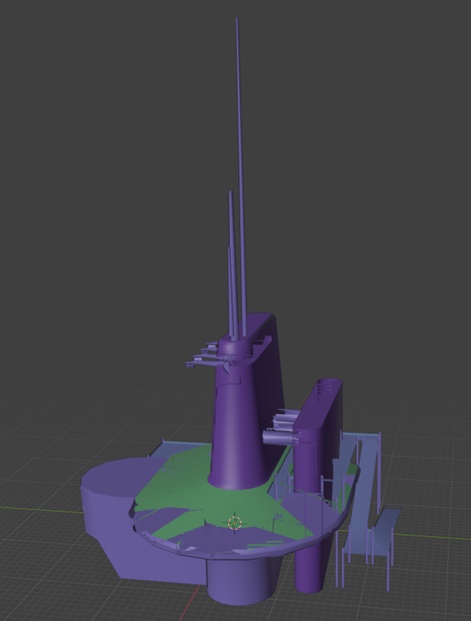
Very early Forerunner architecture test from third-person era prerelease build (“1999 04 26 giant building”) extracted and converted by Digsite team. You can find this in \data\digsite\scenery\cathedral\source
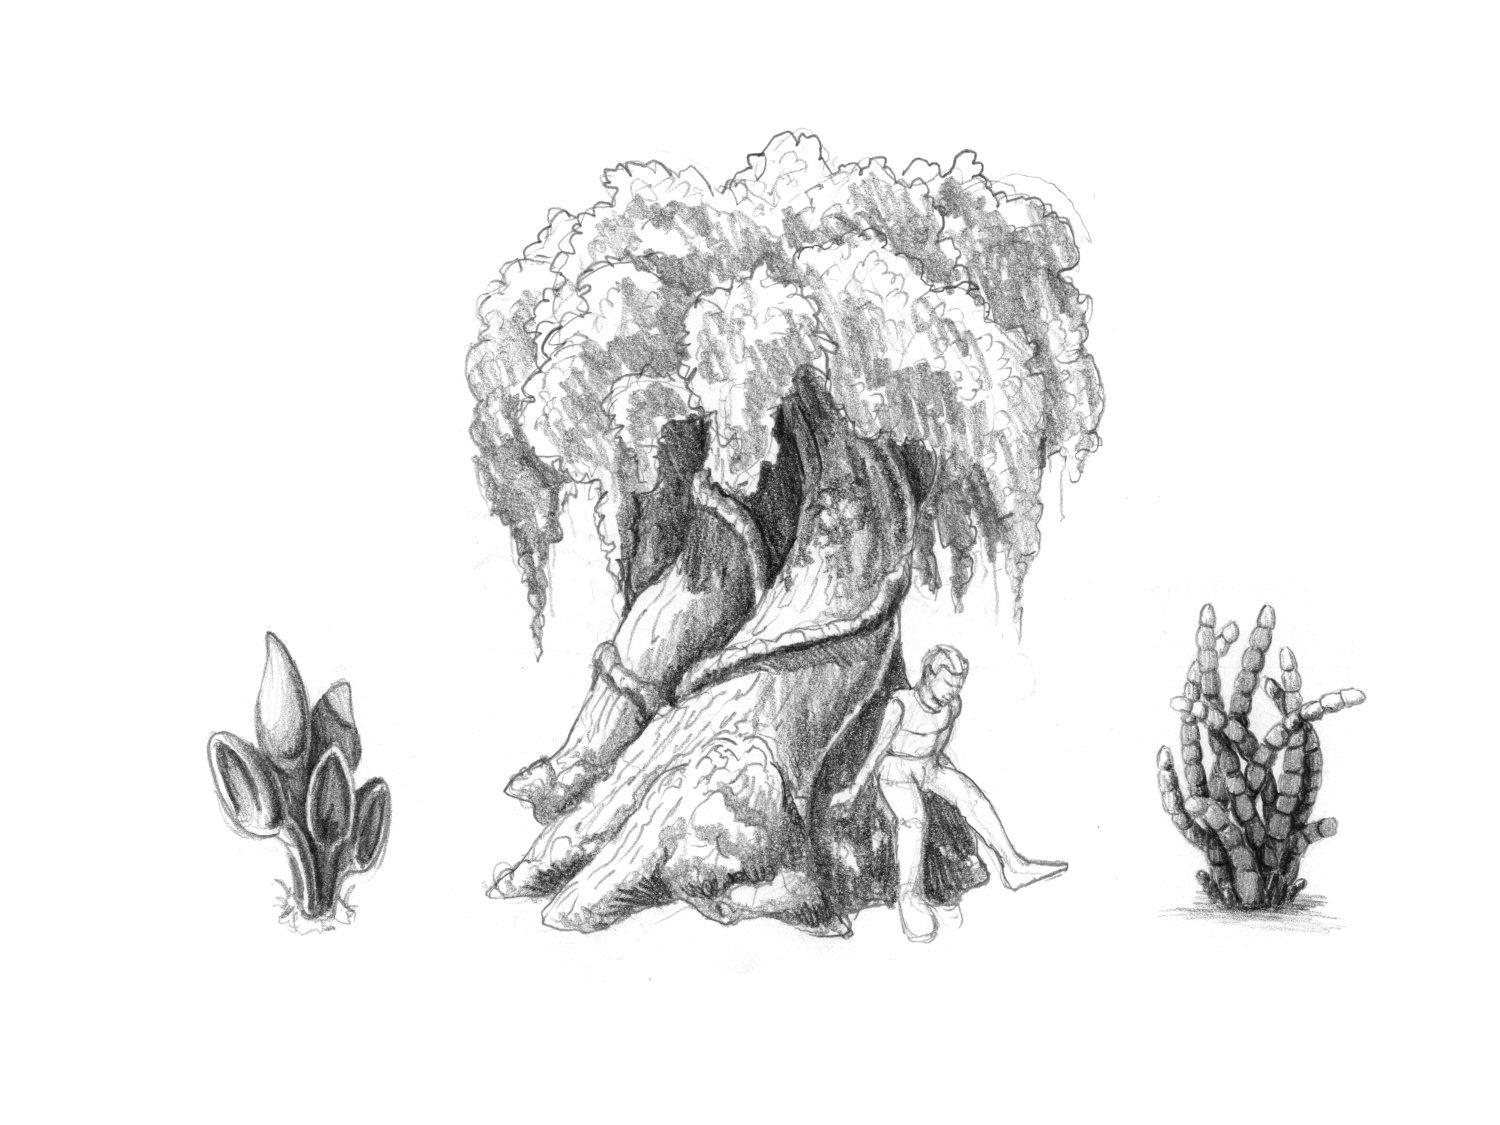
Alpha Halo vegetation ideas. (Bungie concept art.)
Swamplands
By popular demand, John and the team have finished porting over the swamplands map to Halo: CE. This was a map featured in the 2000 and MacWorld builds, and served as the basis for what would become the level 343 Guilty Spark in retail.
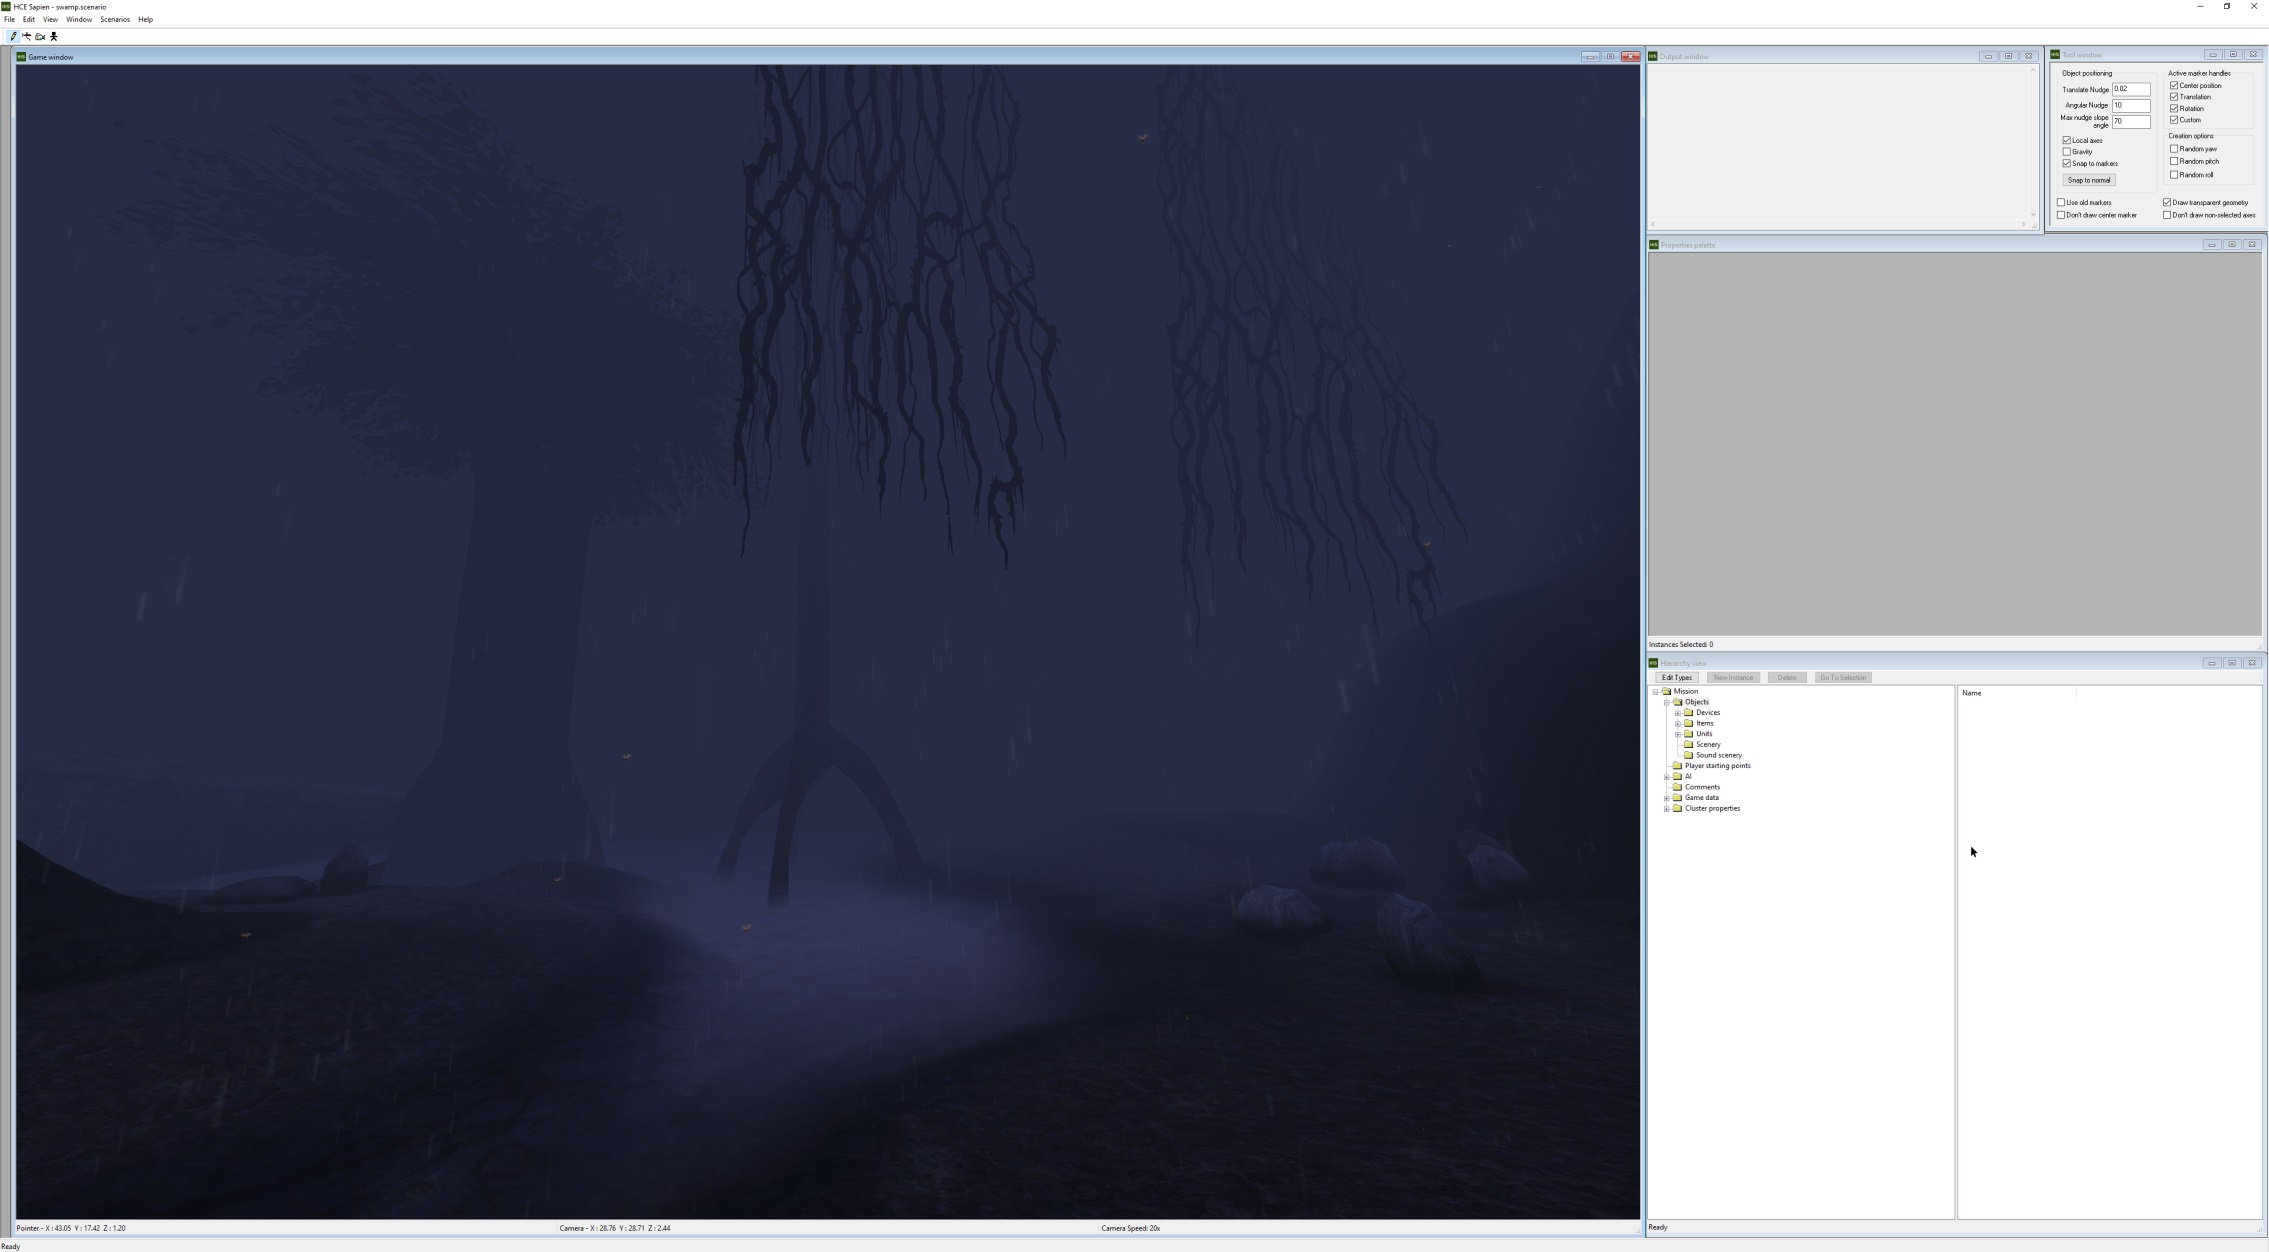
It’s a wet heat, though.
What Almost Was
One of the most common Halo: CE questions I get is “Do you have the levels that were cut?” The answer to that is—unfortunately—no. The main depot of post-2000 Halo content we have recovered is more-or-less from the release branch of the game. The earlier WIP content was not copied over, so it currently remains lost. We are still hopeful of recovering 2000 to early 2001 data, but it’s not in our hands right now.
What we do have are story documents and some script information for the early Halo story, including a very early Story Bible. The earliest docs are very interesting to read, as some story elements are locked in as early as June 1999 (such as Reach having been attacked by the Covenant, the ship you are on being named Pillar of Autumn, your AI assistant being Cortana, arriving and crashing on Halo, etc.) while other elements were in a constant state of flux. Even who you were as a character was not settled until very late—evolving from a Marine carrying Cortana into a nameless clone soldier, then changing into the vat-grown “Specialist,” and ultimately to the Master Chief.
Most of the Marathon references were basically reusing names and some concepts (i.e. rampancy) and not a direct connection—at least as far as I have seen. Oh, and Beowulf had a big role as a secondary antagonist at one point. That said, these docs do allow us to know—at least regarding story and key gameplay beats—what many of the cut levels for CE were intended to be, allowing Halo historians to fill in gaps implied by the retail naming schema.
Cut levels per a "Key Plot Points" document from Joseph Staten dated 01-24-2001 and my notes on the level contents. Again, we don’t have these maps or scenarios, so this is purely for educational purposes:
A10: Retail “The Pillar of Autumn”
A20: Combined with A30. This looks to have been the crash-landing area and “natural formation” tunnel entrance.
A30: Retail “Halo,” but most of the guerrilla war elements were scoped out (cut) when merged with A20.
A40: Attack on a Covenant excavation site. Engineers would have been introduced here. There was a light bridge in this map and Forerunner tunnels, but we don’t know specifics.
A50: Retail “Truth and Reconciliation” but played out differently. Entire section dealing with Prophet arrival was cut. Keyes originally learned the Covenant plan from watching the Prophet's "pre-arrival address" rather than somehow listening in on the guards’ prison conversation.
B10: Prophet assassination mission. Recover keys to the Control Center.
B20: With a Prophet dead, the Covenant military accelerates occupation of Halo and campaign against the human resistance forces. Exterior incorporated into C10.
B30: After Keyes gives a rallying speech, you are led into retail “The Silent Cartographer.” The actual objective changed over time, eventually settling on this being a map room.
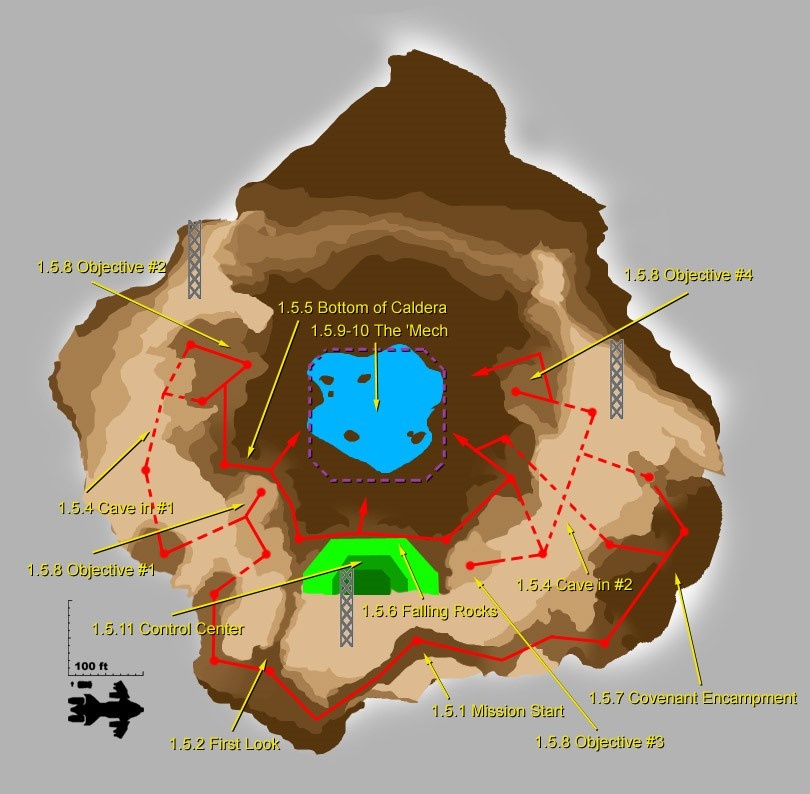
B40: Retail “Assault on the Control Room.” One version of this map took place around a volcano (sorry, Spy Kids) where the Covenant was trying to break into the Control Room with a proto-Scarab.
C10: Retail “343 Guilty Spark” but the swamp was glassed before arrival.
C20: Retail “The Library.”
C30: Activate the Ring's orbital defenses and call down particle beam strikes.
C40: Retail “Two Betrayals.”
D10: Escape from Sentinels. Stunt-filled action extravaganza ending. This was partly repurposed into retail D40 as the Warthog run.
D20: Retail “Keyes.”
D30: Cortana calls all surviving Marines to retake the UNSC Pillar of Autumn. Everyone against everyone. We adapted this for the final mission of Fireteam Raven.D40: Retail “The Maw.” In many versions (including late versions that have dialog recorded) you escaped on a lifepod instead of a Longsword.
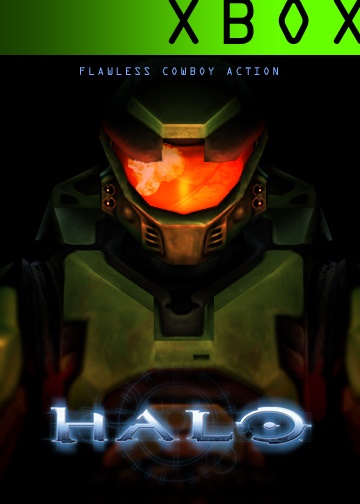
Halo boxart mockup created in early 2001. Note the lack of a “Combat Evolved” subtitle. We’ll talk about “Flawless Cowboy” in a future article. (Bungie concept art by Paul Russel.)
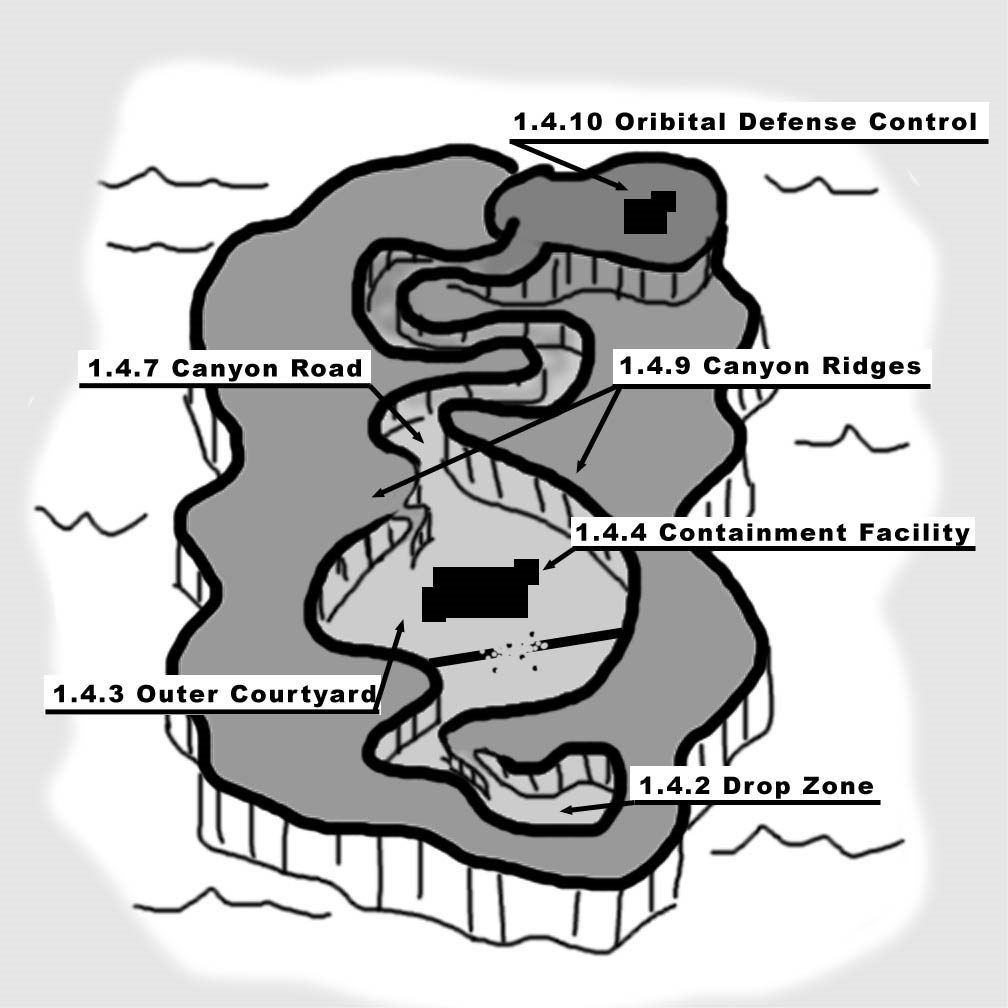
Overview map for December 2000 version of Assault on the Control Room. (Bungie design sketch.)
Overview map for C30. (Bungie design sketch.)
A50 - Captain Bomb
To help show how elements can remain the same while being arranged in a way that will look alien to modern Halo players, let’s look at the overview for A50 as it stood in the August 2000 design documents. I hope to see some fan concepts of what a Keyes Bomb-dummy would look like!
Overview: The Captain is being held in a Covenant pursuit ship that is also serving as the Covenant base of operations on this section of Halo. The Player and a highly skilled Marine sniper are dropped near the ship’s docking point and begin clearing the surrounding area of sentries and enemy snipers. Once the surrounding area has been cleared, the Player uses the hills surrounding the ship to clear the sentries underneath it. Then a dropship full of Marines lands and helps the Player attack the ramp, move through the ship to where the Captain is being held and rescue him. The Captain and the Player then escape in a shuttle after setting a bomb to blow up the ship.
- As the Player crests a hill, the Covenant Pursuit ship is revealed below, buzzing with activity.
- The Player wreaks havoc on unprepared Covenant soldiers around the Pursuit Ship.
- Enemy snipers block a narrow bridge and must be carefully eliminated.
- After arriving in a dropship, a group of Marines assaults the ramp of the ship before the Covenant can close it.
- The Marines and the Player move through the Pursuit Ship, cutting through bulkheads to progress.
- After rescuing the Captain, the Marines replace him with a Captain Bomb.
- Cut off from retreat, the Captain and the Marines steal a Covenant shuttlecraft and escape as the ship explodes.
HALO 2, TOO
Halo 2 still has a bunch of content in various stages of fixing for release, but we’ve gotten some material to a state that we are ready to release alongside the M1 maps. This includes the Covenant command shuttle blockout, H2 Falcon (which other modders have also explored with found tags), MG with grenade launcher, E3 Phantom with landing gear, Covenant plasma mortar (based on the old gravity wrench model), and plenty of new (to you) scenery objects to use in mods!
Some of these are data-only, as creating fully functional examples was out of scope for the team. As promised, we are also releasing the data and tags for the Halo 2 disintegrator and flamethrower (these are mostly as-found and do not necessarily match up to the design document as they were never finished).
Screenshot of the plasma mortar. I suspect this was inspired by the Type 89 “knee mortar” used in WW2.
Excerpts from Halo 2 Weapon Design Documents
Disintegrator
Damage Type - Burning
"Cook him right through that column!"
The Disintegrator is the ultimate ambush weapon, and it is also excellent for killing vehicle drivers and gunners.
After a short spin-up delay, the Disintegrator projects an invisible field of damage in a 30° arc. This field penetrates armor and shields, damaging anything organic or electronic inside. It also passes through cover (like rocks and trees) but not walls. The field is partially visible because the air inside it crackles and sparks.
The field instantly dissipates shields, but it does not stun them and they start to recharge immediately after the beam is no longer trained on them. This means that while the Disintegrator is an excellent weapon to use against shielded enemies, it cannot be used as part of a combo with a headshot weapon.
Since the Disintegrator does damage by heating up an enemy it does very little damage during the first few seconds it is trained on a target and massive amounts of damage during the final seconds. The field also does more damage in the center than on the edges, so keeping an enemy in the center of the beam is the most efficient way to kill them.
Different kinds of enemies take different amounts of time to reach the high damage state. Grunts start taking massive damage after only a couple seconds, but Hunters must be kept in the field for as long as ten seconds before they start taking massive damage. The Disintegrator also causes infection forms to leap out of their host immediately.
Disintegration Field
- Constant soft humming sound gives away location
- Does damage through intense heat
- [effect] barrel glows like a thousand suns
- [effect] glowing particles, pass through obstructions
- [effect] causes water to steam
- [effect] causes surfaces to blacken
- Continuous short-range AOE damage in a wide arc
- penetrates any obstruction
- rapidly depletes energy shields
- damages riders though their vehicles
- causes infection forms to leap out of their combat forms
- causes carrier forms to explode
- does not ping units
- [accel] accelerates havok objects
- Ineffective against metal and inorganic materials
- Operates on battery power
Flamethrower
Damage Type – Burning
…buuuuuuuuuuuuuuuuuuuuuuuuuuuuuuuuuuurnnn… ok, that was three screams of agony, so where did that last guy go?
The Flamethrower fires a gigantic stream of jellied gasoline, burning anything organic to cinders almost immediately. When the Player is firing the flames obscure their vision, essentially blinding them.
Completely squeezing the trigger on the Flamethrower creates a long narrow stream of fuel that completely obscures the Player’s view. Barely squeezing the trigger creates a wider, short-ranged cone that uses fuel more slowly and does not blind the Player.
The Flamethrower’s fuel canister will explode if it is hit by an Instant Critical Damage weapon.
In order to reload the Flamethrower the Player must stop moving. Reloads must be started manually by hitting the Reload Button.
Charge Weapons
Charge Class Weapons are special function grenades and charges that are not a constant innate ability, but must be prepared and used intentionally. In order to access Charge Class Weapons the Player must hold the Switch Grenade button for a few seconds to enter a Charge Selection Mode. If they have multiple types of charges tapping the Switch Grenade button will cycle between them. The Player can hold the Switch Grenade button for a few seconds again to exit Charge Selection Mode and return to their more traditional grenades.
Once a charge is selected, the Player can throw one with the Throw Grenade trigger. A single, quick pull throws the charge and allows it to explode normally, while an extended pull put the charge into manual detonation mode, allowing the player to blow it up intentionally by releasing the trigger. As soon as they have thrown a charge, they exit Charge Selection Mode and return to whichever grenade type they had most recently selected.
Mines are special types of Charges that are automatically triggered by proximity. This means that while most Charges can be picked back up, Mines cannot.
Plasma Charge
Anti-vehicle charge that sticks to any surface. Placing a charge in manual detonation mode allows the player to blow it up intentionally. Plasma Charges placed in normal mode will only explode if burned, run over or triggered by another explosion.
Satchel Charge
Anti-vehicle charge that sticks to any surface. Placing a charge in manual detonation mode allows the player to blow it up intentionally. Plasma Charges placed in normal mode will only explode if burned, run over or triggered by another explosion.
Oldnaut Also included as a special treat is the original Forerunner dreadnought skybox image.
Forerunner dreadnought as it appeared in early builds of Halo 2.
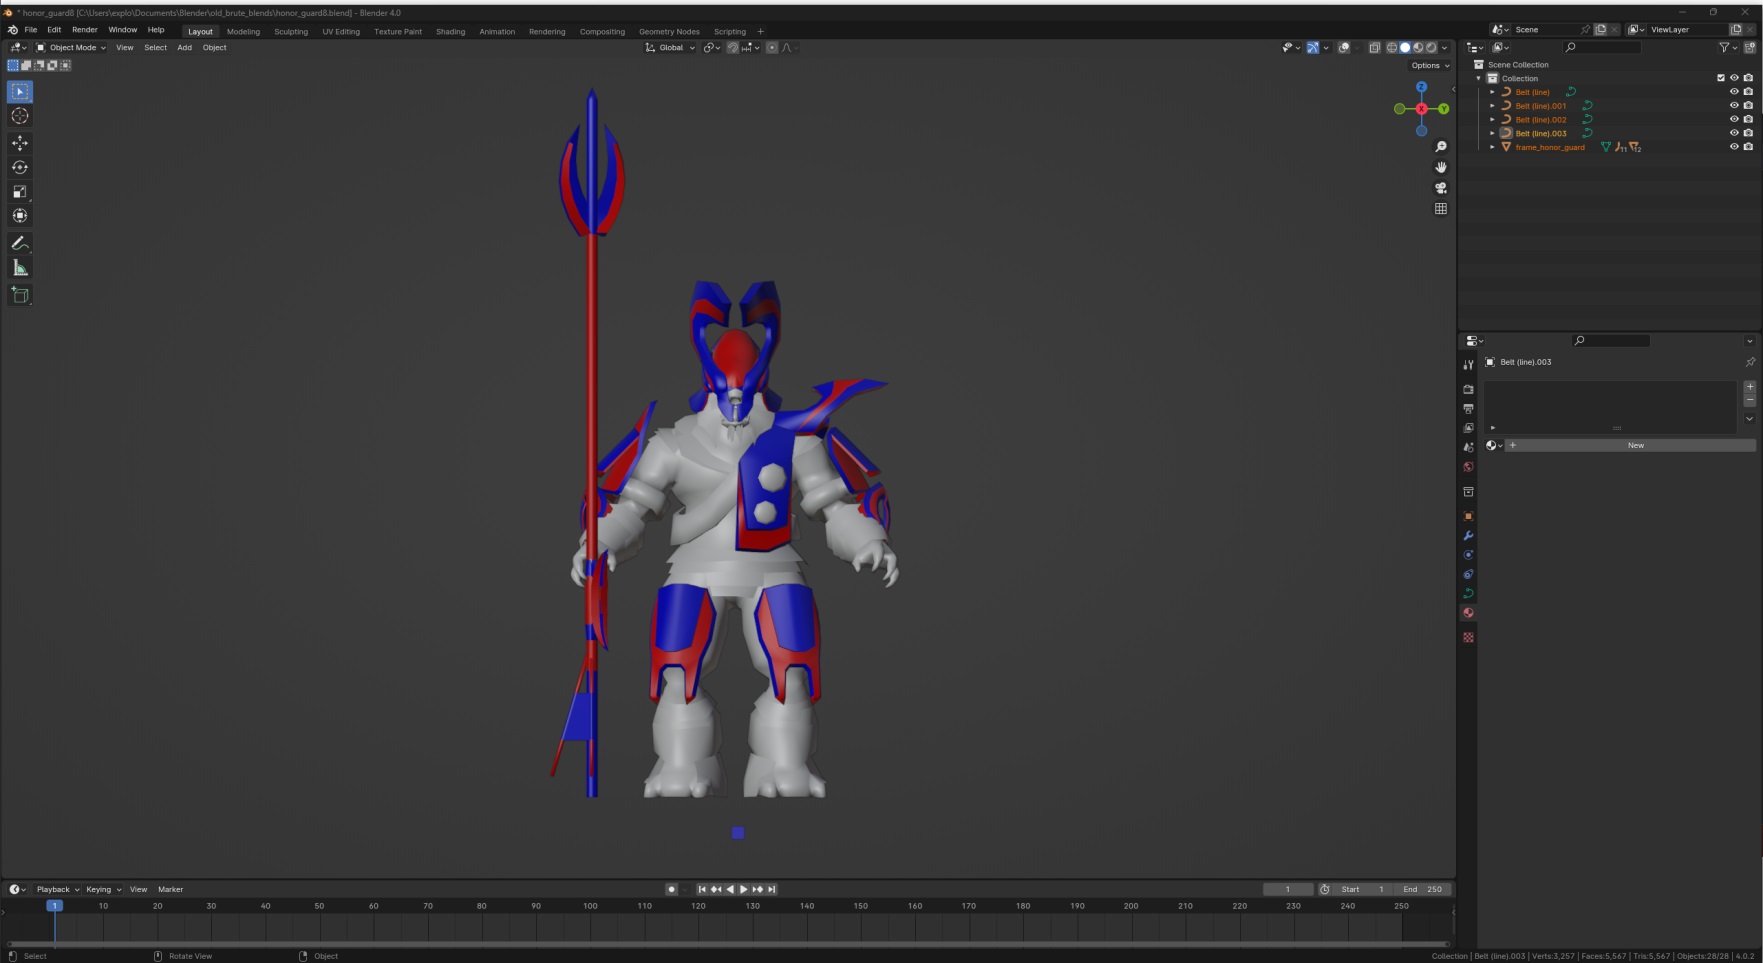
Honorable Guards
Not all WIP character work gets to be featured as Digsite content. Some of it is too esoteric, complicated, or simplistic to be worth more than a “neat!” even from the team. But sometimes we see things that are so interesting that one or more of the Digsite crew really digs in and does something special with it—going above and beyond what even Bungie themselves did.
Such is the case with the various Honor Guard permutations we found in the working folders that were then given proper UVs, textures, and rigging for use in Halo 2! This was a substantial amount of effort, and a real labor love for the Halo community. Krevil did a full pass on the Brute Honor Guard armor working files to create over a dozen permutation variants that make use of designs from early months of development all the way to pieces that were cut just before retail went gold.
Honor Guards
Example Halo 2 Brute Honor Guard ideation. (Bungie concept art by Shi Kai Wang.)
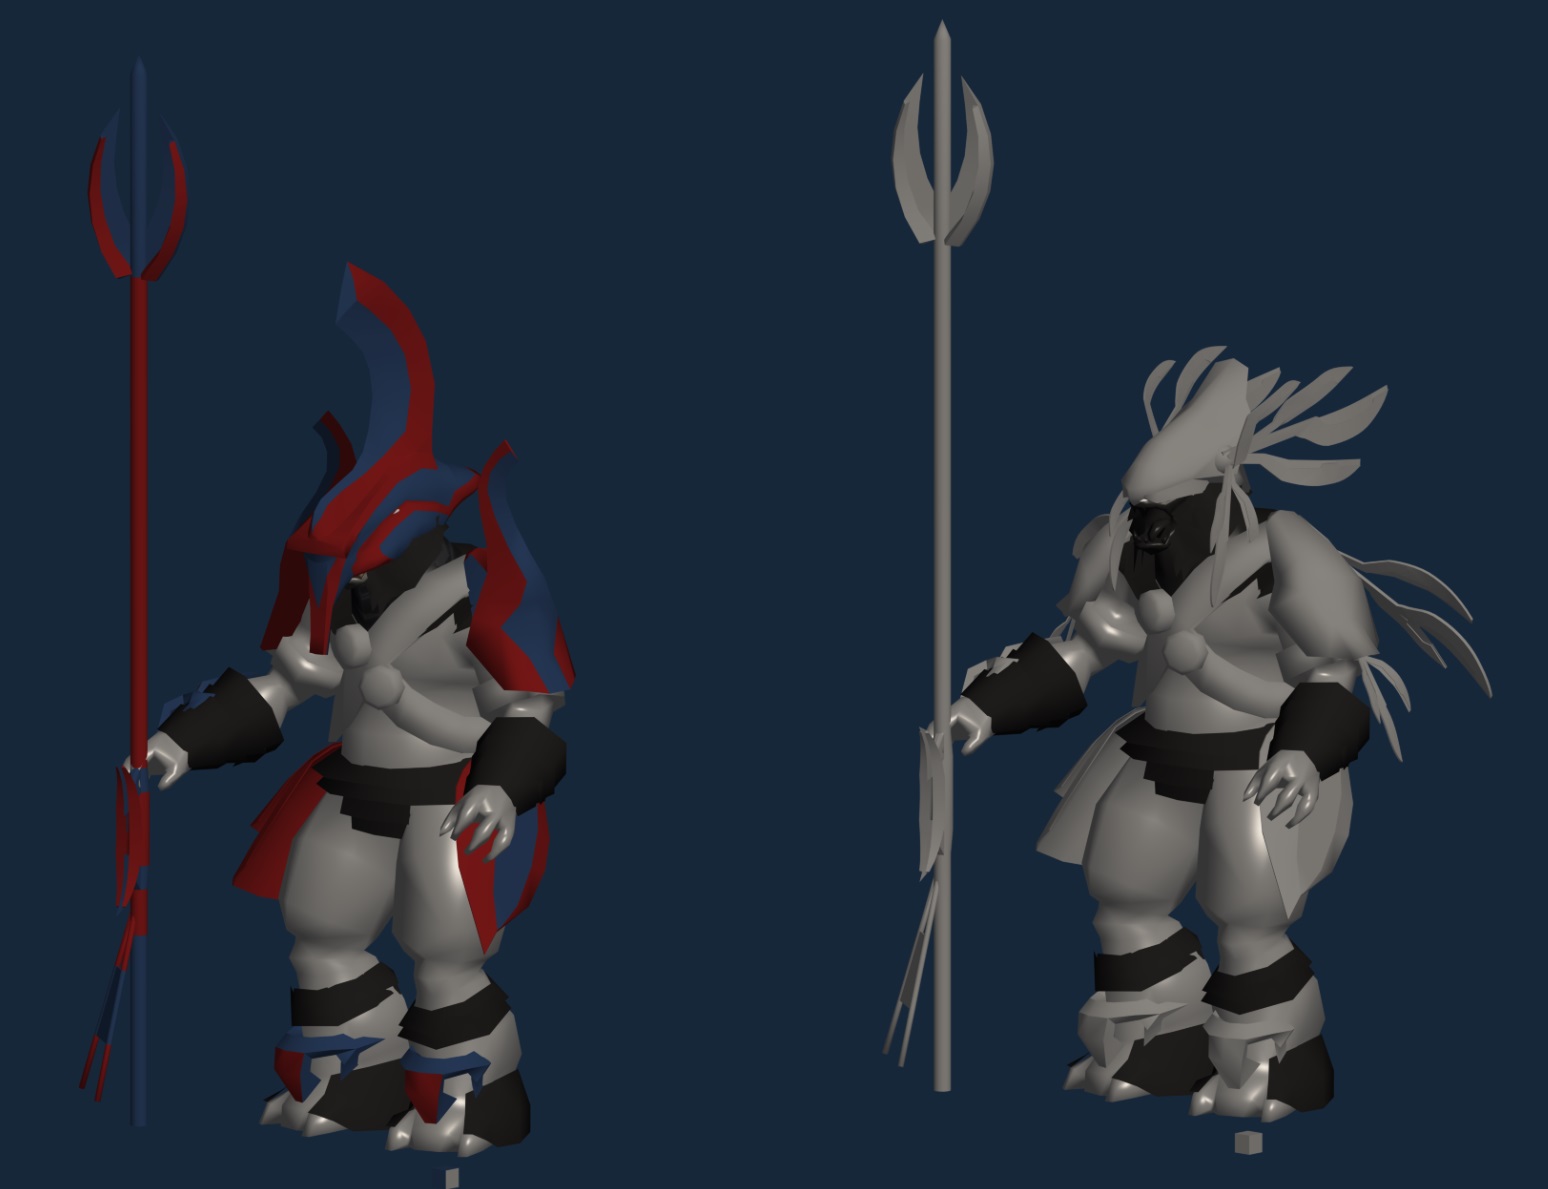
Bungie 3D concepts for Honor Guard armor.
Krevil painstakingly reworked the Bungie concept models into retail-ready armor pieces.
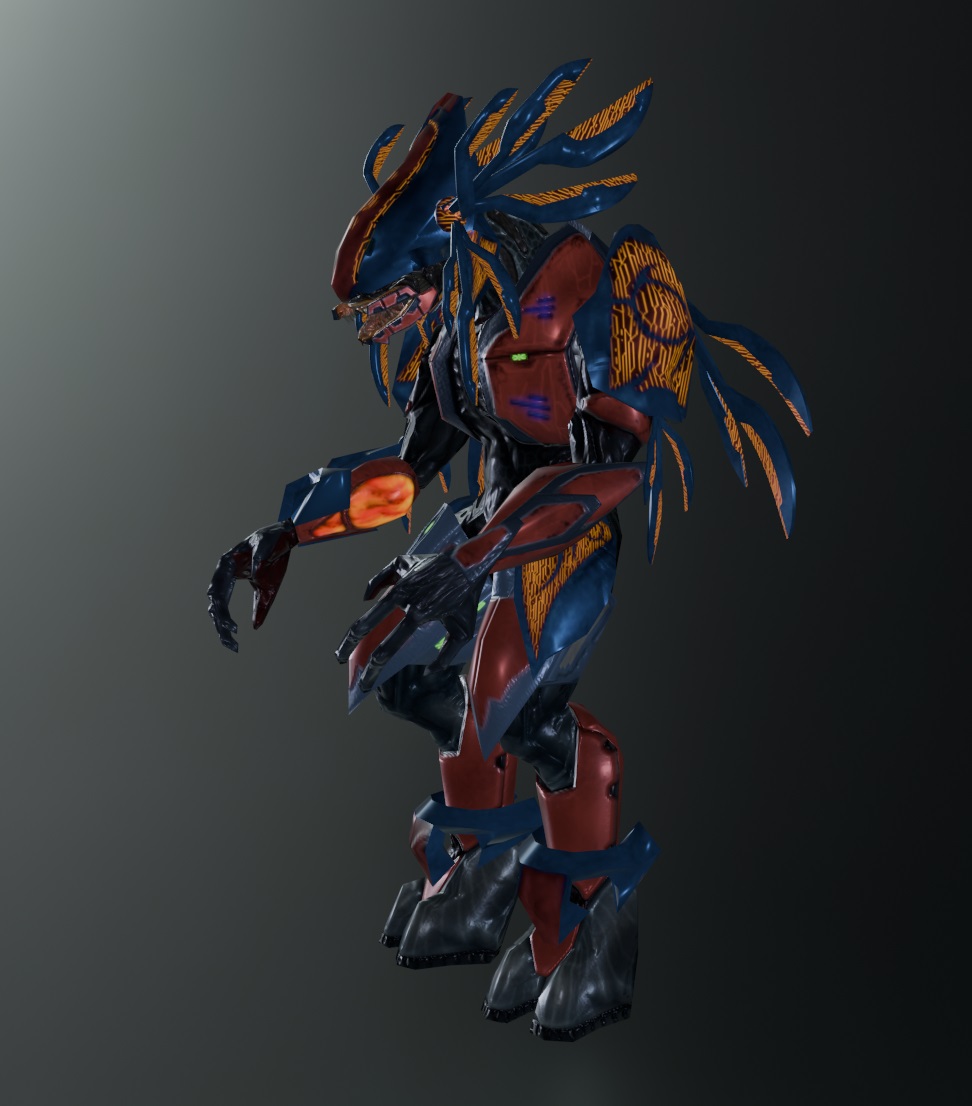
Test render by Krevil to show how (scaled down) pieces of the new Honor Guard armor would look on an Elite.
HALO 2 MAPQUEST 2: THE SEQUELING
We’ve covered the Milestone maps in depth earlier, but I want to call out the work done by the team to get more Bungie and Certain Affinity multiplayer test maps converted and fixed up for use by the community! These provide fantastic starting points for budding MP designers as you can benefit from the early thoughts and ideas of the original Halo designers and see paths-not-taken (and some that should never be taken).
Bloodgulch_test As it says in the name, this was a port of the classic CE map to Halo 1.5/2 for development testing and use as a playground for new vehicle and enemy types.
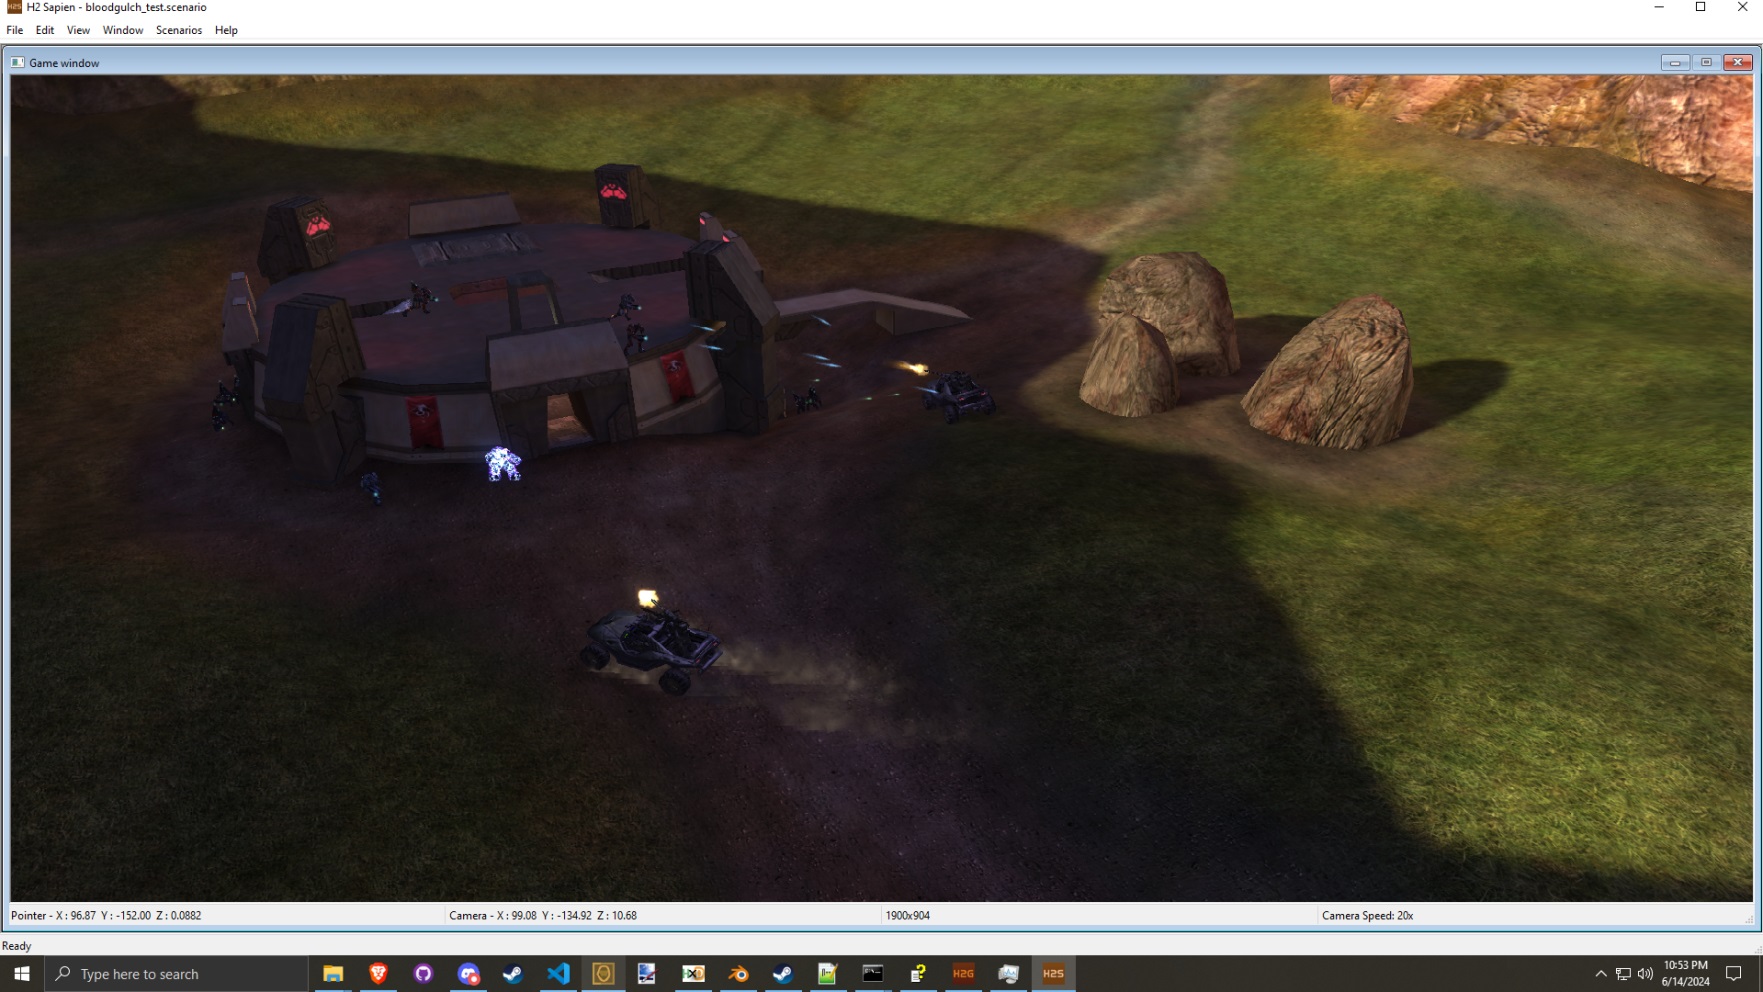
Ol’ stompin’ grounds.
Evergreen
You’ll see a strong family resemblance to the map Containment with this map, though it does play with ideas that ended up being shelved with its retail sibling.
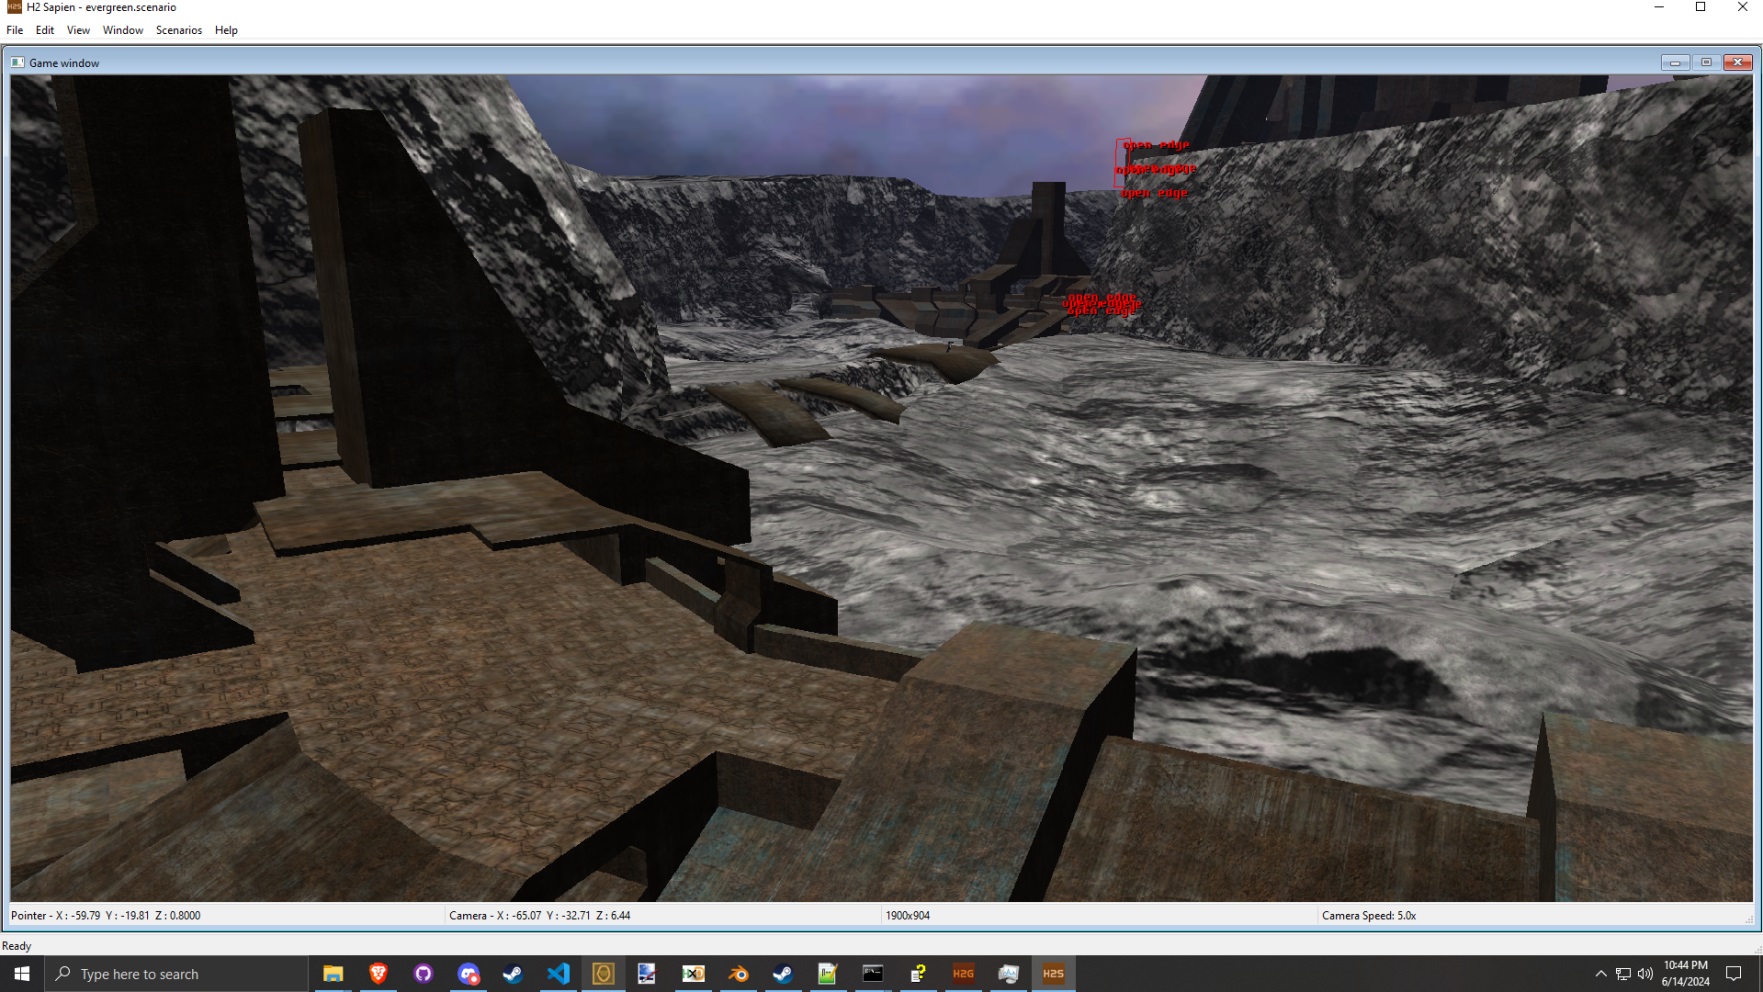
The name is ironic.
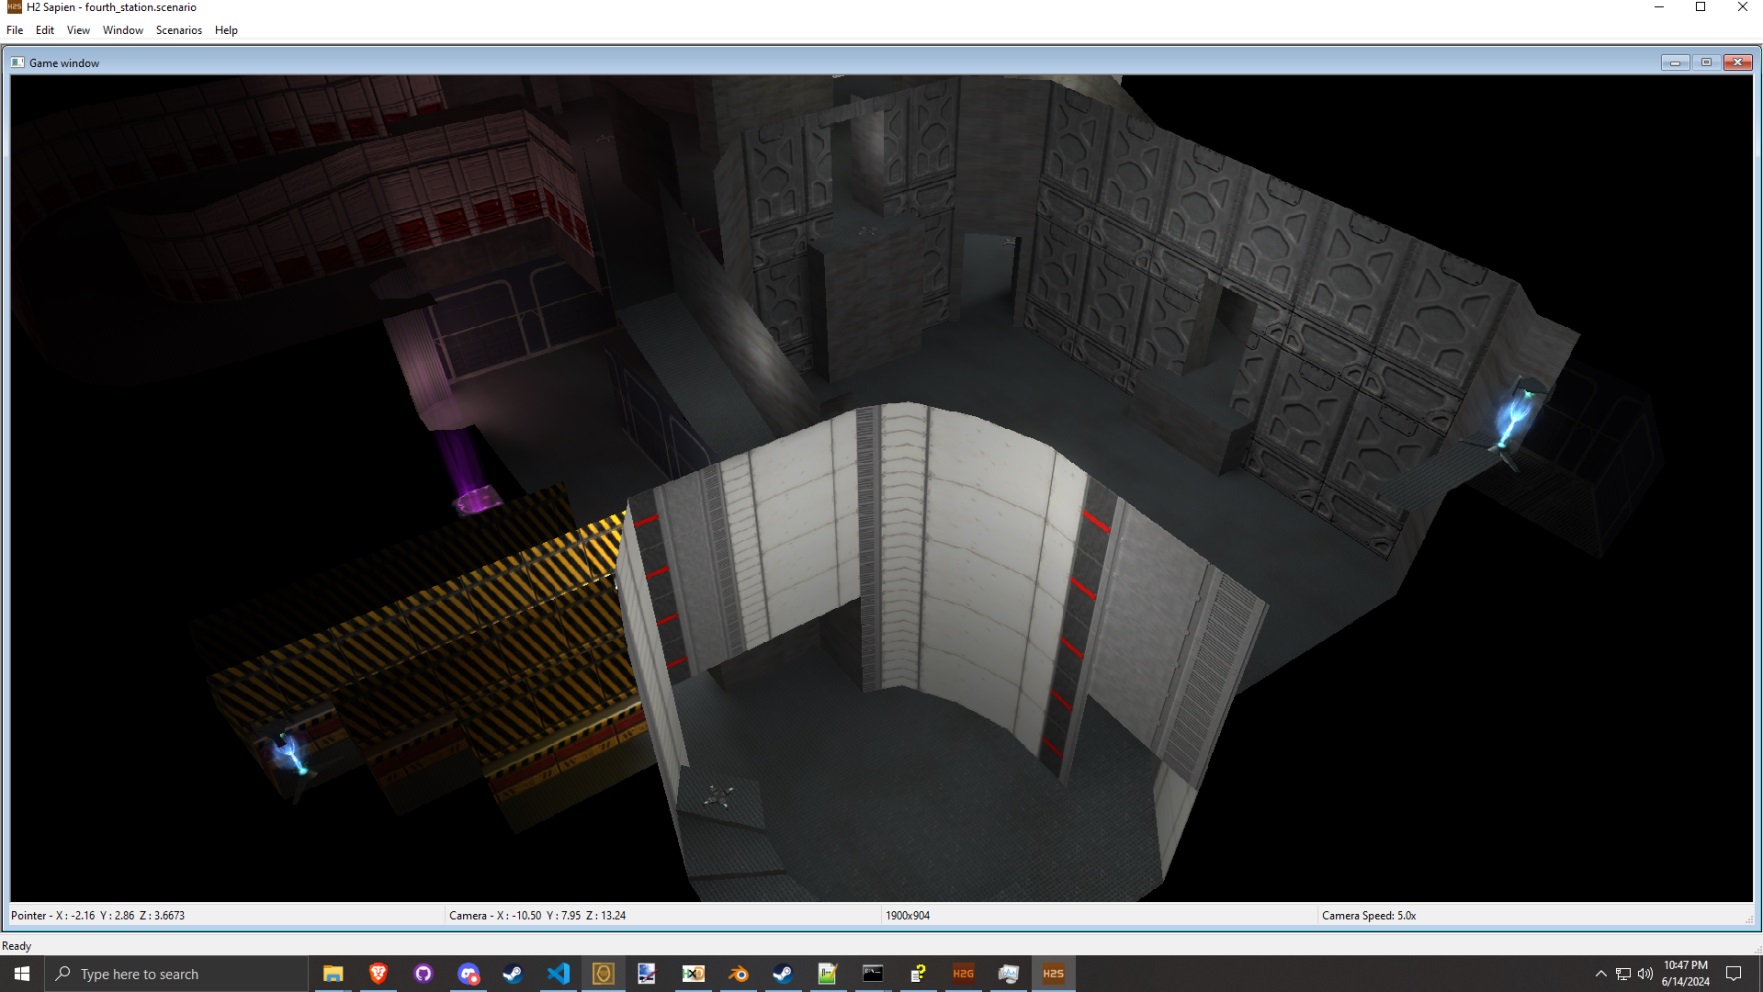
Fourth Station
One of the DLC maps concepted and designed by Certain Affinity but never released, this is an adaption of the “Mars Needs Women” multiplayer map from Marathon.“Fourth Station is primarily a FFA Slayer map, and the qualities that made it so good for this game type in Marathon will be preserved. However, a lift will be added at one point to create an alternate way up to the second level and a much more significant loop between top and bottom, and also to better facilitate single flag CTF games by creating two points at which a flag bearer can ascend to the second level.” – Max Hoberman, Fourth Station Design Doc
Gauntlet
This Bungie map was teased by Max Hoberman last year and now we have the chance to make it public. The map itself has some interesting visual divergence from the one concept\design image we have for it, so try out some biome remixes!
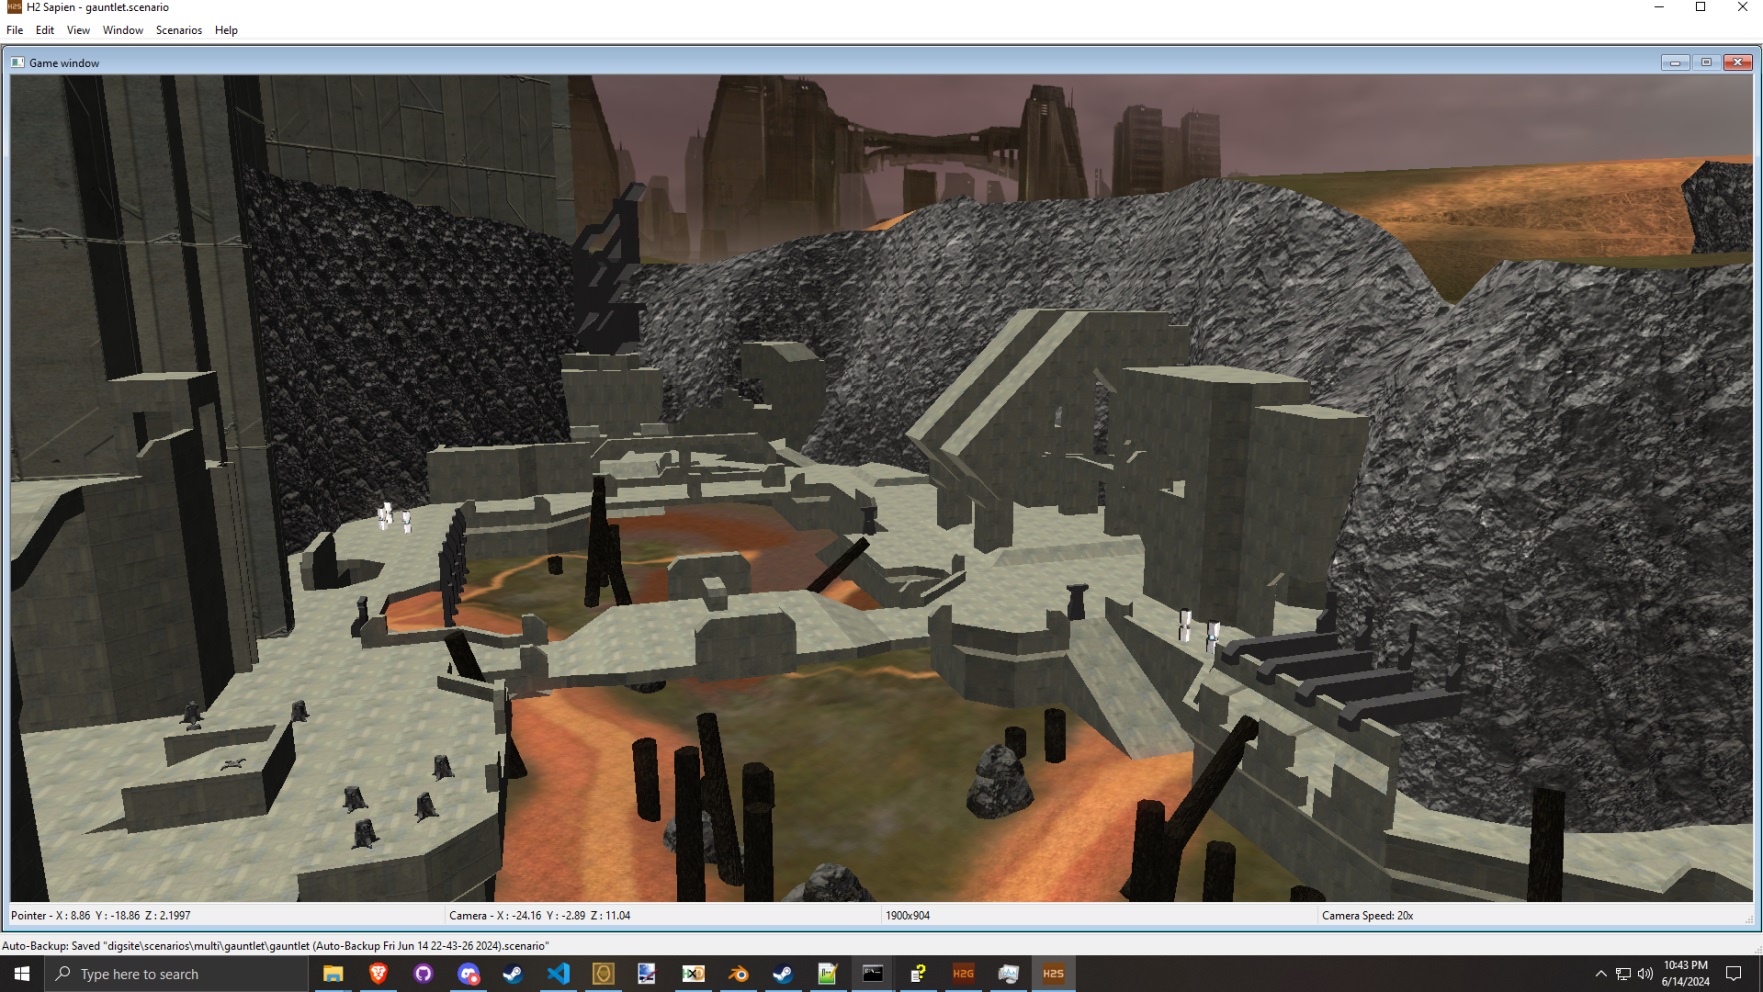
Getting Gauntlet ready for release.

Gauntlet rough layout. (Bungie design image.)
Missile Beach
A map design and concept that survived into Halo 4 but never quite got refined for release, this Missile Beach iteration was worked on by Certain Affinity as a potential DLC map.
“Missile Beach is a natural terrain box canyon in the vein of Blood Gulch, but scaled down so that it’s appropriate for a faster-paced medium-sized game. The map is an elongated oval, but unlike Blood Gulch it is not symmetric, and is instead designed for single flag games and a smaller player count. The center span of the map is split by a deep chasm which can be crossed by a light bridge in the center, natural bridges middle top and middle bottom, and high walkway paths along either end.
Missile Beach incorporates aspects from Wall of Cotton for CTF and Assault games, in that the defenders start in an easy to defend forward position and with heavy firepower, putting the attackers at an initial disadvantage. This position, a series of structures controlling a central bridge, is far forward from their flag base and respawn, slightly closer to the attackers’ respawn, making it hard for the defenders to reinforce it when they die. Furthermore, the central light bridge is initially inactive (always active for Slayer), but once turned on cannot be deactivated. Since the attackers have a vehicle advantage (both quantify and respawn), once this bridge is activated the position is no longer tenable and the defenders are forced to fall back to their secondary defenses in and around their base.
Rather than the rocket launcher this map uses lots of Brute Shots, but also features the very first ever use of the Fuel Rod Gun from single player. The shot from this gun will have to be modified so that it’s not a framerate killer. The gun will be included by default, but will have to be classified so that it disappears whenever the player uses a weapon replacement set.
We will consider giving the attackers a Banshee, though playability and performance will need to be evaluated. We may also consider resurrecting the Banshee bomb exclusively on this map—enough cover, turrets, other vehicles, and heavy weapons may be able to balance it. Optionally we can give each Banshee a single bomb if it’s too powerful.
We may also create a new variation on the Warthog, the passenger hog, for quickly moving troops to the front line. (Art already exists for a turret-less Hog but it needs the seats set up.)The attackers will have Covenant vehicles, including a Wraith. Even though this is problematic on Terminal we’d plan on attempting it, and believe that many of the problems with its usage on other maps can be addressed by giving it to attackers instead of defenders, through the constraints put on it by the light bridge and other choke points, and by surrounding it with infantry-only areas, especially on the defender side of the chasm where it must eventually move to in order to assist with offense.” – Max Hoberman, Missile Beach Design Doc
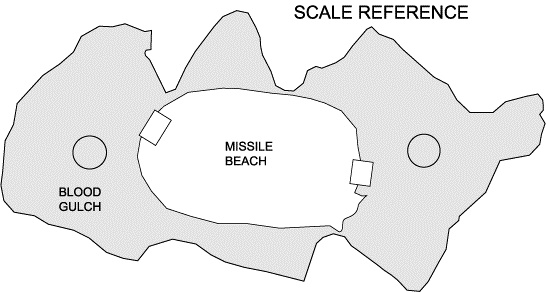
Missile Beach scale reference. (Certain Affinity design image.)
Solitude
This took a bit more work than initially expected to get to a level of visual polish we were comfortable with, but it’s certainly one of the more “experimental” maps we’ve found through Digsite. You can see elements of Ascension, Lockout, and what would become Halo 3’s Guardian if you squint.
“Solitude is a hybrid of our two most popular small maps, Lockout and Midship—while it boasts Midship’s symmetry, it borrows heavily from Lockout’s patent figure eight, two main levels plus rooftops, and many ramps and shortcut jumps. Like both its parents it also features an open center, giving it an arena feel.
Structurally Solitude is most similar to Lockout. The entire area is arranged around an open central platform surrounded by four island towers, each separated by ramps and Lockout-style jumps. The central platform has a lower level, as do the side towers, and these towers are interconnected in pairs. Unlike Lockout, Solitude is symmetrical, with flag bases on the tops of the larger outside towers, making it good for small-scale classic CTF. A large hole in the center platform drops down to the bottom level, but a player that lands in the middle will shoot back up via a jump pad to the same height as the roofs of the surrounding towers.
Gameplay on Solitude is fast and furious. The level is defined by a large figure eight that interweaves the two main levels, plus it features numerous smaller loops and shortcut jumps, so a player is rarely if ever cornered. Combat is primarily short range, with lots of corners to fight and bounce grenades around, although the open center, open walkways, and rooftop to rooftop battles create opportunities for medium and even long-range battles.For 2-flag CTF games the roofs of the larger towers double as bases, with a straight line connecting them down the middle, across the killing field that is the center. The safer approach is of course the longer one, dropping down to the lower level, grabbing an active camo or shotgun if you’re lucky, and then sneaking in from below. While the cautious defender will guard from on-high, setting someone at the flag itself and another on the roof of the nearby tower, the gutsier will play offensively and never let the enemy near the flag.” – Max Hoberman, Solitude Design Doc
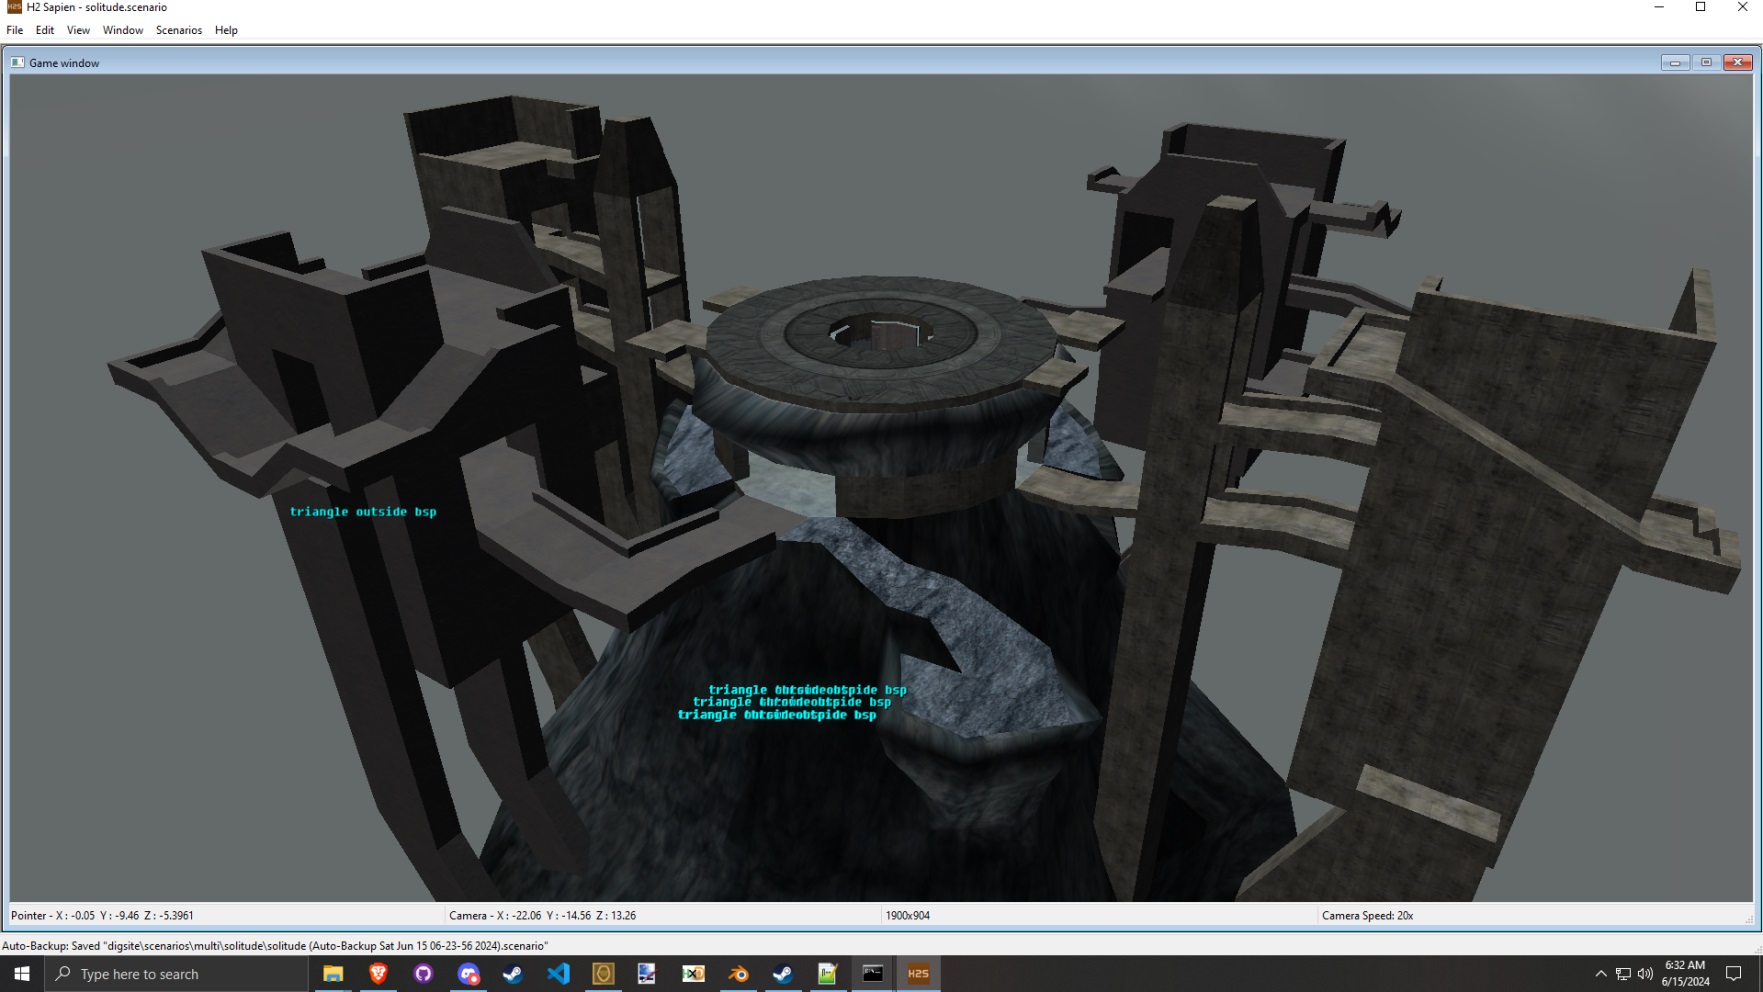
Finally textured!
Sunken Temple
An early experiment in using single-player environments for multiplayer maps. In this case, one of the underwater Forerunner vaults from Delta Halo. Fun fact: this map had been getting work done on it since before Digsite was officially formed!
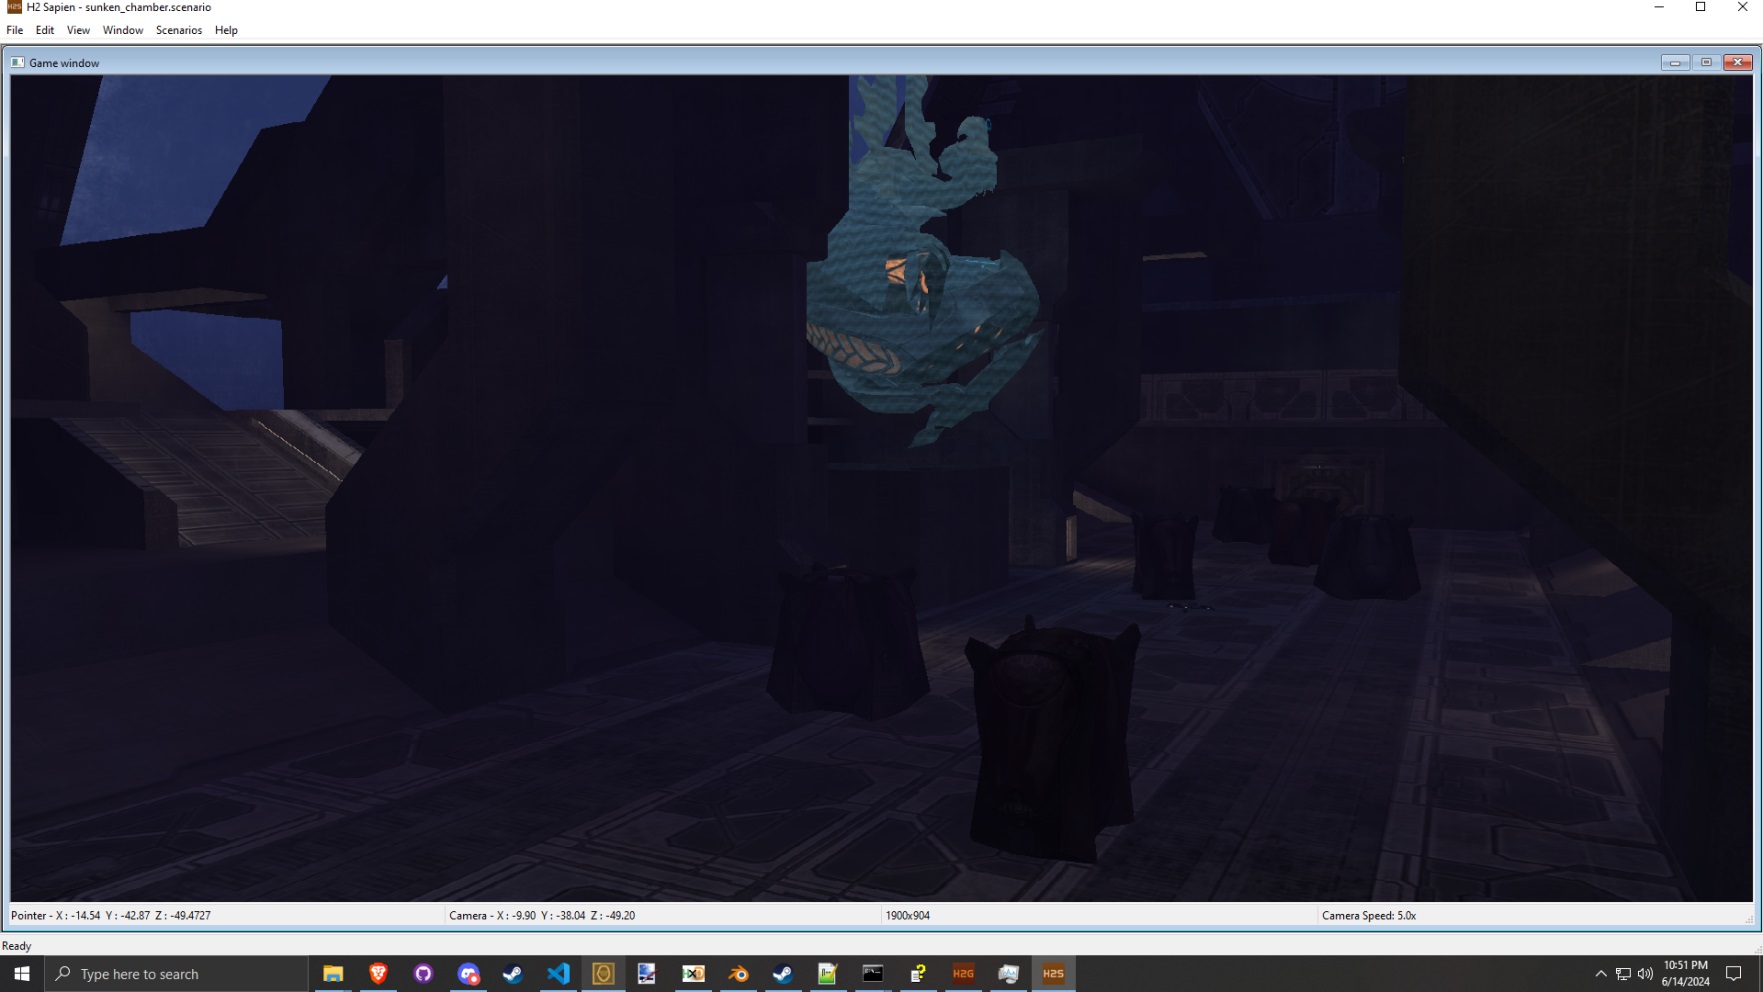
A watery grave.
Timberland
Timberland is similar to the Halo: CE PC map from Gearbox which shares its name but taking a completely different evolutionary approach to work with the Halo 2 sandbox. I have to point out that the map you are getting has had a lot of fixes applied by the Digsite team after multiple rounds of playtesting; the original was… not in a state we would use even as a data-only release. So, huge shout out General101, Why, Cryo, and other rest of the team that whipped this into shippable shape.
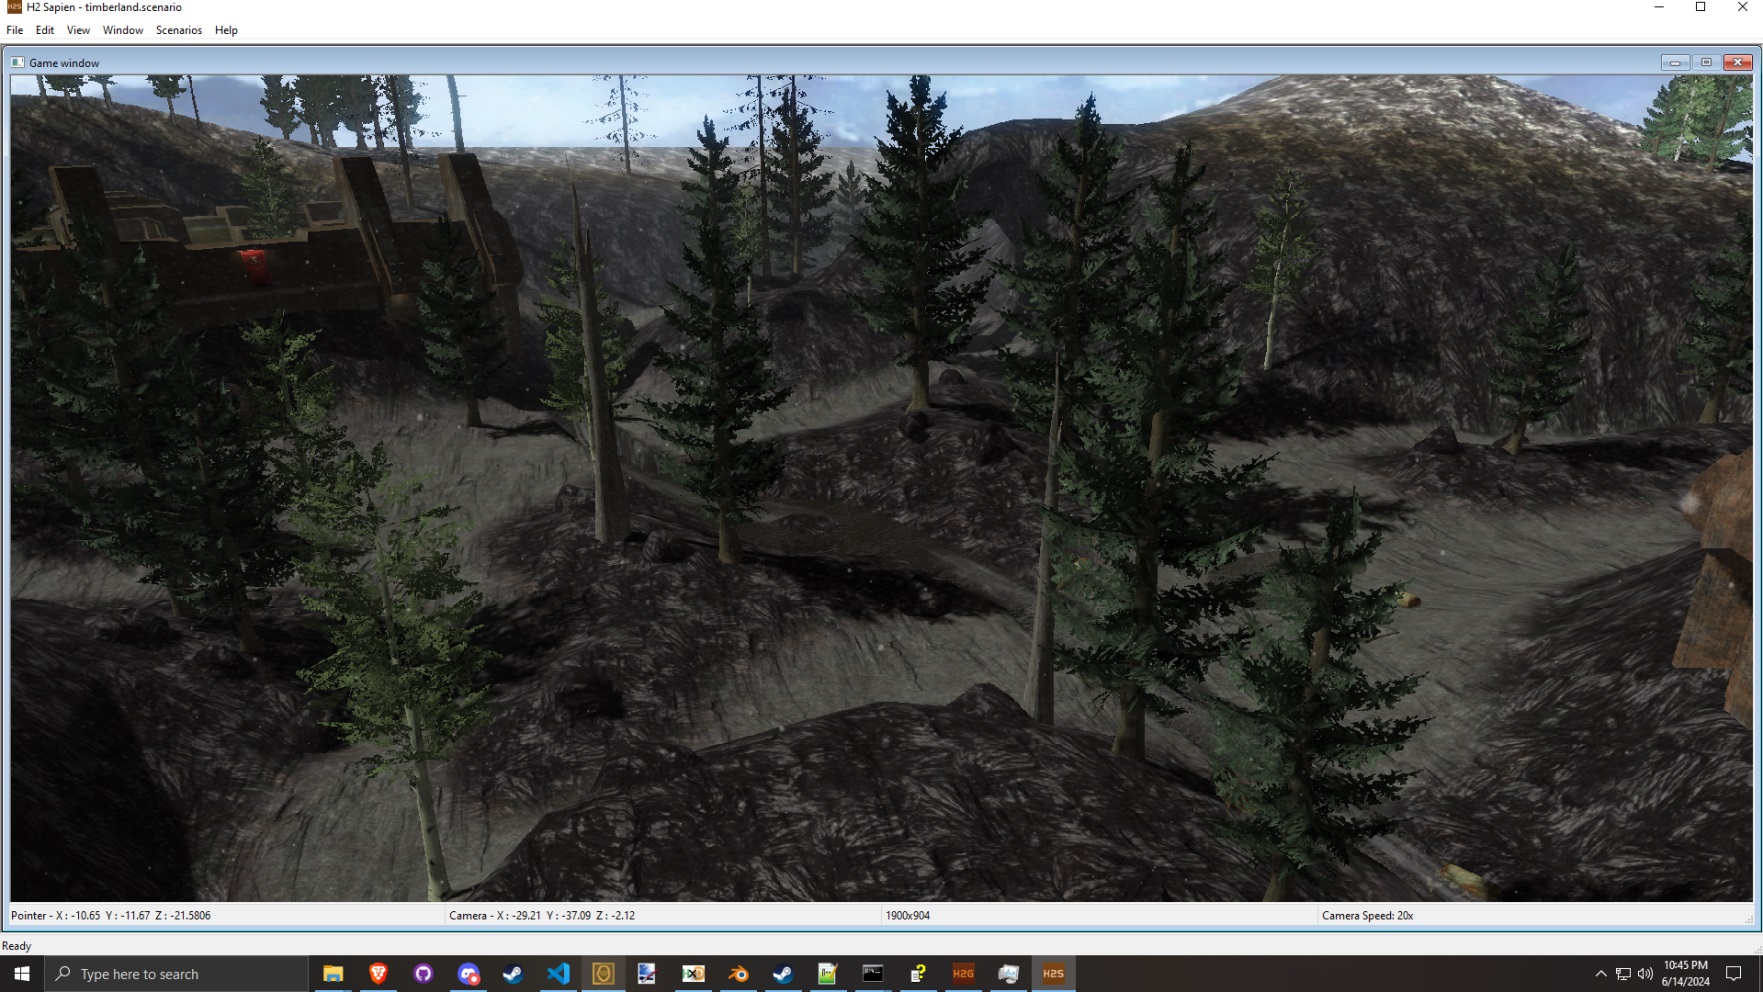
Forest for the trees.

Digsite dev Why put in extra cycles to get the creek looking good, inspired by water in the H2 campaign level Uprising.
Destructo
Destructo set out to be a testbed for multiplayer environmental destruction and the new physics systems in Halo 2, but many of these systems work in the MCC version of Halo: CE.
Urban renewal with extreme prejudice.
Overboard
A last-minute find and addition to this release, Overboard is a very early Halo 2 development map (pre Halo 1.5 it appears) that we don’t believe ever went past the 3D massout stage.
As sometimes happens with interesting new finds, General101 got an itch and quickly converted the map into something that would compile and run in-engine. For some context, this was a 3DS Max development file that had no UVs, broken geometry, and no instancing. So, not the most ideal source data to work from.
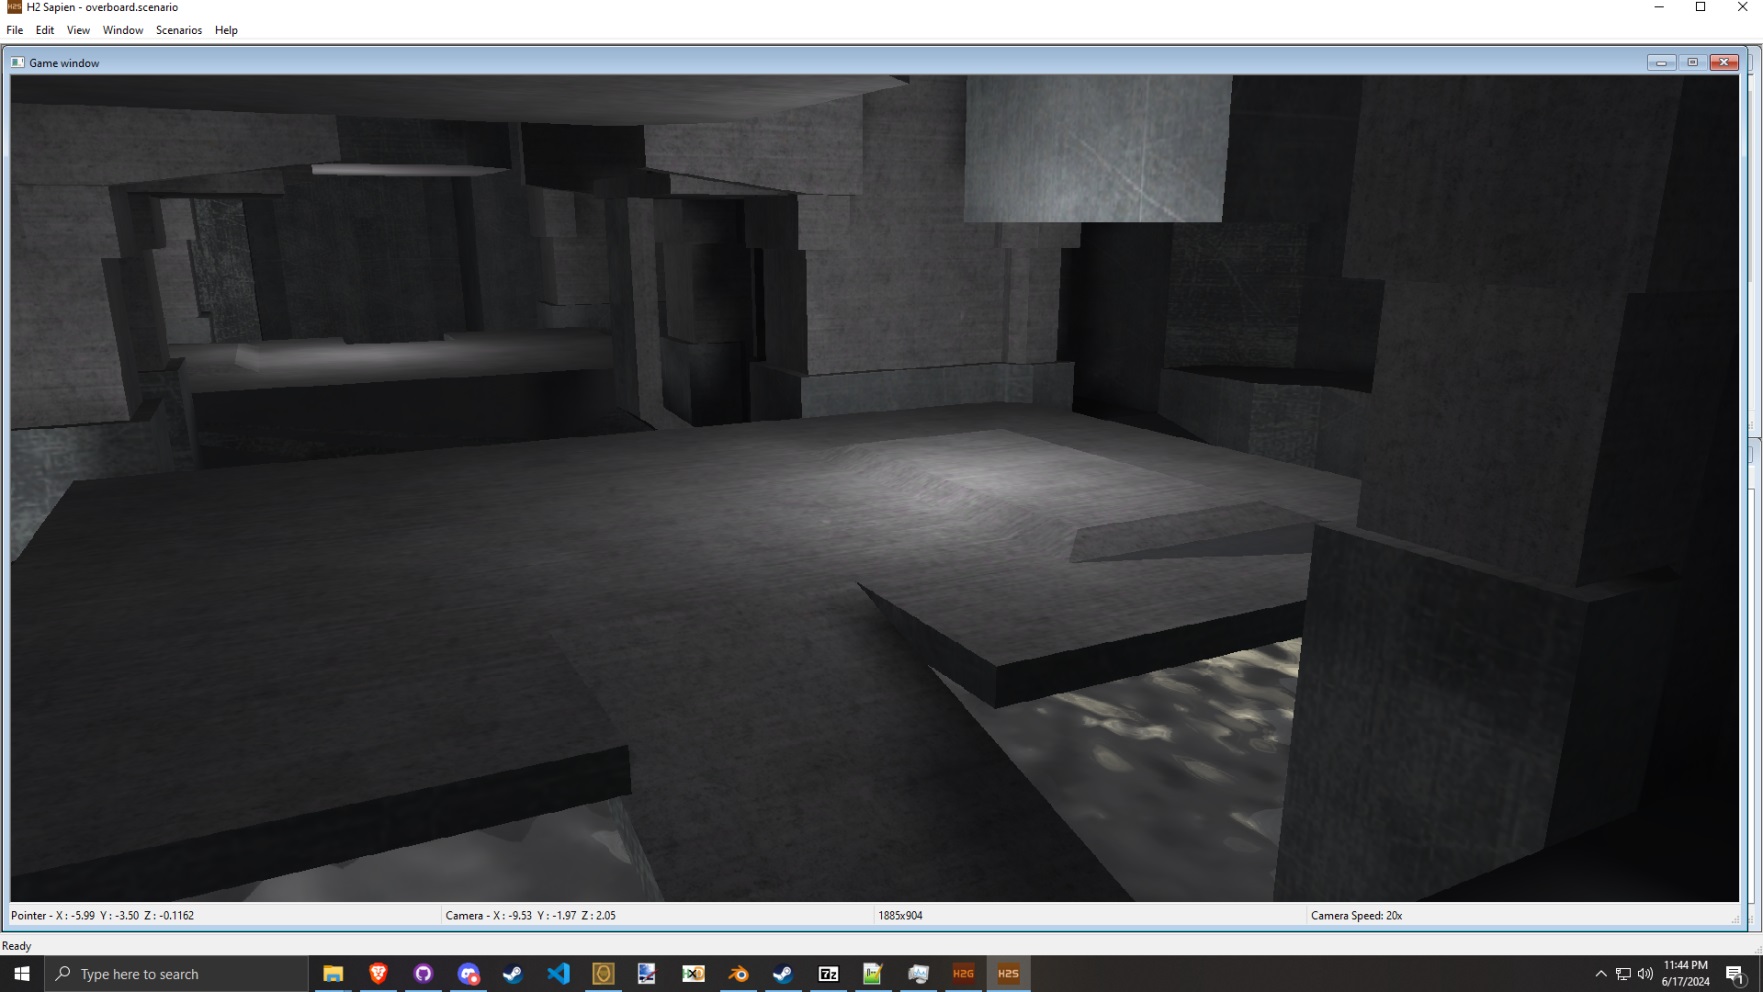
Thanks to General101 you can now walk the plank and visit the infamous Fruit Cellar!
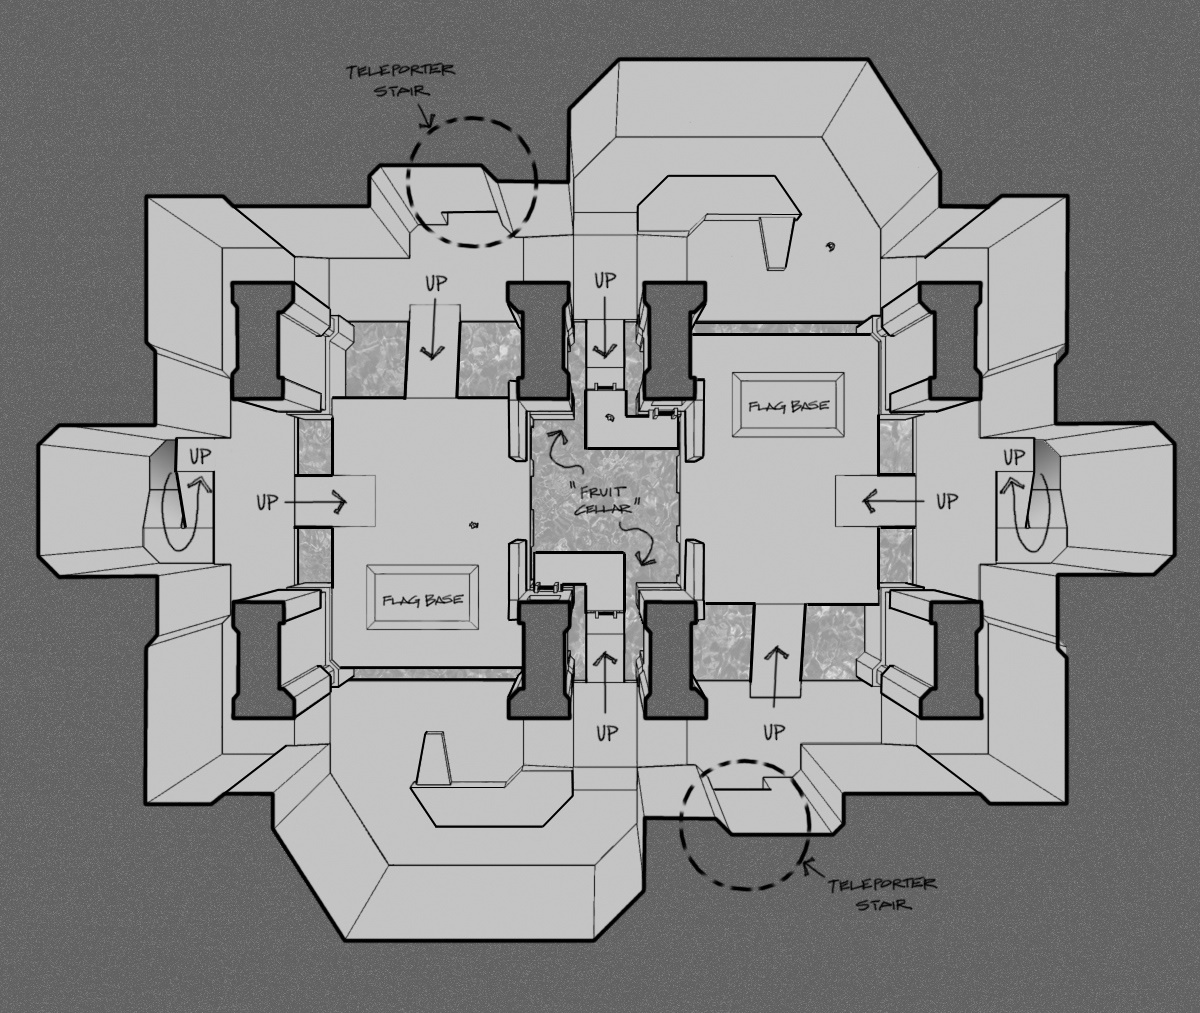
Overboard rough layout. (Bungie design image.)
Perspective section view. Note the H1 style teleporters and ladders (Bungie design image.)
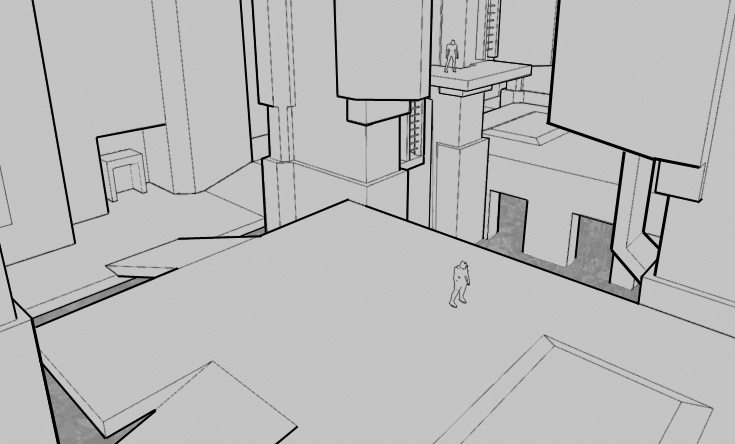
Cloud City
Design cousin to Overboard, this was also a late find-and-repair job that turns a 3D massout into a playable game space. We don’t have a great deal of information on this map beyond the fact that it was designed by someone nicknamed “Danger Boy” in 2002 and intended have a gas giant skybox.
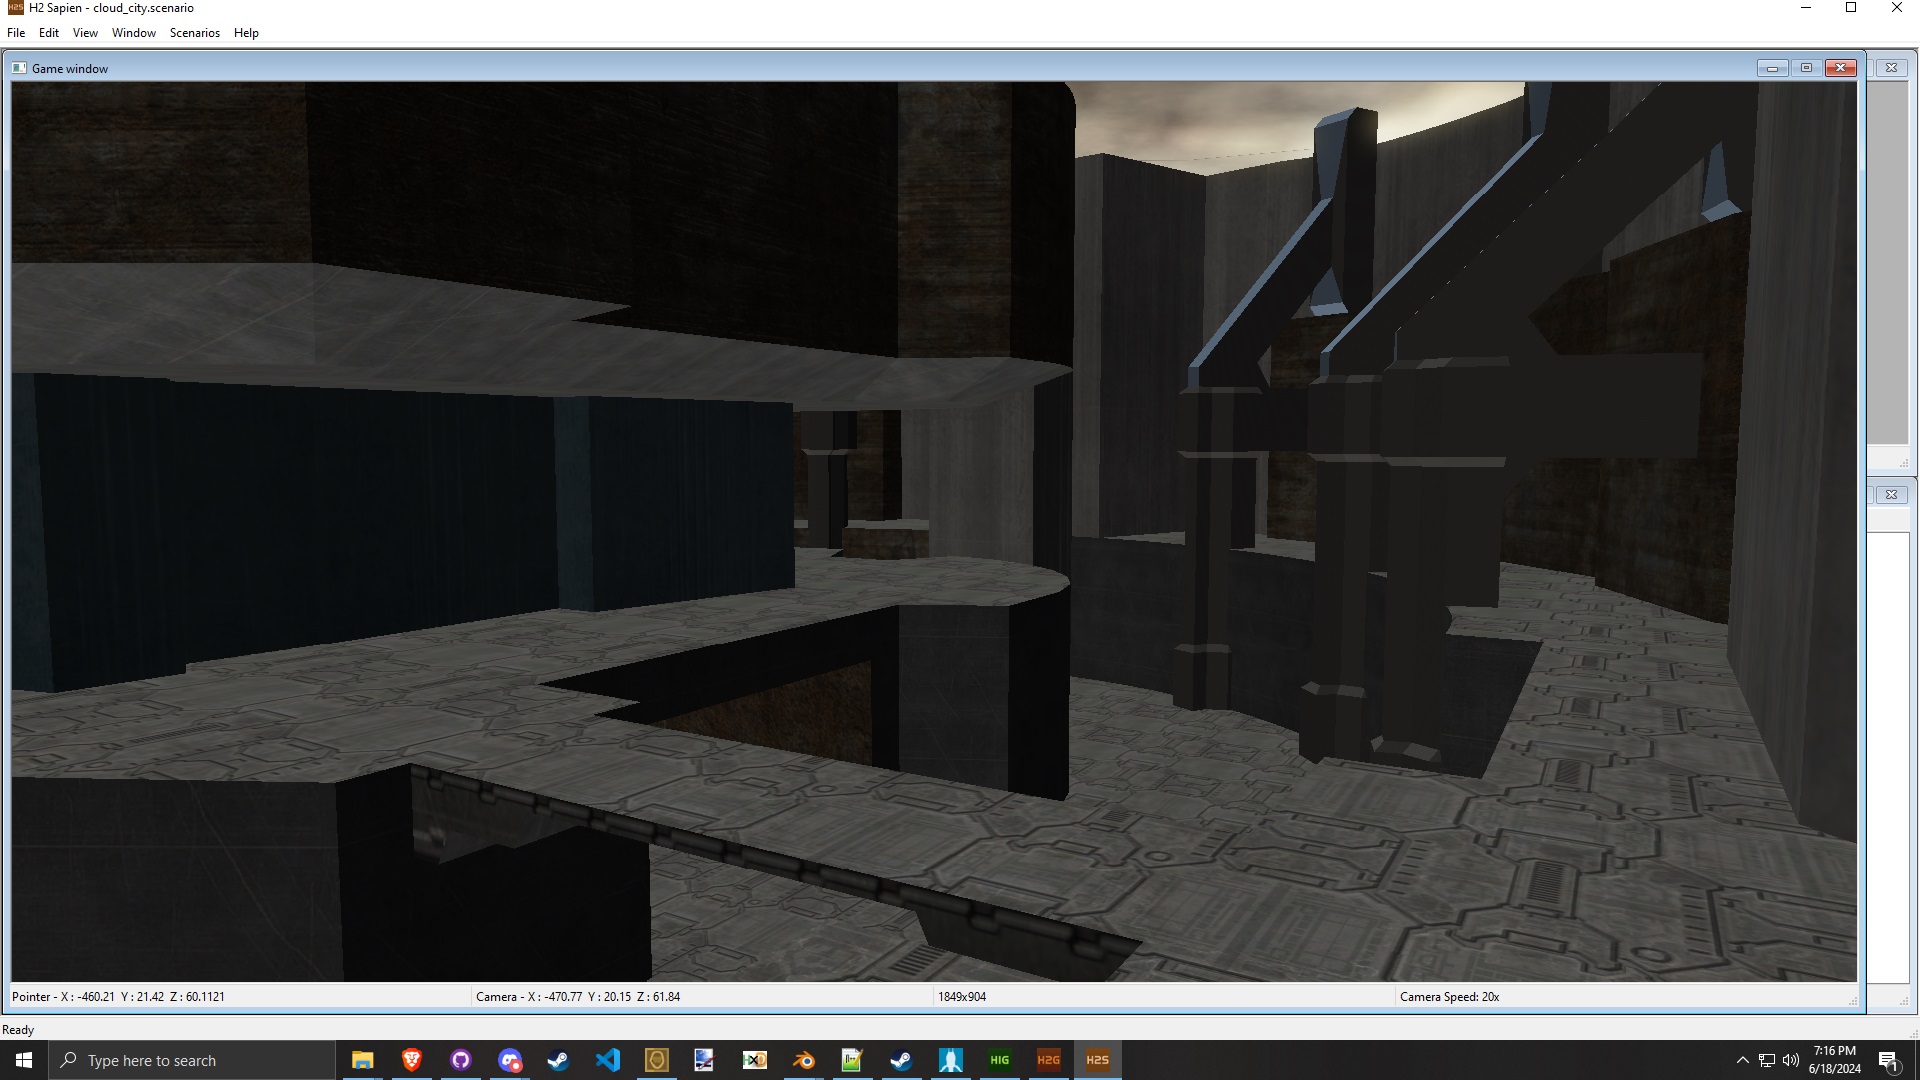
A home above the clouds.
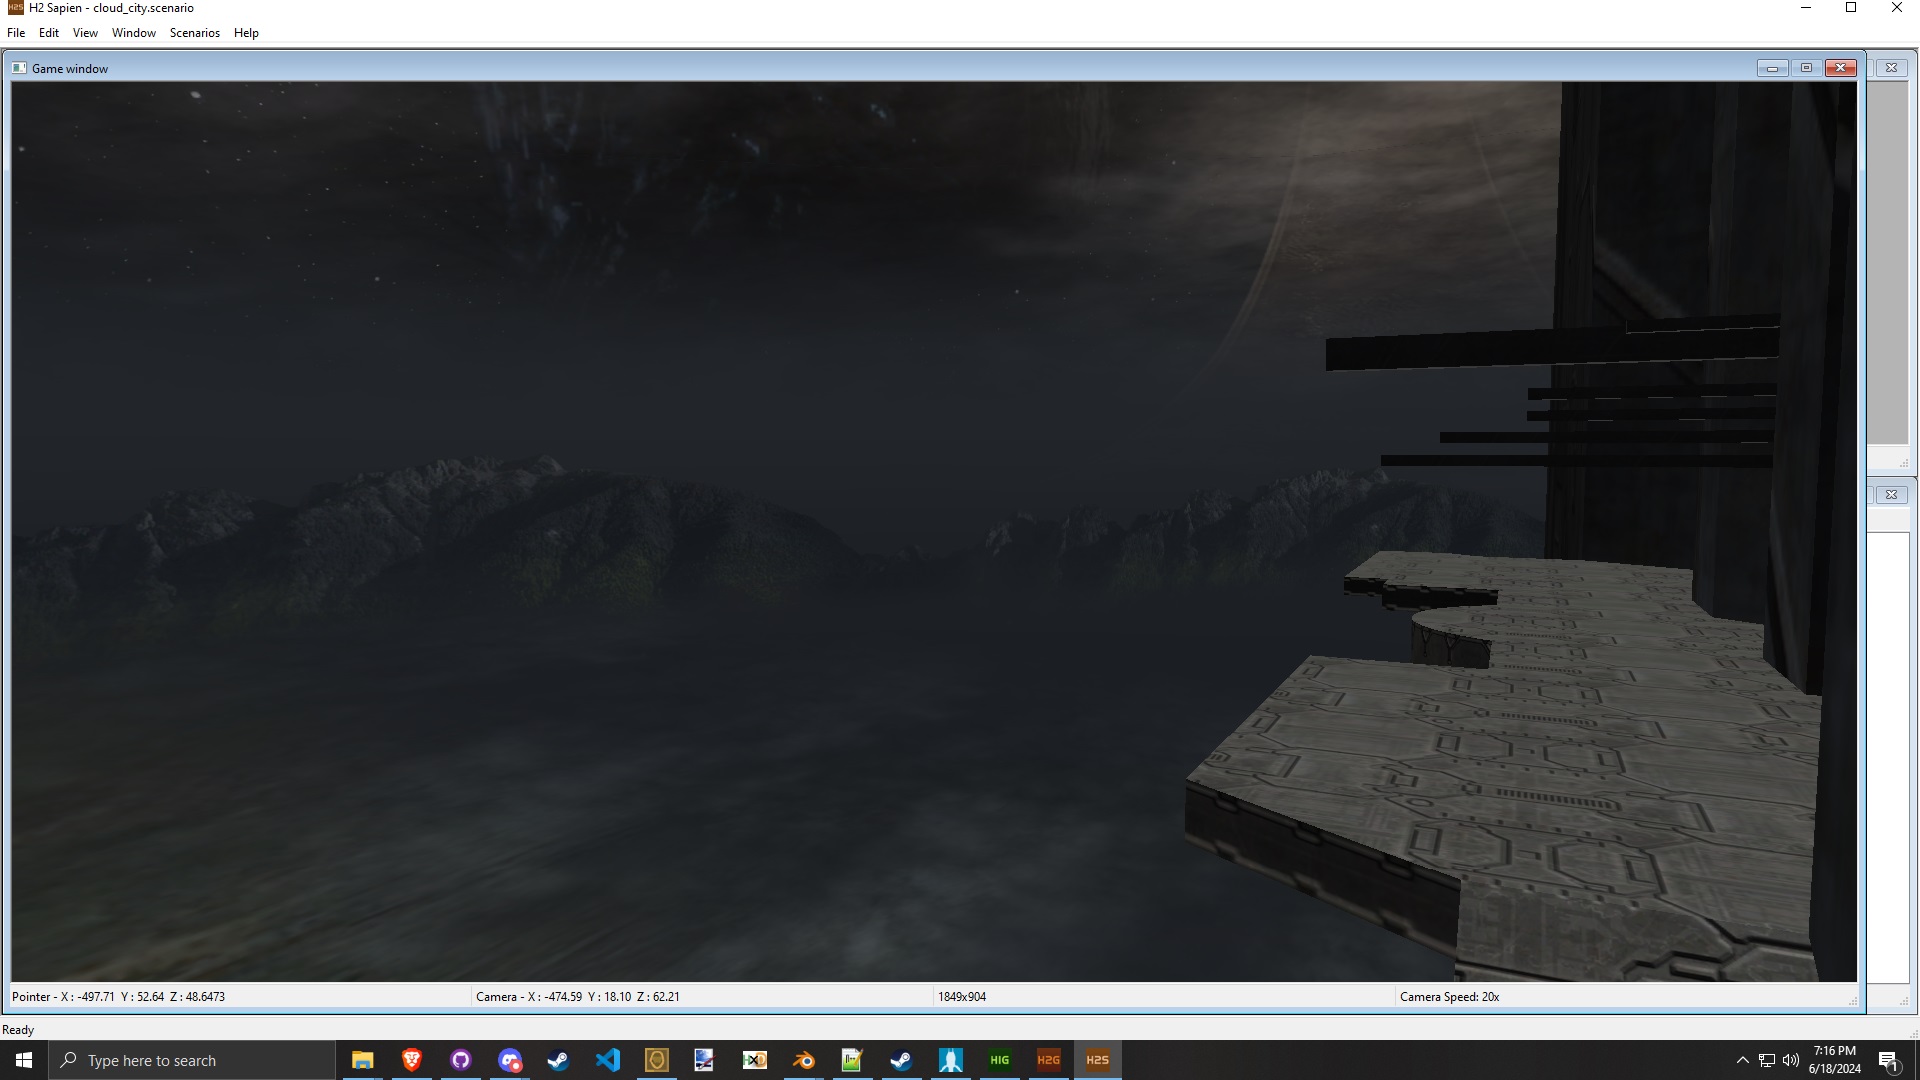
Instead of a gas giant skybox we selected one that is more analogous to what you see outside the Delta Halo containment wall.
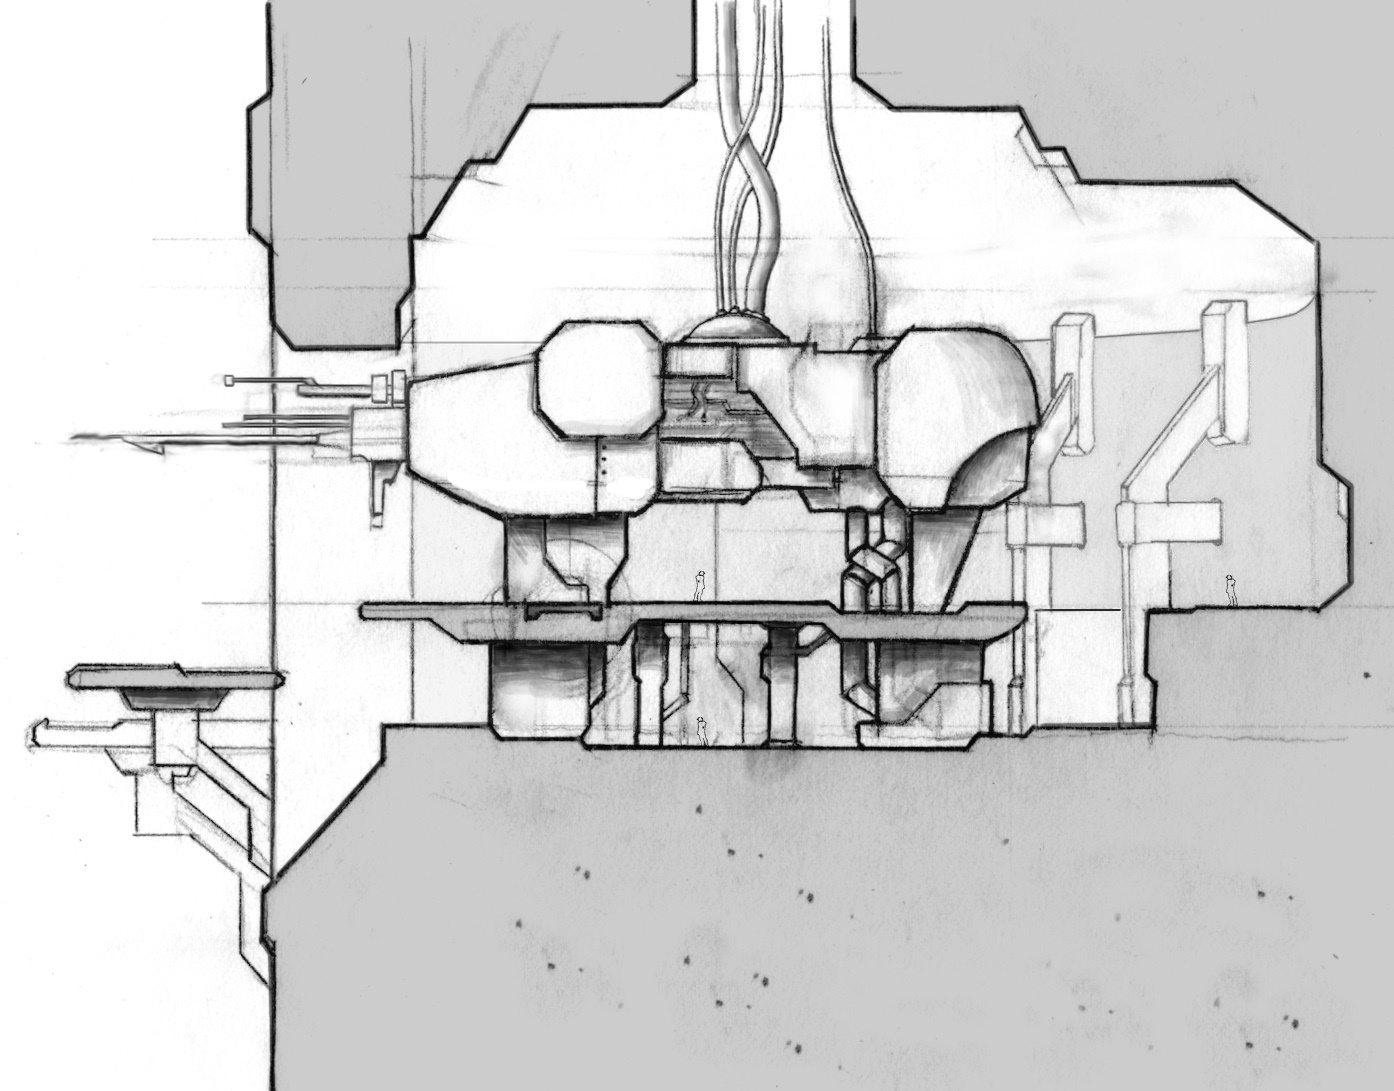
Cloud City side view. (Bungie concept art.)
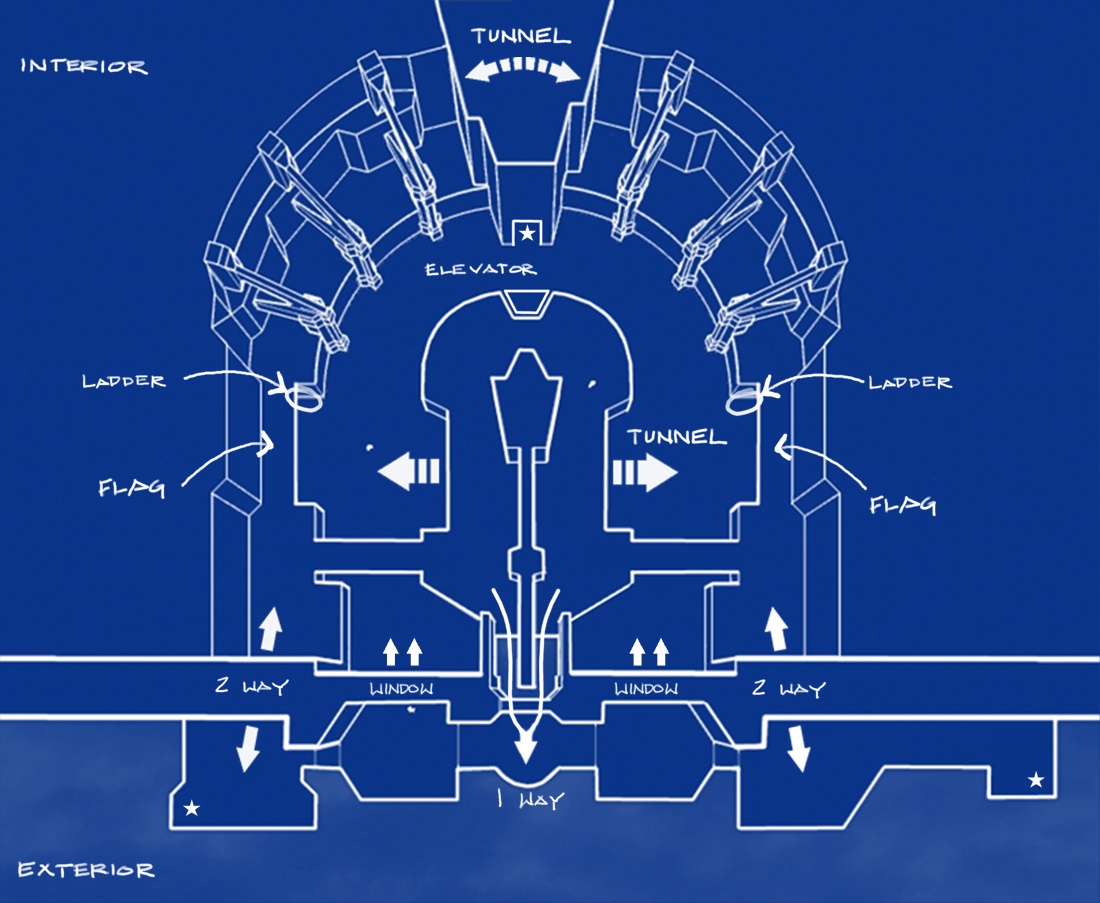
Cloud City rough layout. (Bungie design image.)
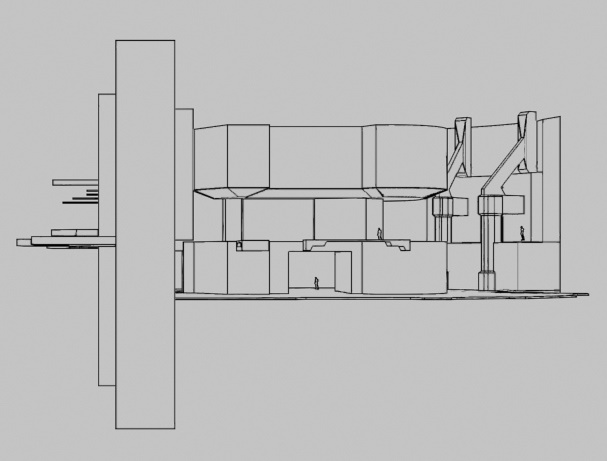
Cloud City section view. (Bungie design image.)
THIRD TIME’S THE CHARM
Halo 3 gets new Digsite love with four maps resurrected and given development love for the fans and modders!
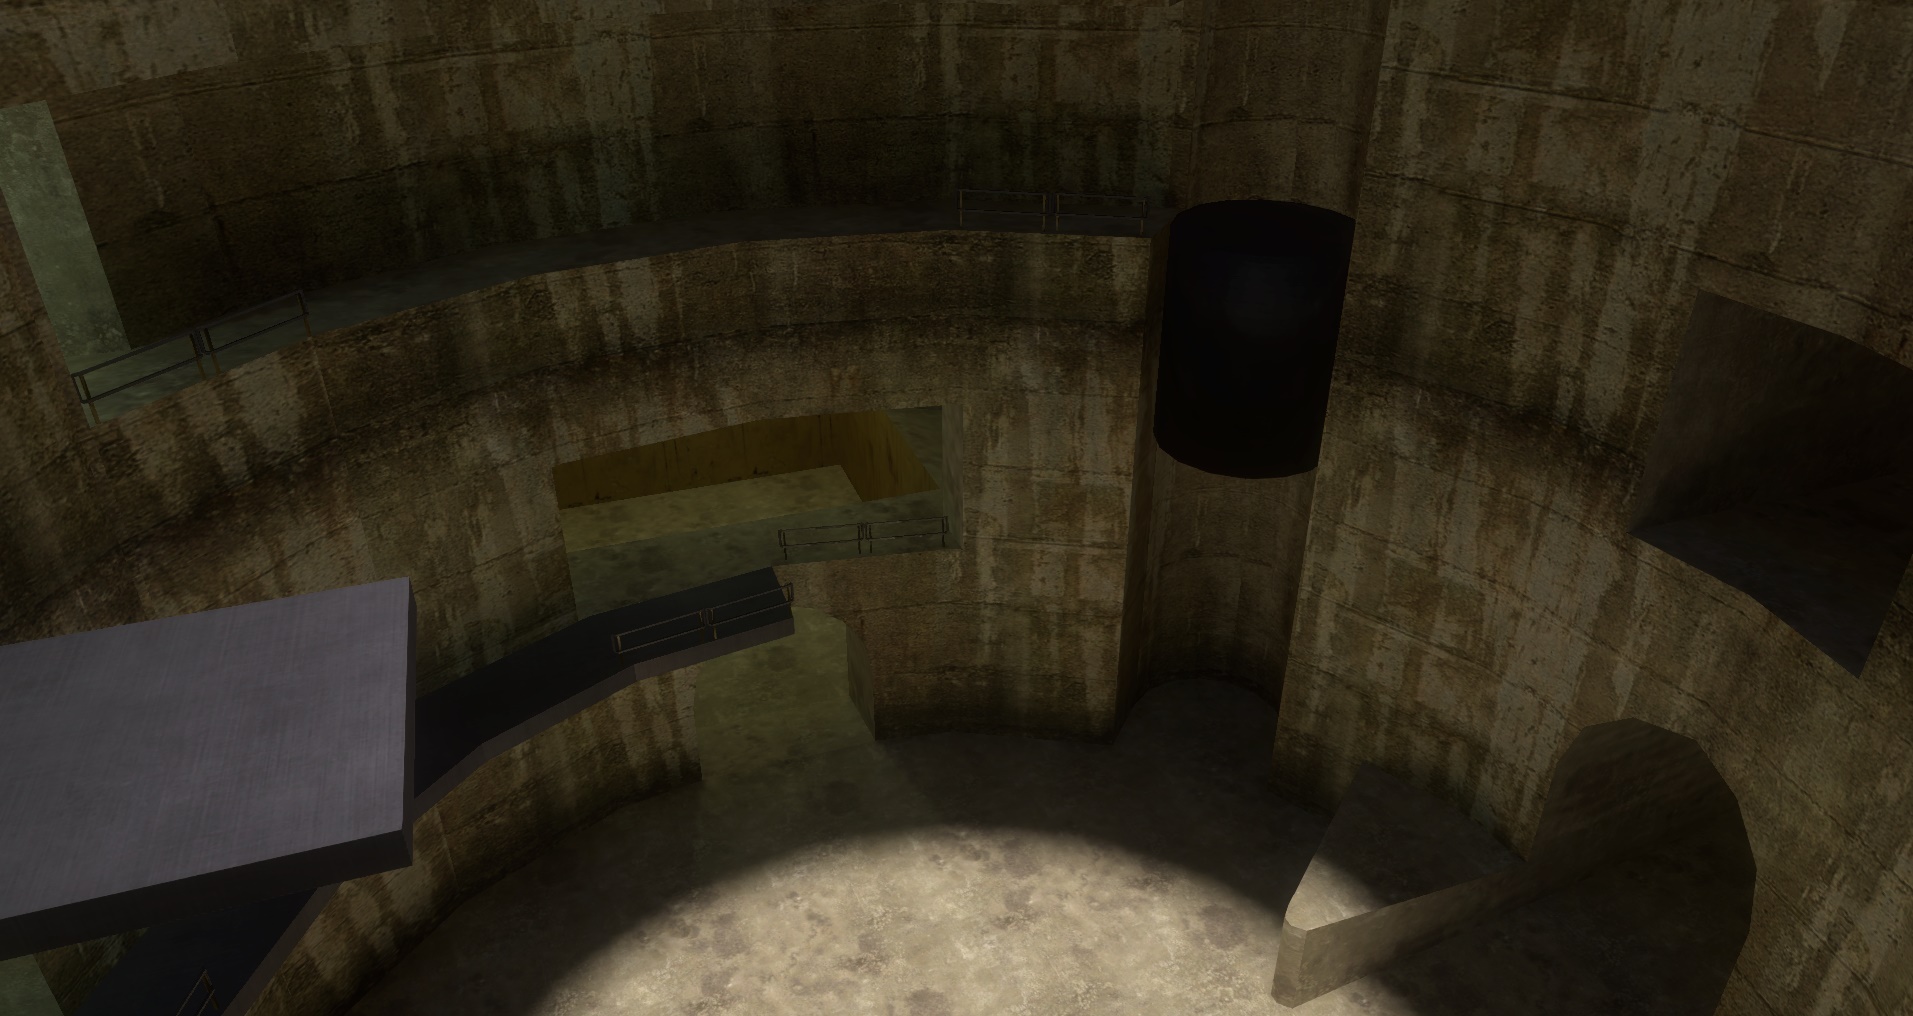
Pump Haus
Pump Haus is a map that's been shown off on Twitter by Max Hoberman, and that helped inspire us to get the map out the door! It's a small map vaguely reminiscent of the sewer area in Crow's Nest meant for 2-4 players, with large machines allowing players access to higher levels.
It puts the BR on its skin, or it gets the SMG again.
Original Design Information
Overview: A massive, underground pumping system sits underneath a WWI-era bunker complex in the hills of Africa. The overall layout is defined by two, multi-story chambers which lie on either side of a large, central storage volume. Small ports, doorways, and tunnels surround the interior of the center container, but vertical movement can only be obtained by moving to the outside edges of the level.
Time of Day: Tunnel interior with distant light above. Large spaces contain a slight haze of moisture.
Weather: Humid, but not oppressive. The temperature is a constant 55 degrees F.
Single-Player Environment: Earth - Secret Base
Spatial Organization: A linear layout with three volumes that are interconnected on multiple levels. All three spaces are joined by small tunnels and ramped pipes which form a type of ghost “roller coaster.”
Orientation: The center volume is perforated by openings that are asymmetrical in layout and the connection to each of the side volumes is very distinct. Dripping water and light provide secondary means of orientation.
Device Machine: One of the secondary volumes contains a large, moving cylinder which causes the entire room to act as a massive pump.
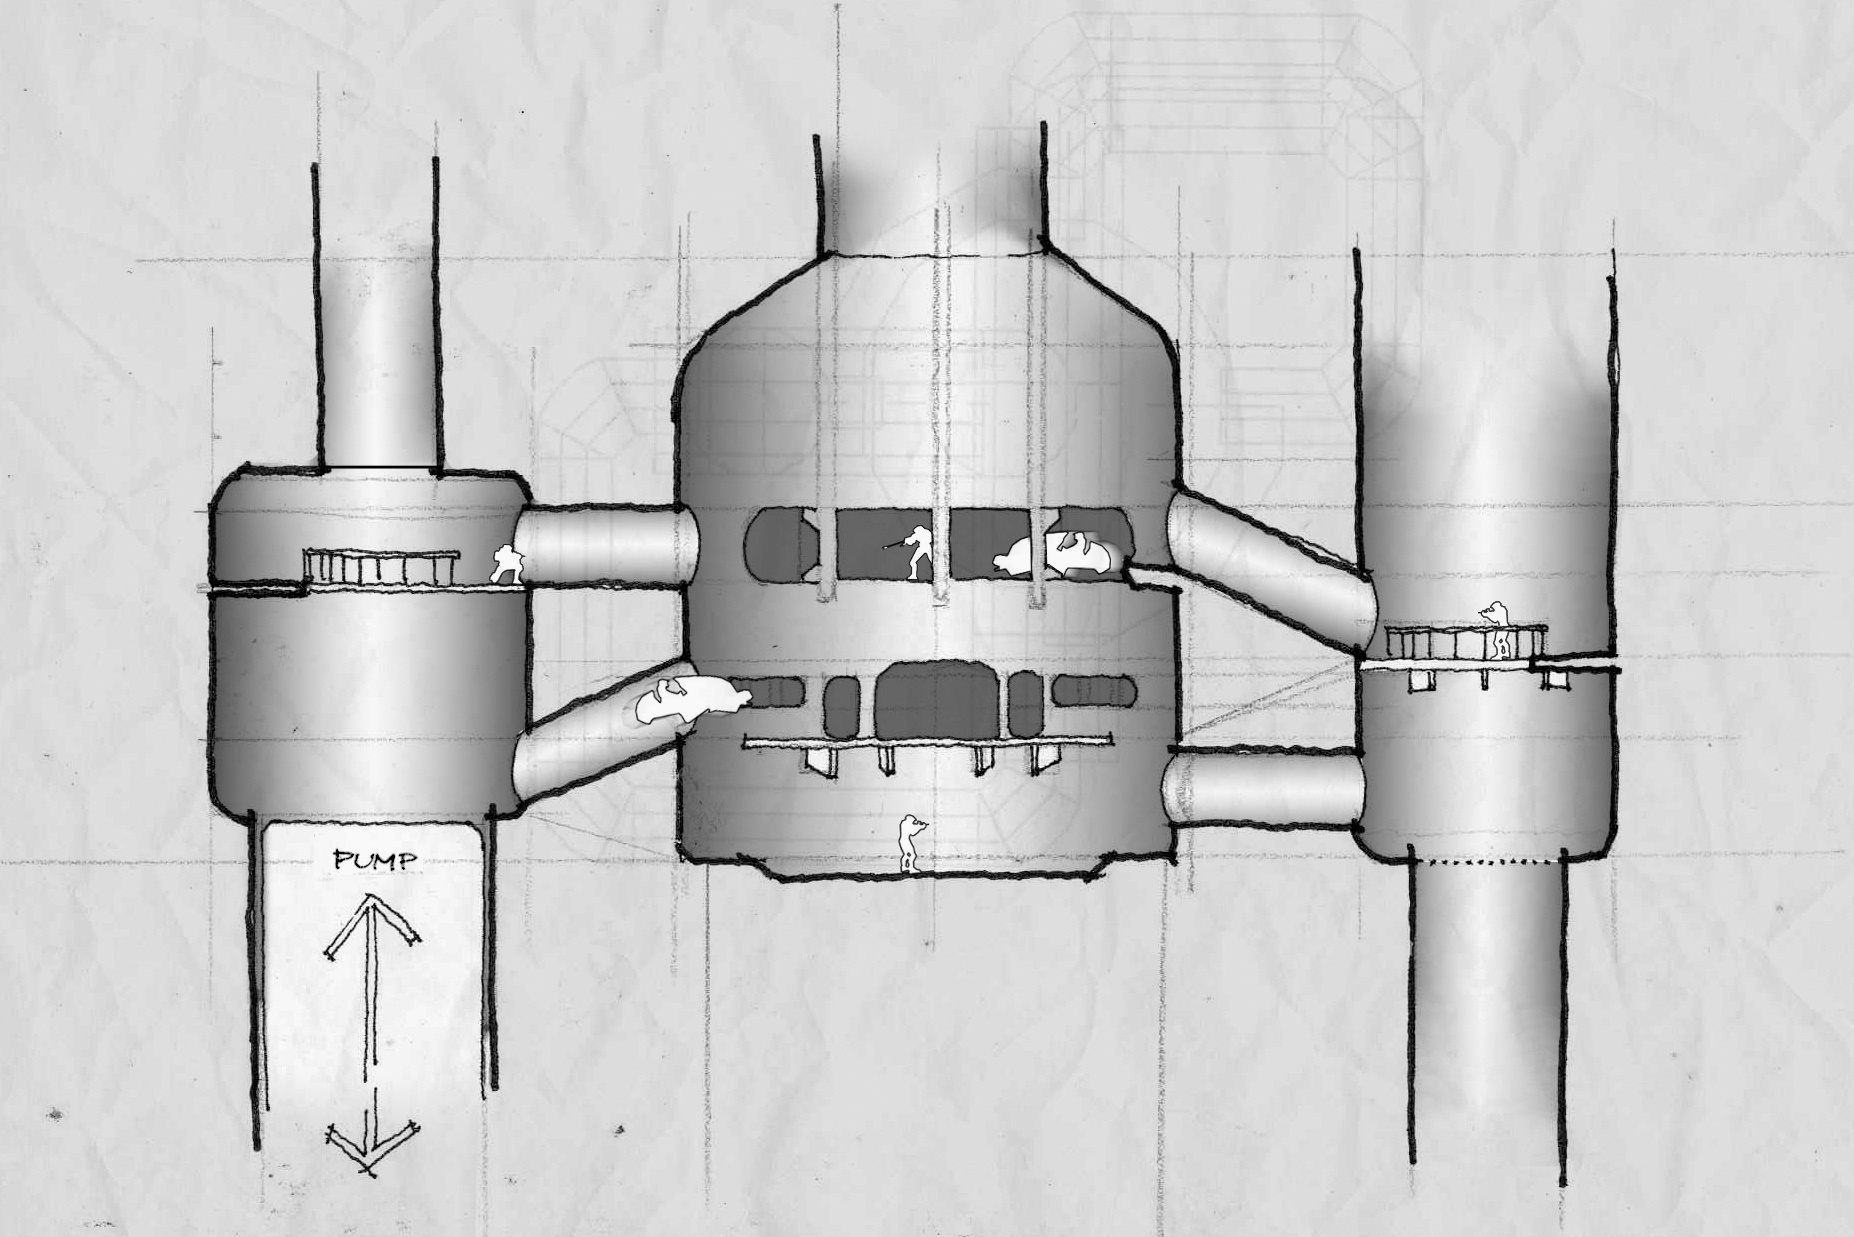
Pump Haus elevation plan. (Bungie concept art.)
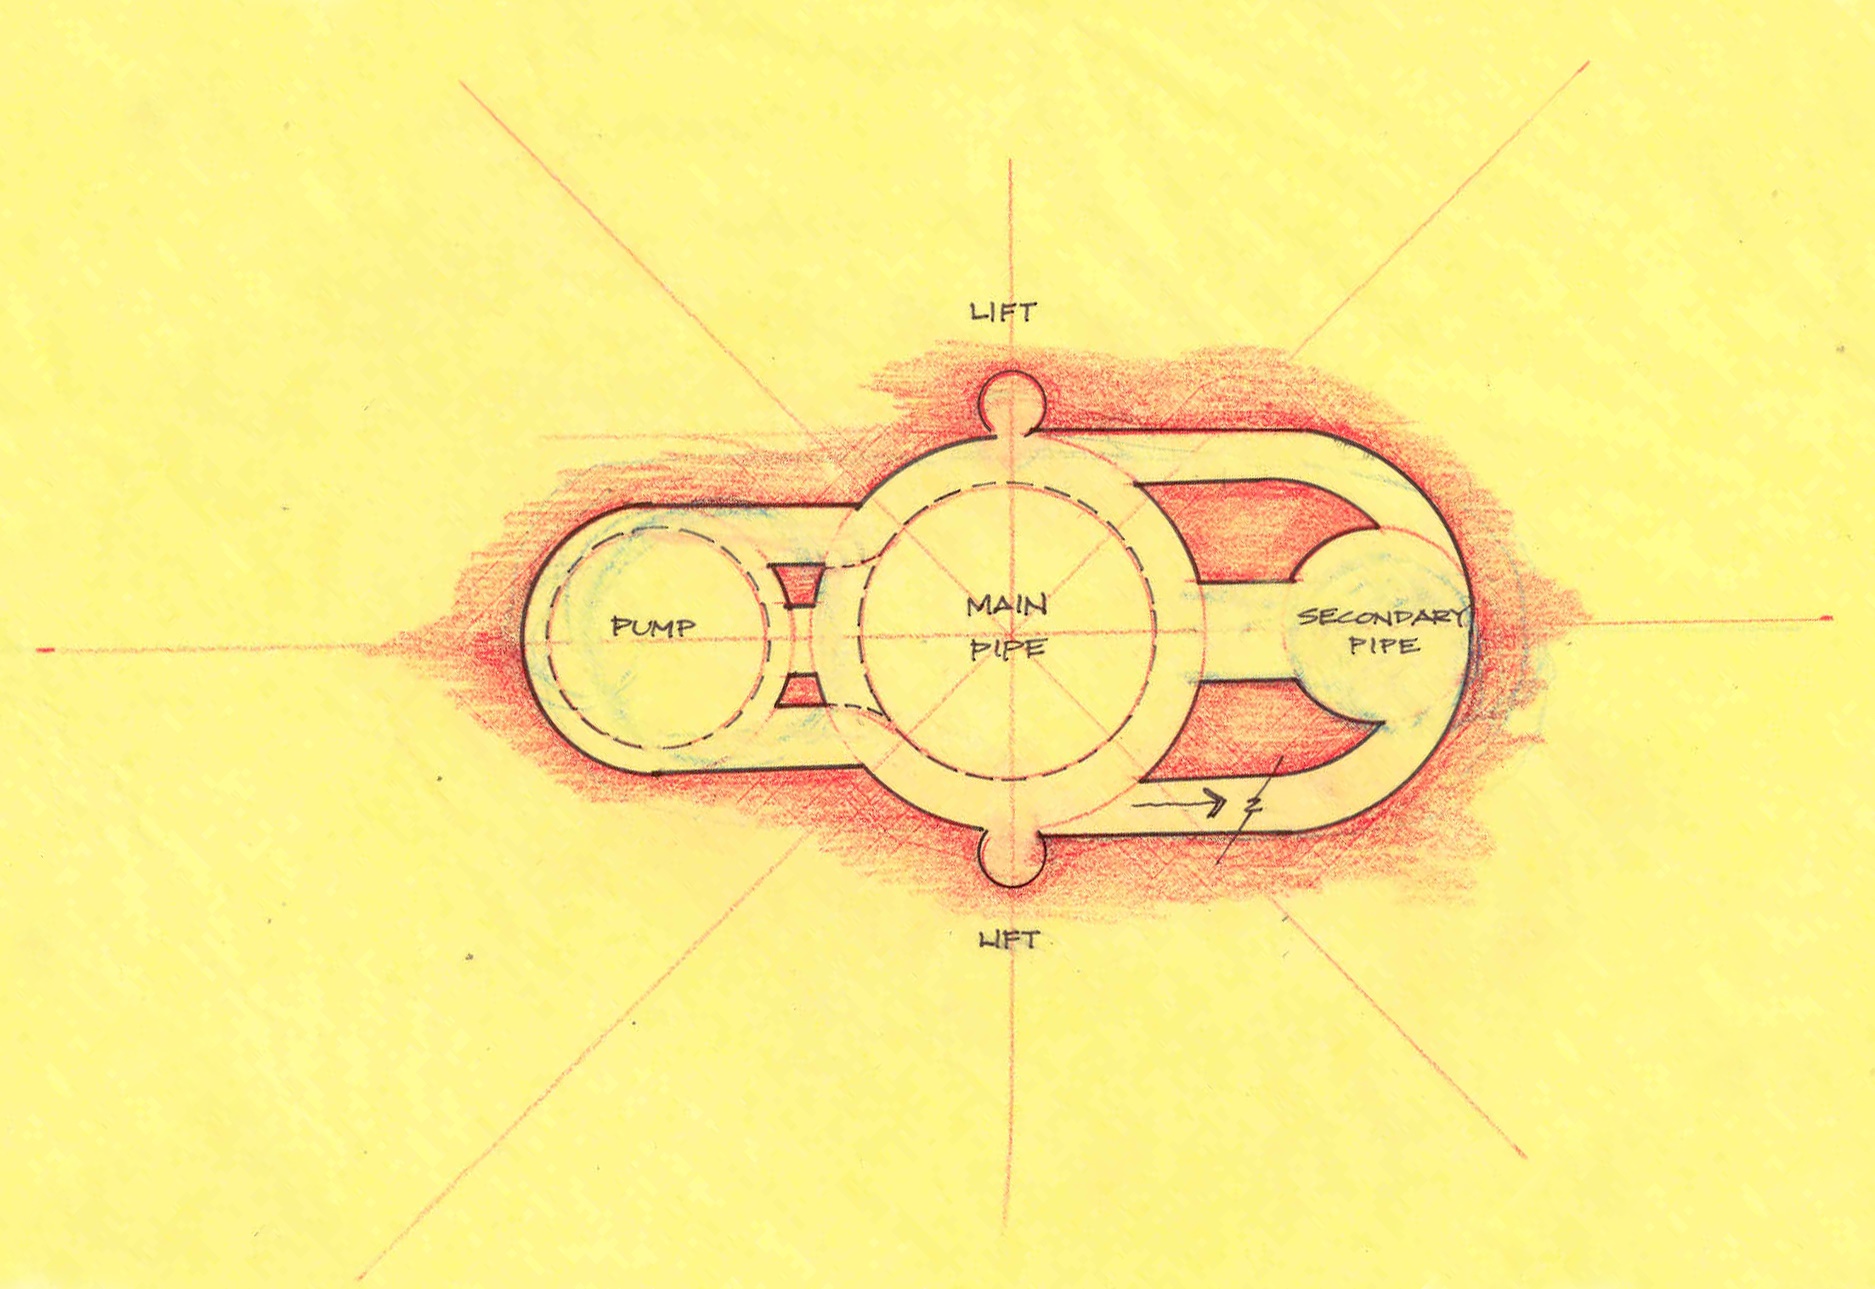
Pump Haus pipe plan. (Bungie design image.)
Blam Mountain
Blam Mountain is a mostly unseen map that has some similarity to High Ground, though is larger in scale and was planned for BTB matches. Much like High Ground it's an ideal map for asymmetrical game types, with one team being expected to assault the enemy base.
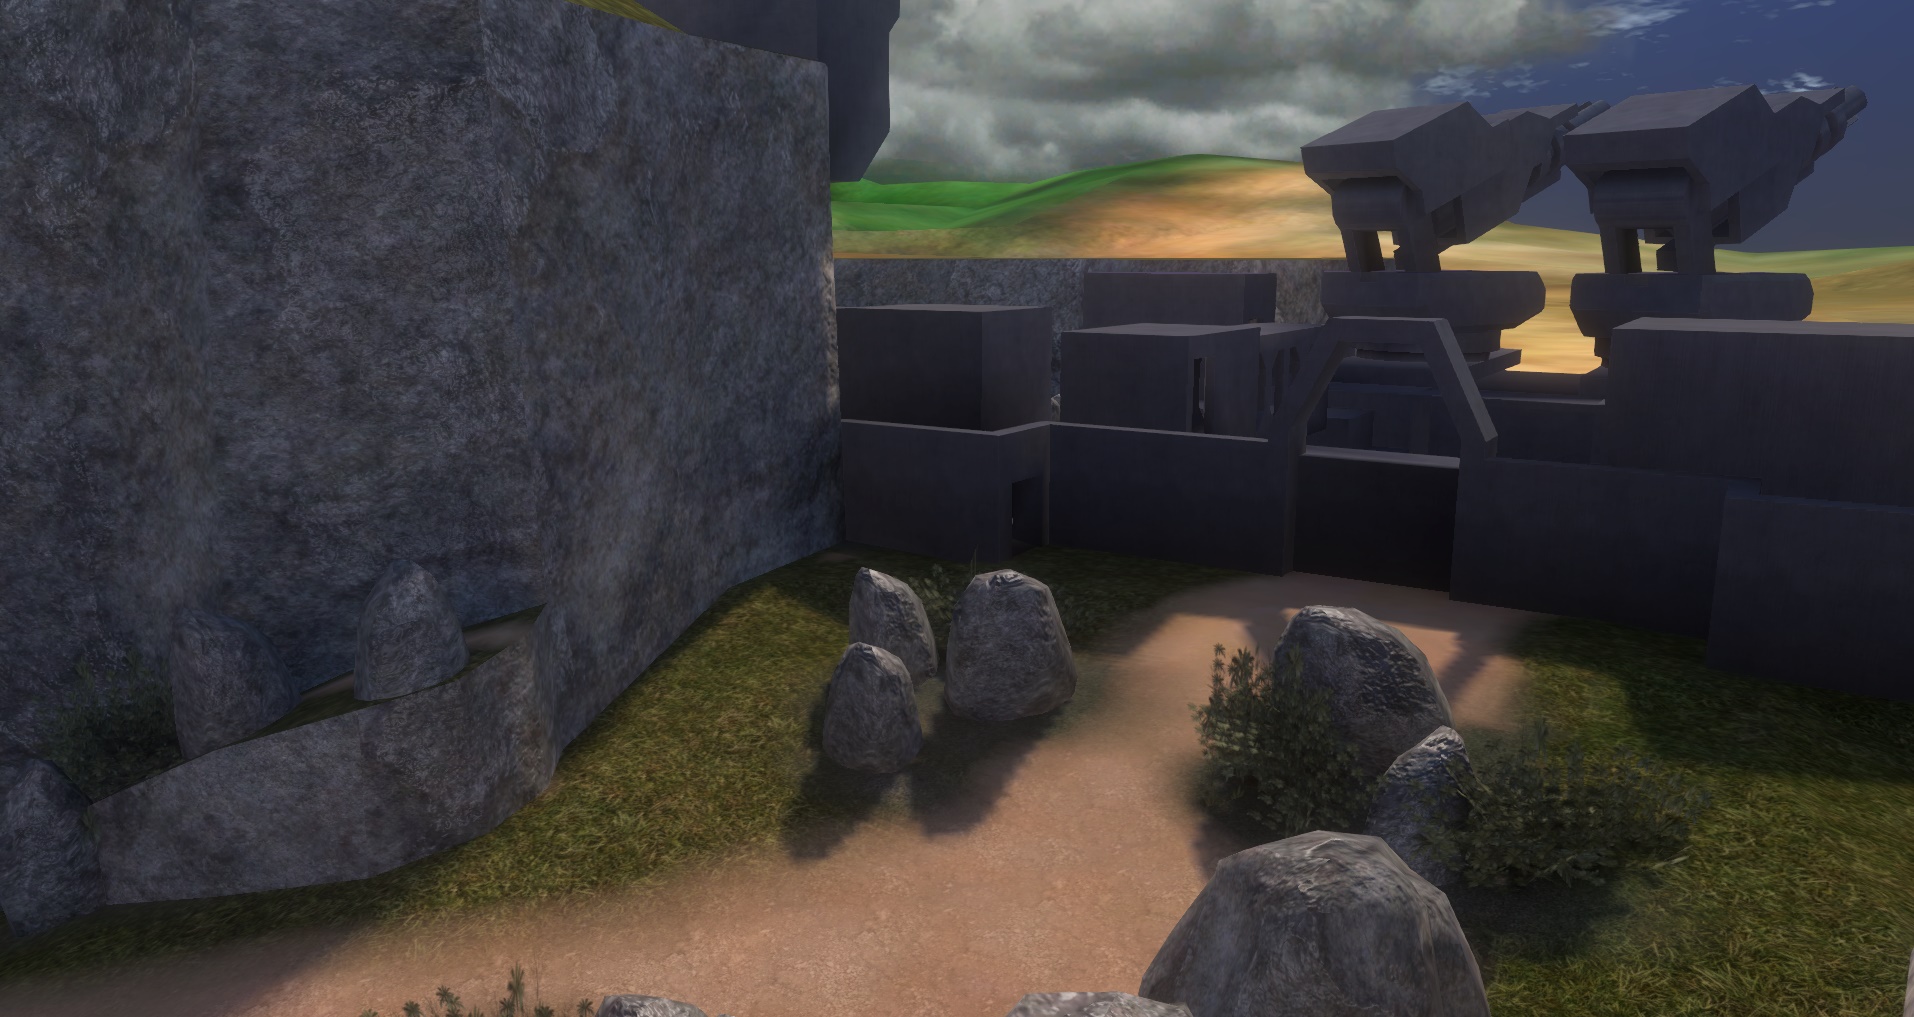
Fighting the good fight.
Original Design Information
Overview: Near the Voi factory complex in Africa sits a pair of mountain top, suborbital cannons which protect the entrance to the valley below. The Attackers spawn on a landing pad in the jungle, near a river dock, and make their way up a hillside to the Defender’s cannon/bunker complex. Past the bunker and next to a cliff lies the flag, which allows for a quick grab and launch to the beach below (ala “Relic”). However, the return point is only accessible through a pair of gondola like “ammo barges” which ferry between the two docks, thus slowing the flag capture and giving the Defenders time to recover.
Time of Day: Late afternoon – a humid haze stagnates the air.
Weather: Humid, wet. It is the jungle.
Single Player Environment: Earth - Voi Factory Complex
Spatial Organization: The environment is roughly based on a circle in which the Defenders spawn in the center and the Attackers travel around the circumference. The Defenders spawn in a centralized bunker complex / hive and contains easy access to several paths which intersect the Attackers as they travel around the circle.
Orientation: The map is split between a low river and jungle area and a high mountain bunker complex. The two massive cannons are visible from several points on the map firing into the sky to the Northeast.
Device Machine: The two ammo barges swap locations based on the position of a switch. An elevator also loads ammo up the cliff near the flag and doubles as an elevator.
Blam Mountain rough layout. (Bungie design image.)
Shaft
Shaft has already had a Digsite version released for Halo 2, however the Halo 3 version of the map is very different. It's a symmetrical map with four pathways leading into the center where a huge Sentinel looms over the drilling platform, making it a good map for multi-team and symmetrical game types.
One of the ideas for the map was having AI sentinels roam the area that could be set to ally with different multiplayer teams with controls, however this functionality never made it into the final game.
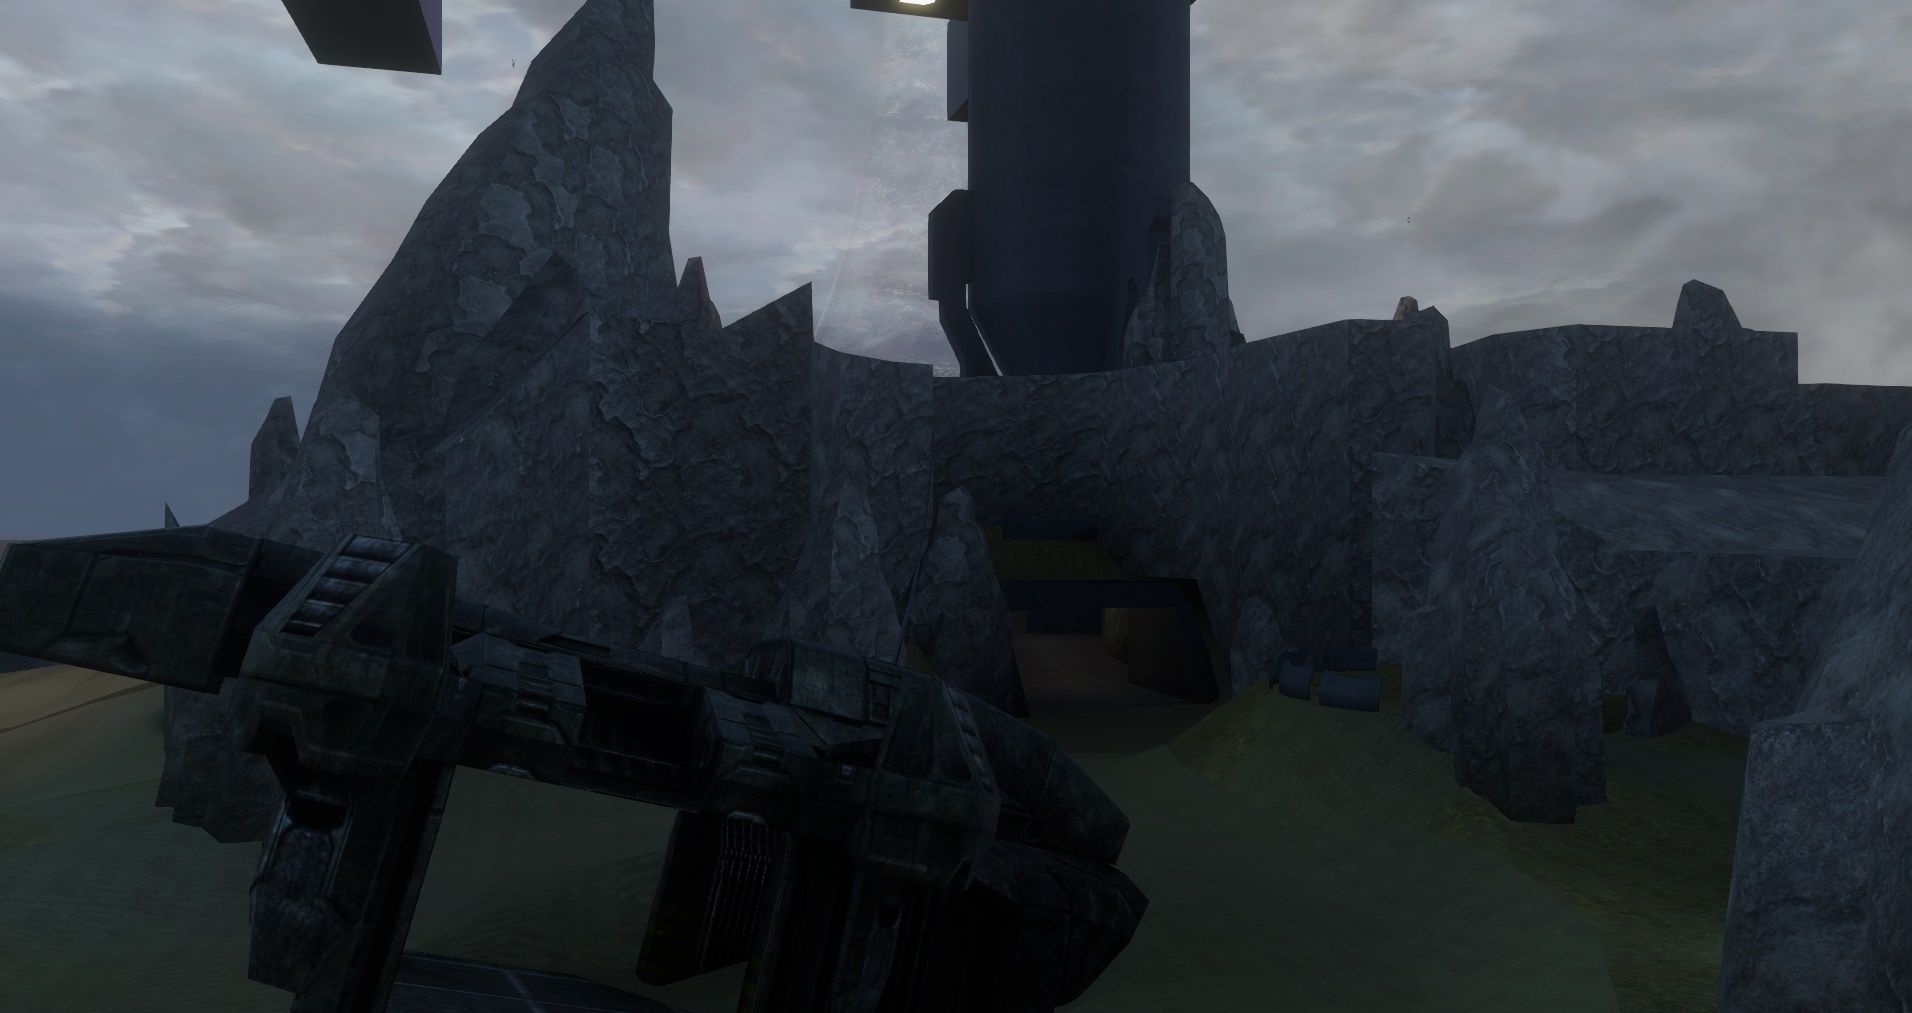
Can you dig it?
Original Design Information
This lonely island is the site of a massive excavation. The hovering Mega Sentinel is slowly and inexplicably coring through the mantle and understructure of Halo.
Time of Day: Dawn or Dusk. Primary, almost sun-like light source from Mega Sentinel.
Weather: Oppressive, dark clouds. Bright horizon.
Single Player Environment: Delta Halo
Spatial Organization: Isolated, beach-ringed, Relic-like island with a crater/depression encircling a large, pit-like excavation. Relatively open beach perimeter. Crater at center accessible by tunnels that radiate out from the pit. Various teleporters connect parts of the island. A Mega Sentinel hovers overhead, covering nearly the entire island.
Orientation: The two teams start on opposite sides of the island. Drivable beach area extends all the way around the island. Rocky, impassable slopes lead up to lip of crater. Three of the access points to the interior are also the three territories.
Hazard Zones: Falling into center pit might teleport you high above map or to the edge of the map. The height would not be so great as to kill players.
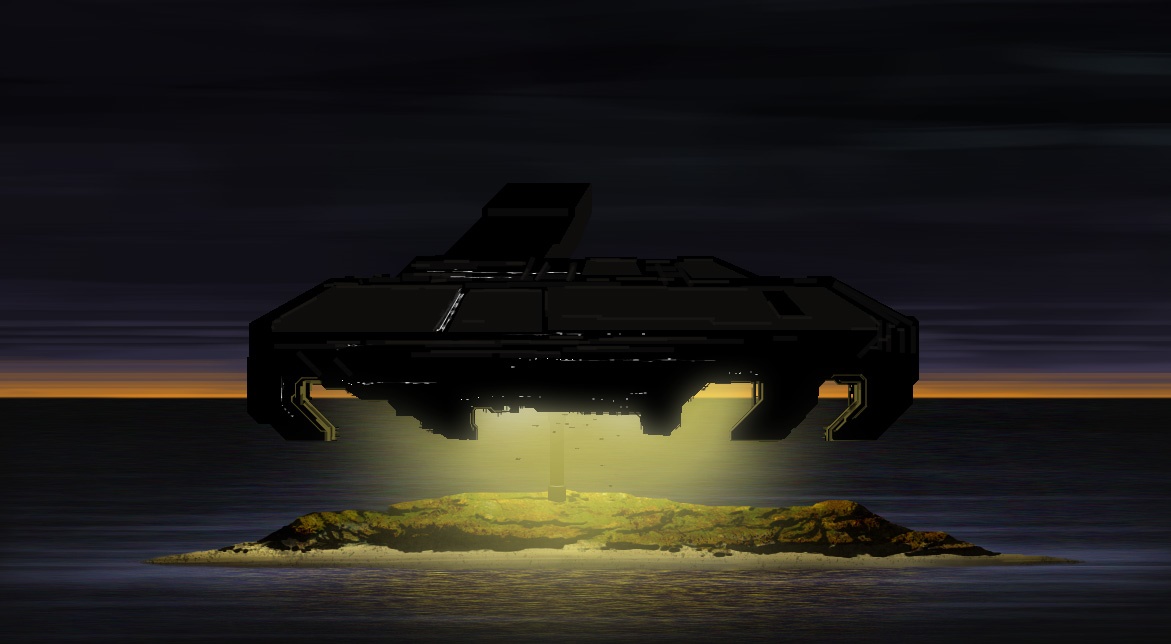
H3 Shaft looming “Mega Sentinel.” (Bungie concept art.)
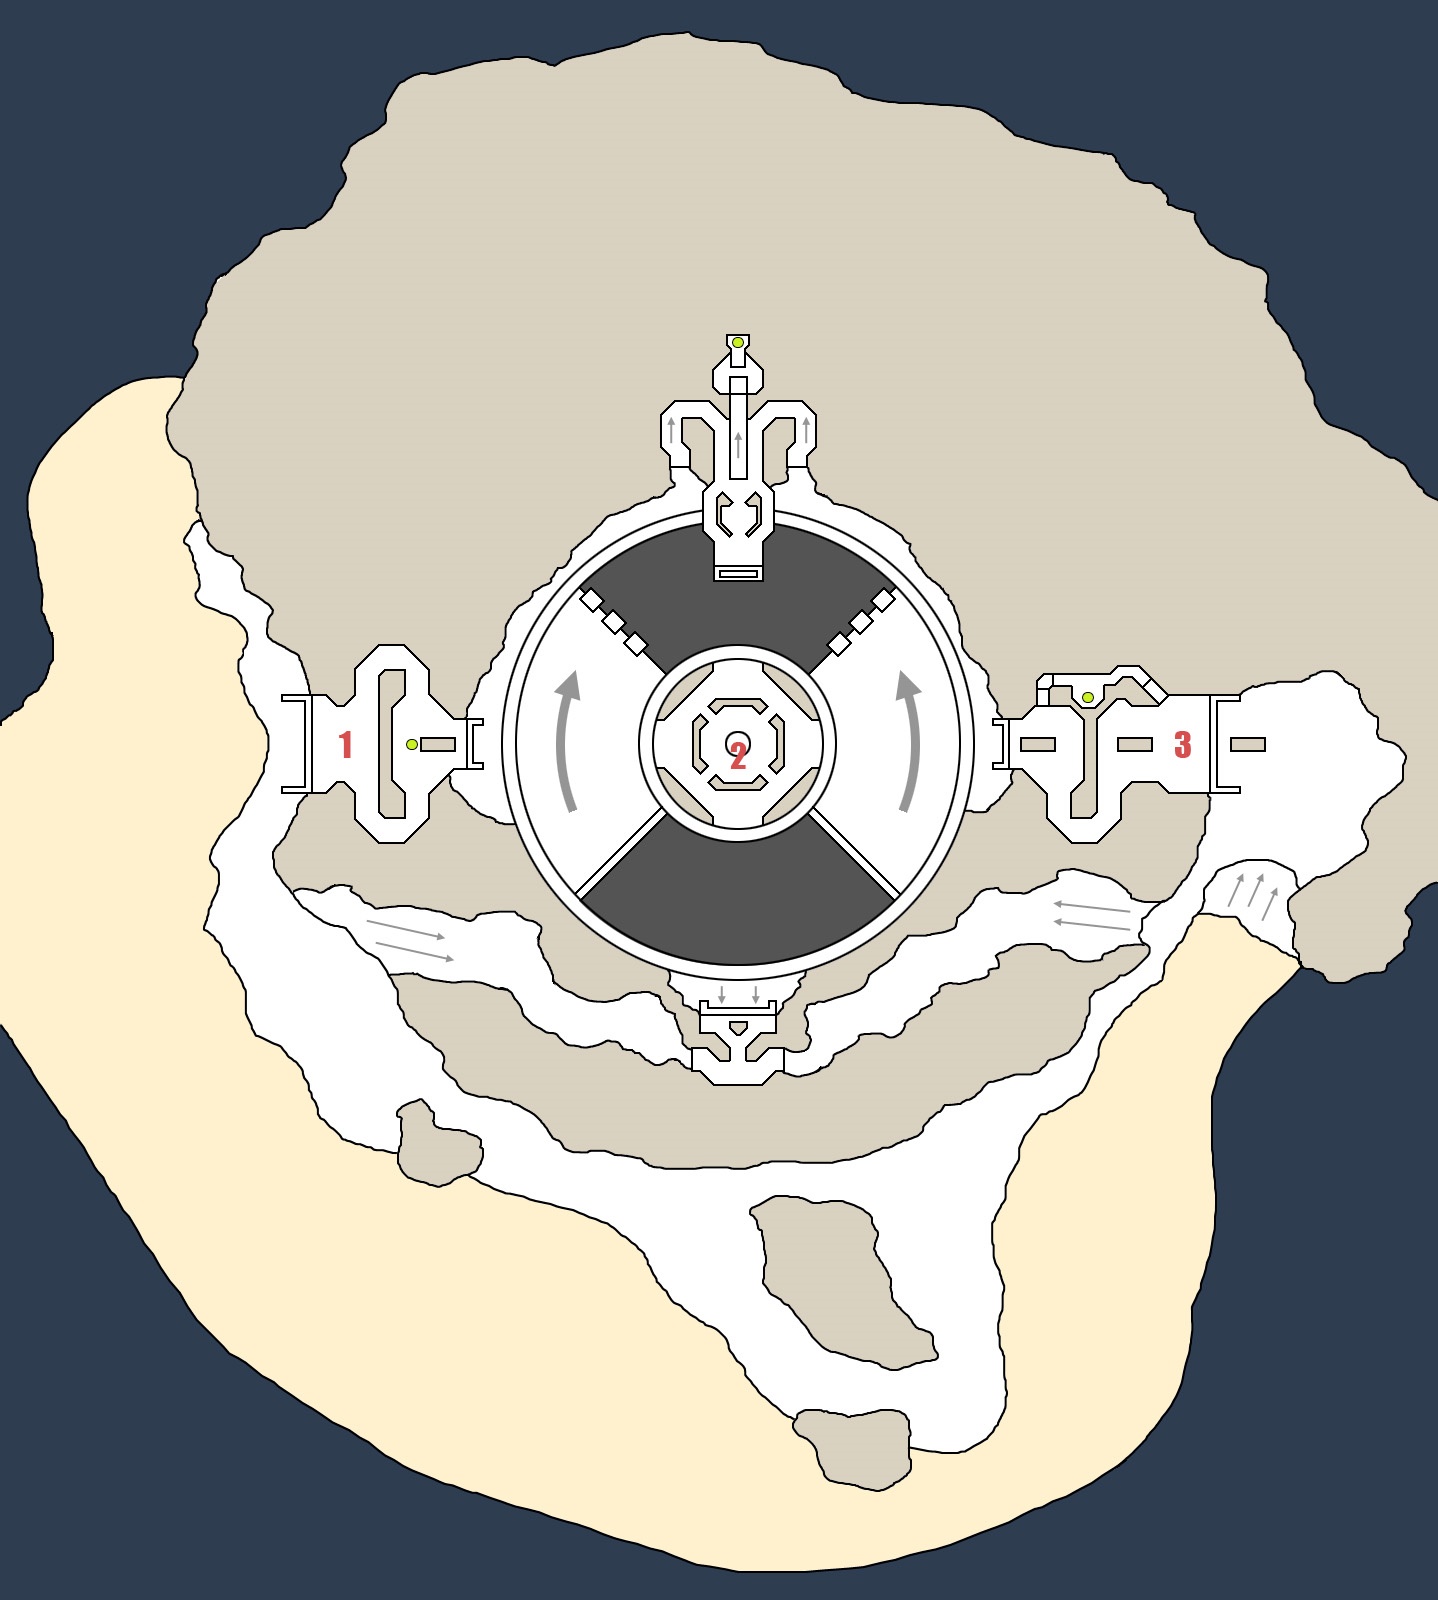
H3 Shaft rough layout. (Bungie design image.)
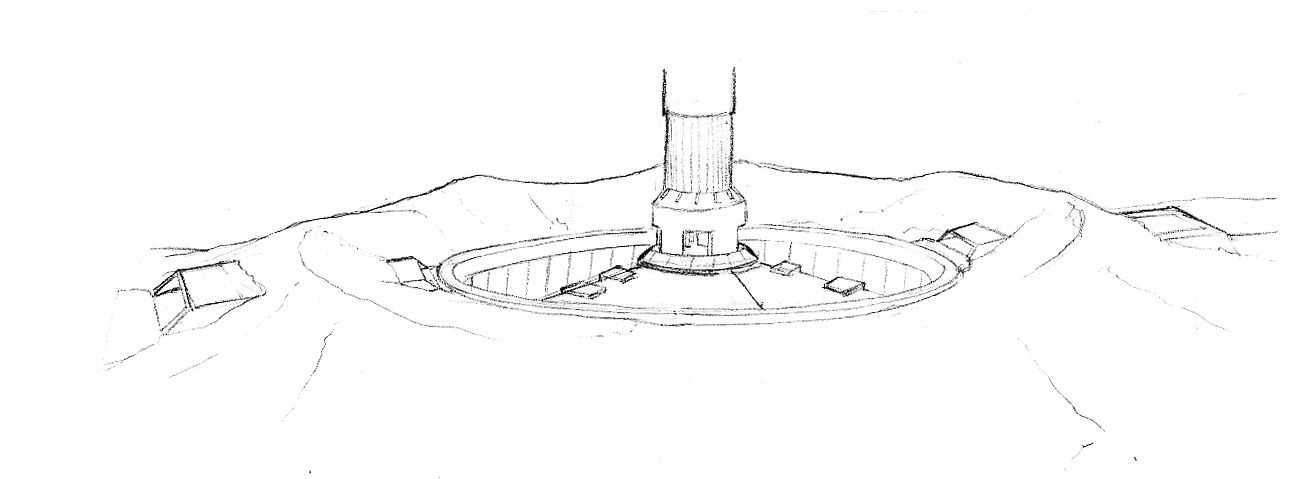
H3 Shaft drill interlock. (Bungie concept art.)
Farm
Farm is a map from very early in the development of Halo: Reach, at a point where it had few assets made for it—hence why it reuses geometry from the Halo 3 map Standoff and Sierra 117's skybox. Like Standoff, it works well for medium-sized symmetrical team games. Notably, a blockout of an APC vehicle was found in the source file for this map which has been restored as a usable vehicle here.
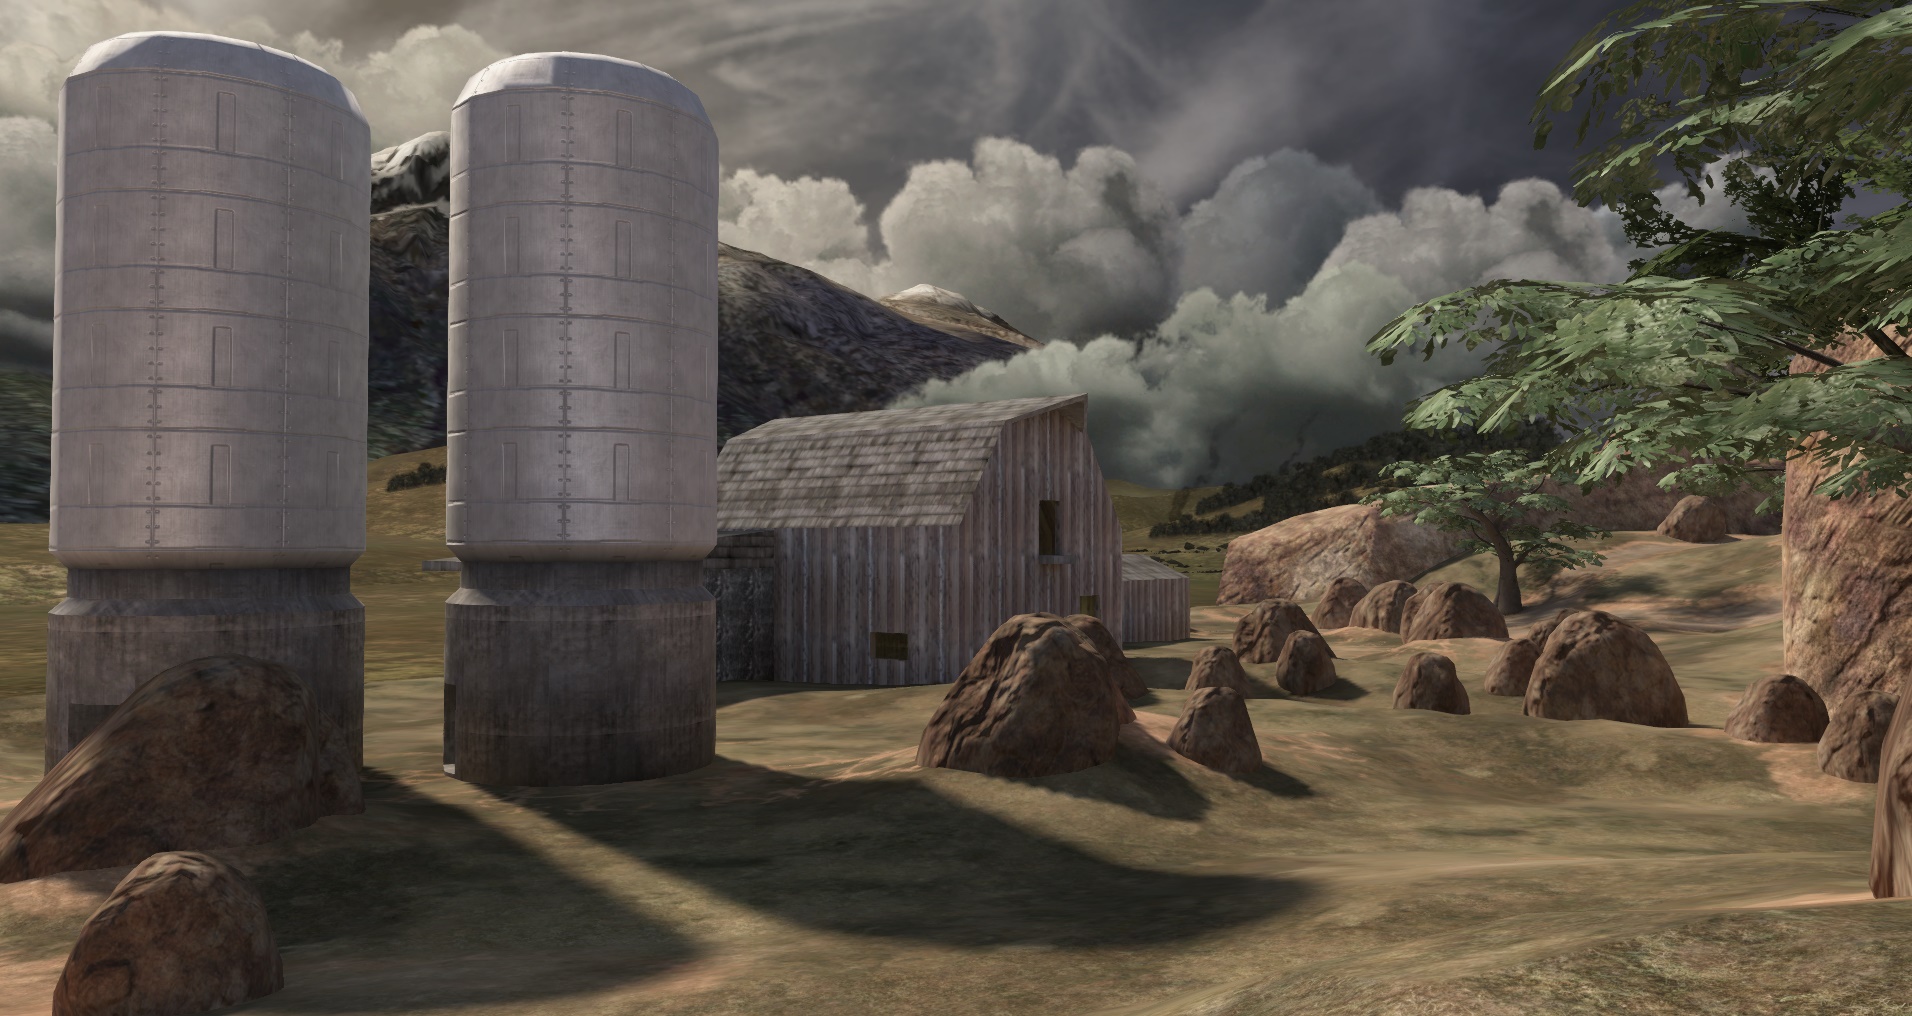
Time for a blood harvest!
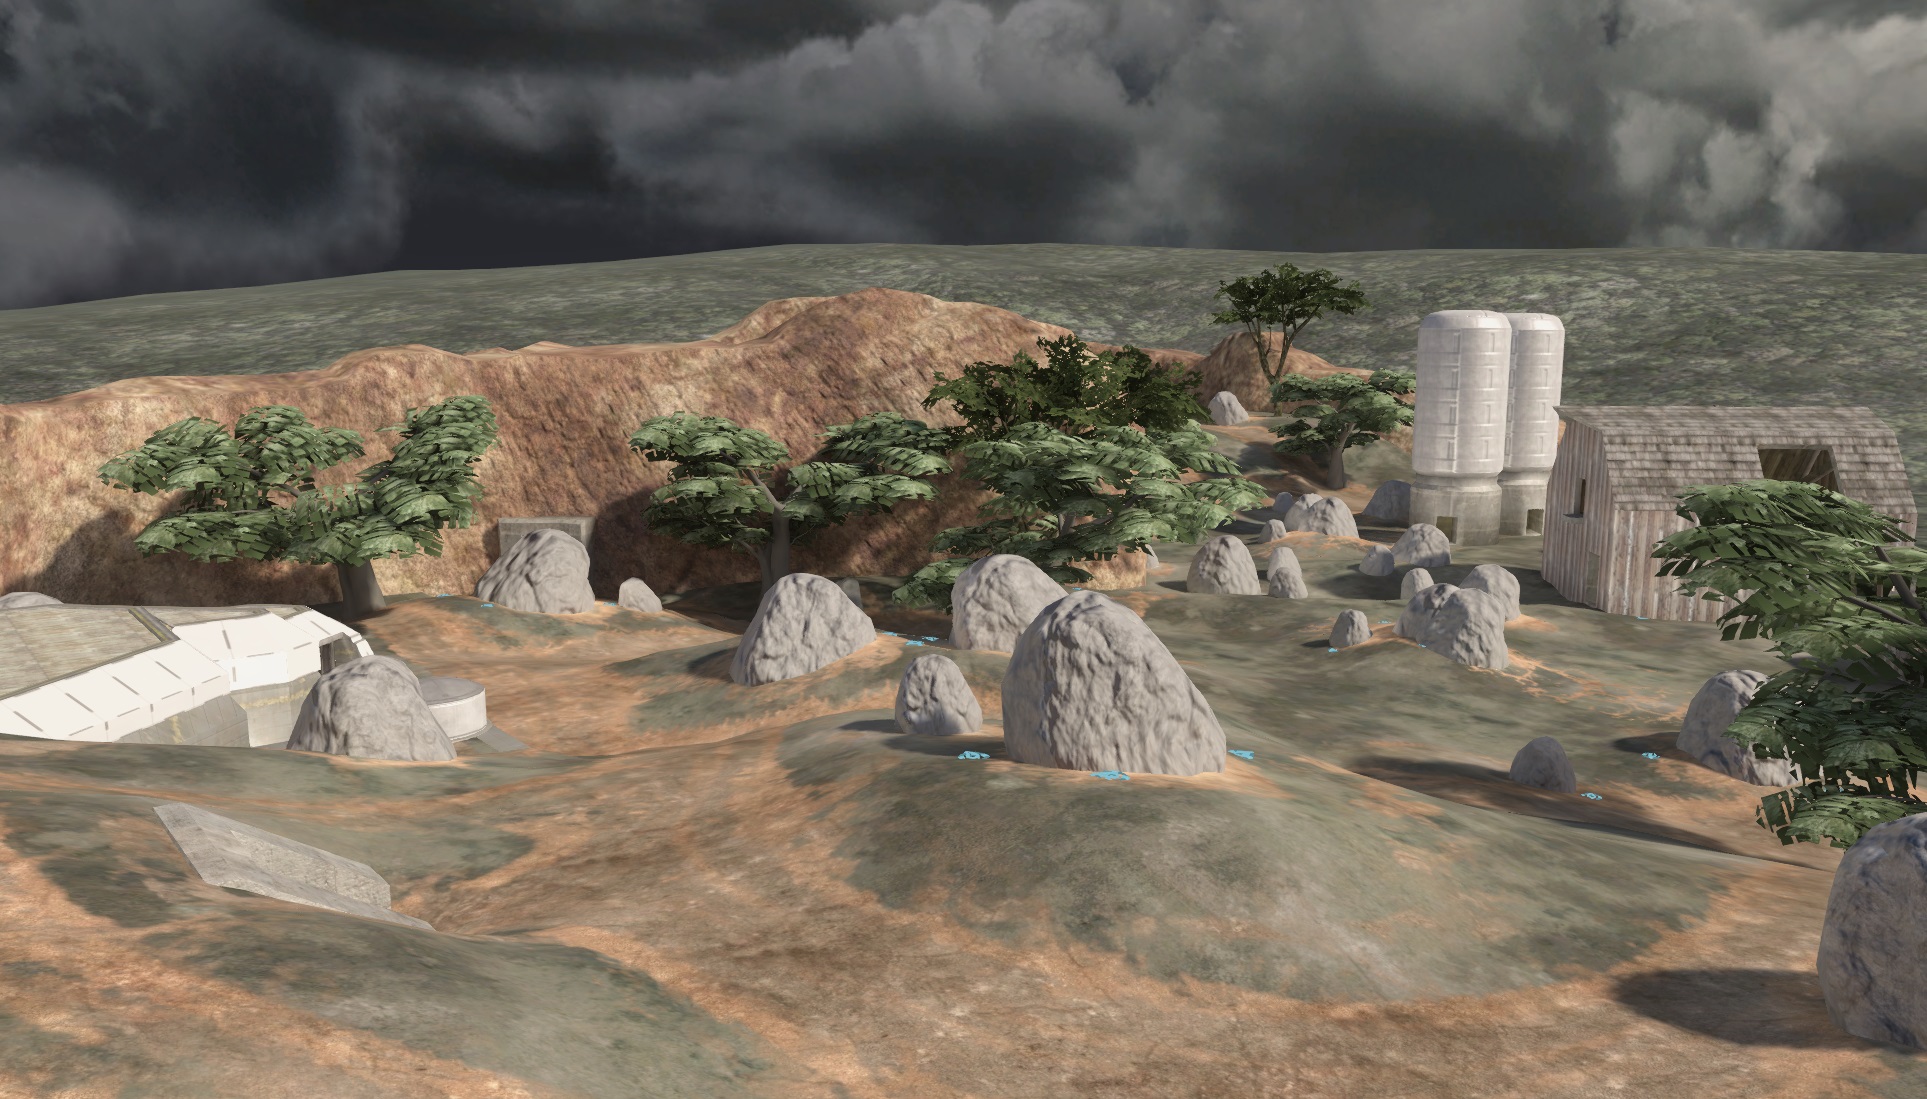
Early work by Krevil to get the map stood up in H3EK. Tag references (e.g. removing DMR) and shaders still needed to be updated, but farming is truly honest work.
Original massout of the Farm “APC Mobile Station.” This got us thinking…
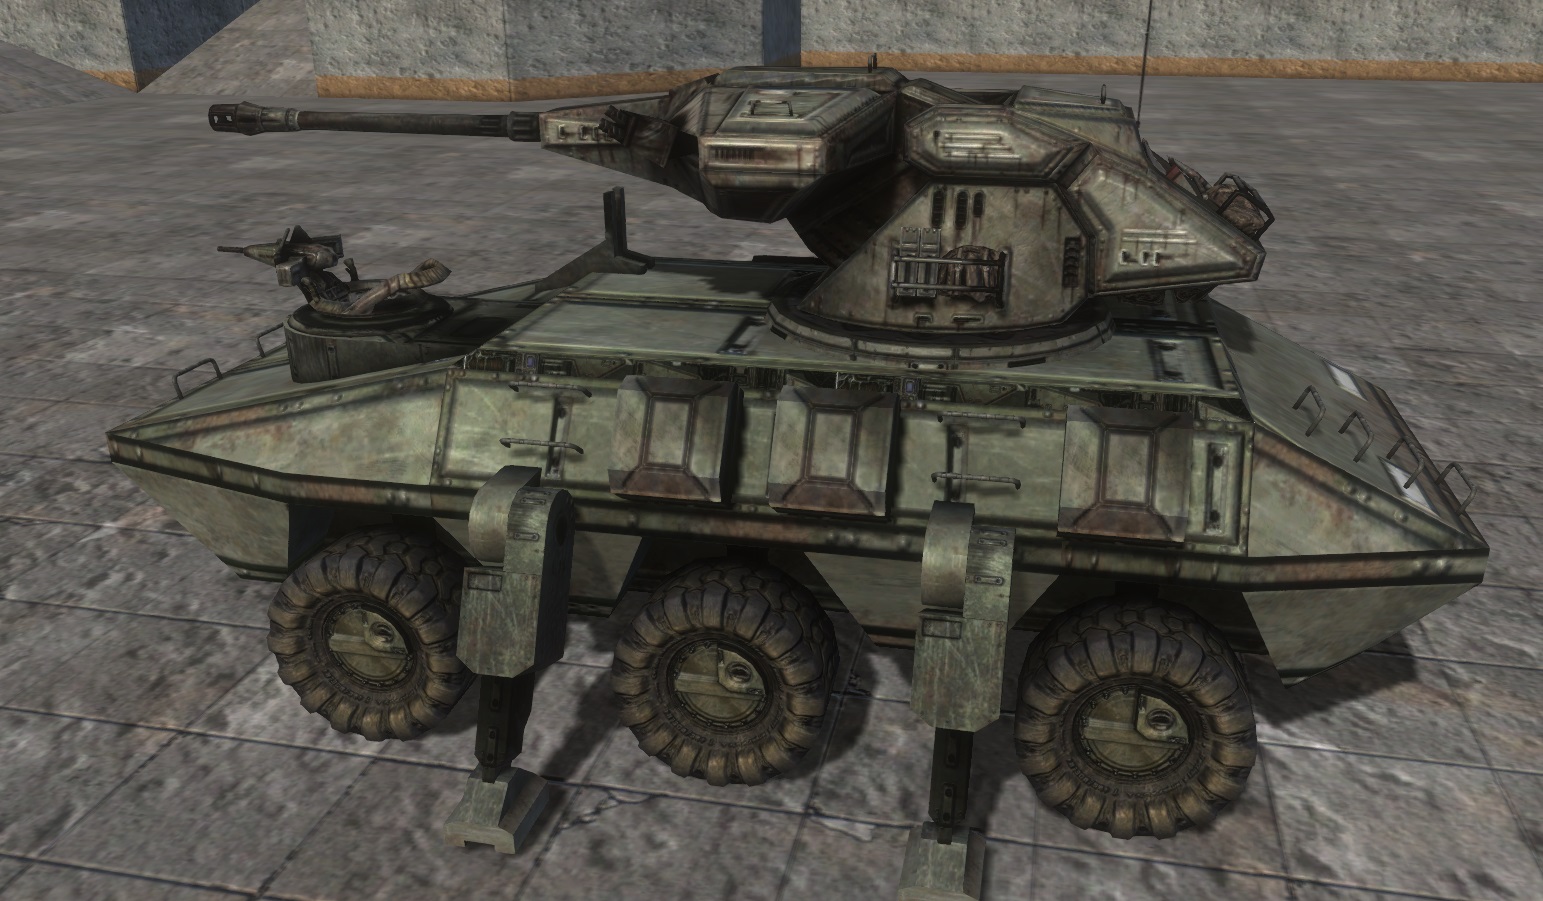
APC after Krevil did his magic. A Scorpion turret and cupola matched perfectly to the massout, leading us to believe this was heavily inspired by the real-world AMX-10. Once we had the turrets attached and some new UVs applied, it was only a bit more work to make it usable in the Sandbox. Note that deployment (“lockdown”) mechanics don’t work with Halo 3, but up-porting it to Reach should provide modders with new options as that was added to support the Kodiak APC.
Master Chief? Mind Telling Us How You Cloned Yourself?
And that’s not all of the Halo 3 goodness to come your way in this release. Here’s a sampling of the new goodies you’ll be able to play with once you do a Git pull.
Krevil and the team have packaged versions of Master Chief from early builds of Halo 3 showing the Spartan model at different stages of development. One notable feature is the materials on the armor that make the Spartans look more gritty and less shiny like the final retail version.
Variations on a theme.
You Too, Brute
In the Digsite Halo 3 git, you’ll now find an early development Brute model with a different face and hair from what shipped in retail. It uses materials designed to recreate the look of the Brutes shown in the “Et Tu Brute” ViDoc and the Delta build.
In addition, to replicate the original ViDoc experience, we’ve packaged the Halo 2 gravity hammer and plasma turret, modified to fit the proportions and animations of Halo 3 characters.
Savages in review, ready for Et Tu Brute 2.
Armored Reconnaissance
Referred to as the “Wolverine APC” and “Scorphog” by the Digsite crew, this wheeled gun system was built from a massout found in the Reach Farm map (see above). Krevil and team worked hard to get it up-and-running as a fully functional vehicle in the Halo sandbox for you to enjoy.
(Military Nerd Note: We call it an APC as a shorthand, we know it would not have room to carry troops in this configuration.)
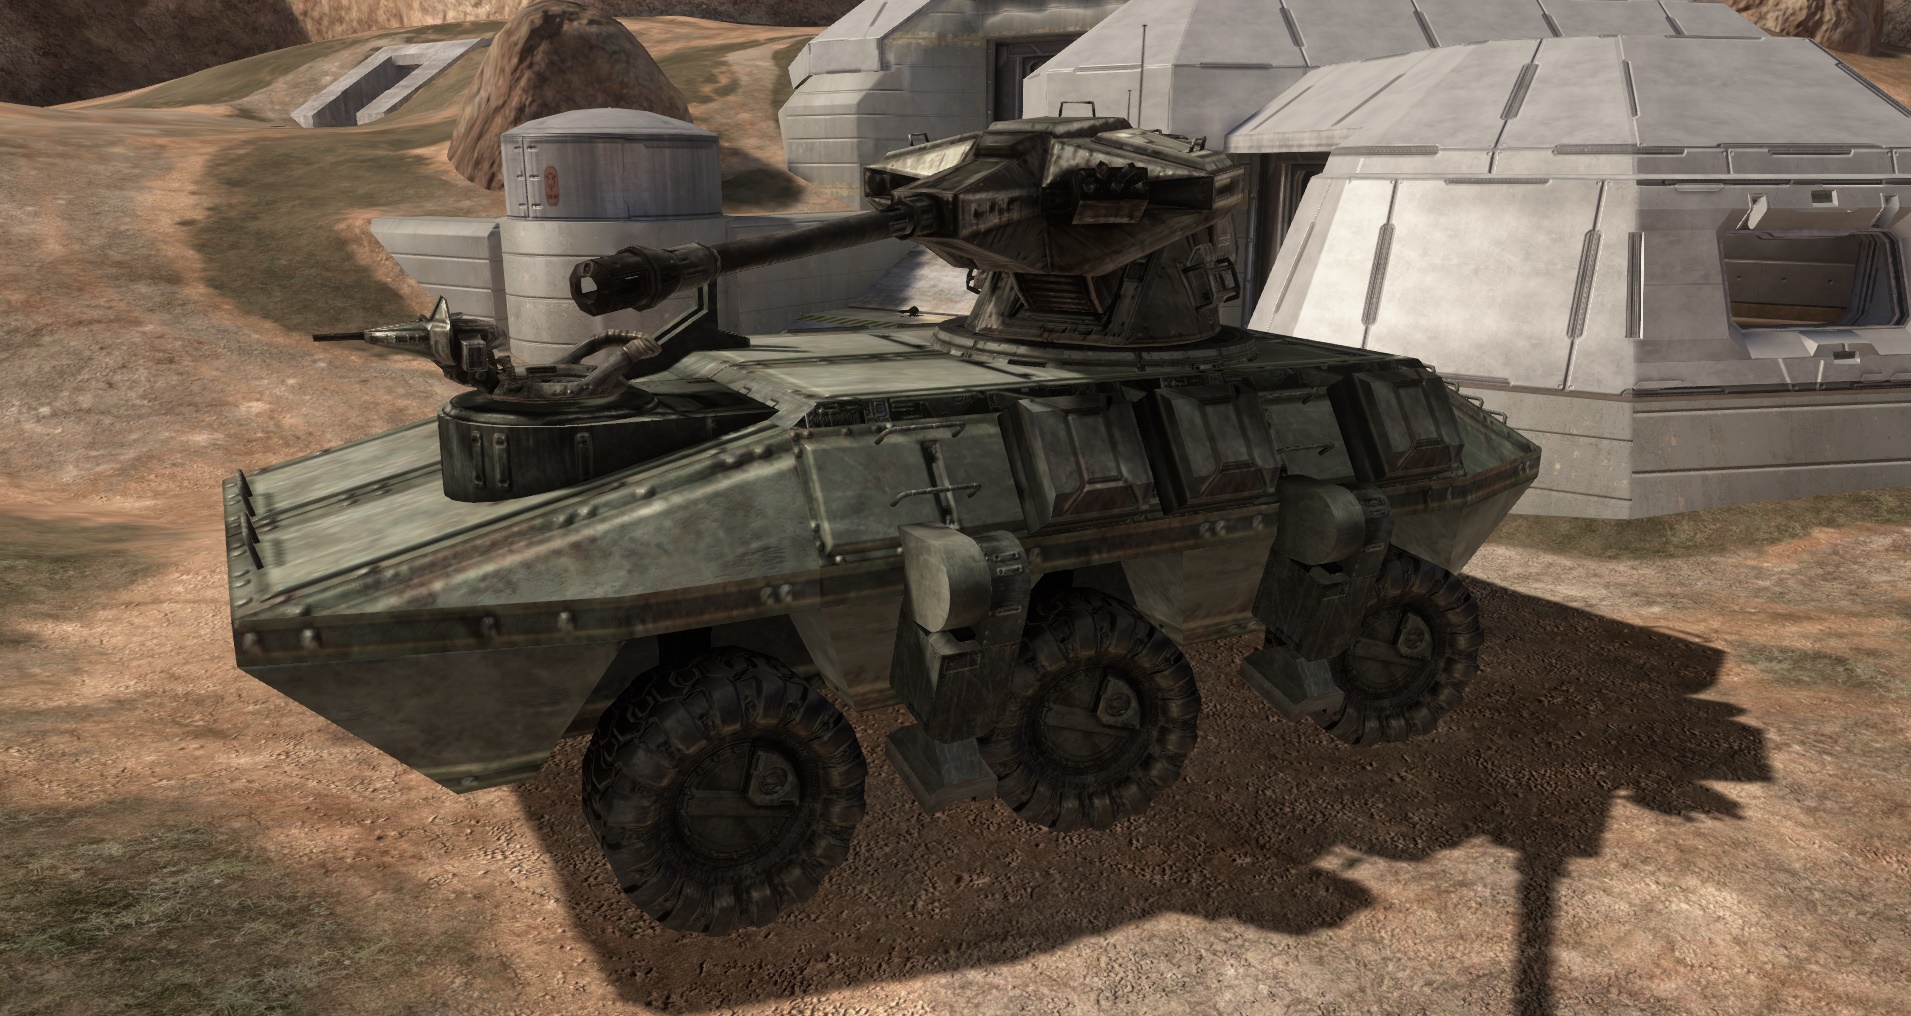
Lean and mean mobile gun machine. Almost ready for a Canon Fodder!
Vortex Equipment
The Vortex equipment is listed in the Halo 3 toolkit’s debug menu but has otherwise gone unseen. When deployed, it attempts to drag players and other objects towards it, trapping them in its orbit and making them vulnerable.
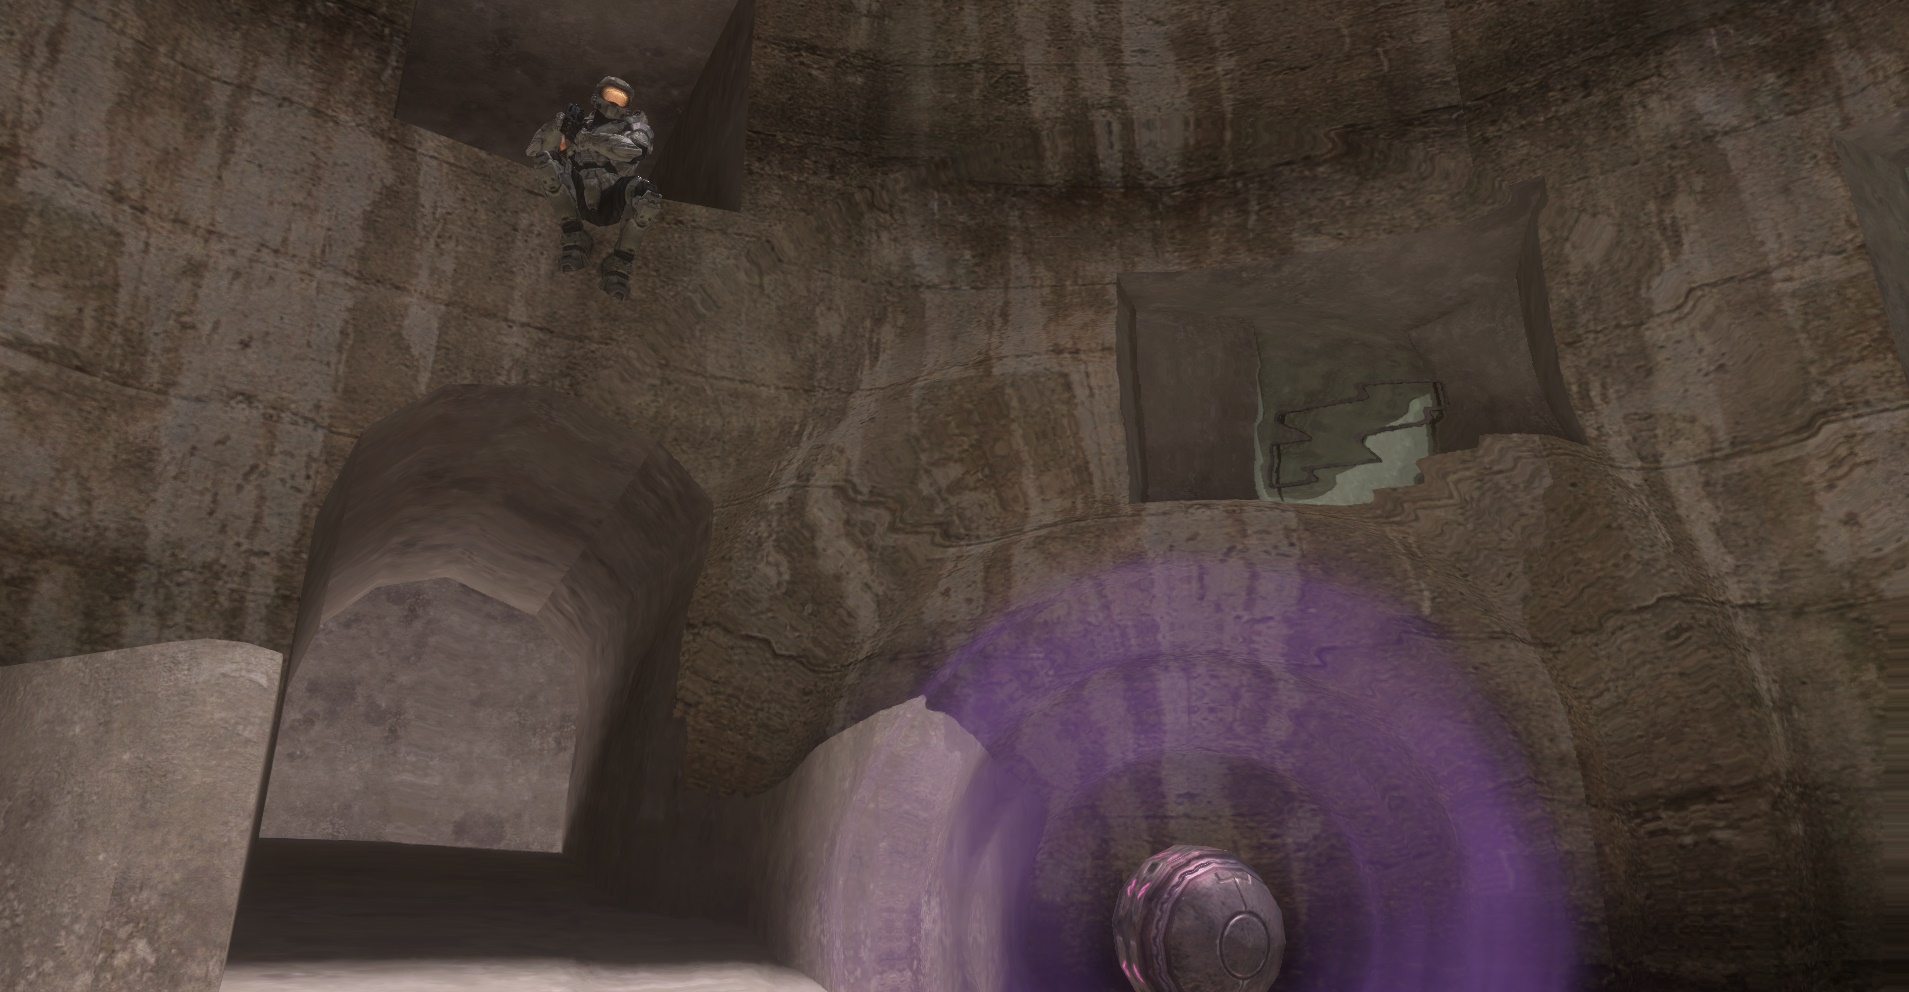
Fatal attraction.
Spike Pepperbox
The “Spike Pepperbox” is an early version of the Brute’s Spiker weapon that acts more like a rapid-firing pistol than a rifle or machine gun. Now get out onto the battlefield and give us combat action reports!
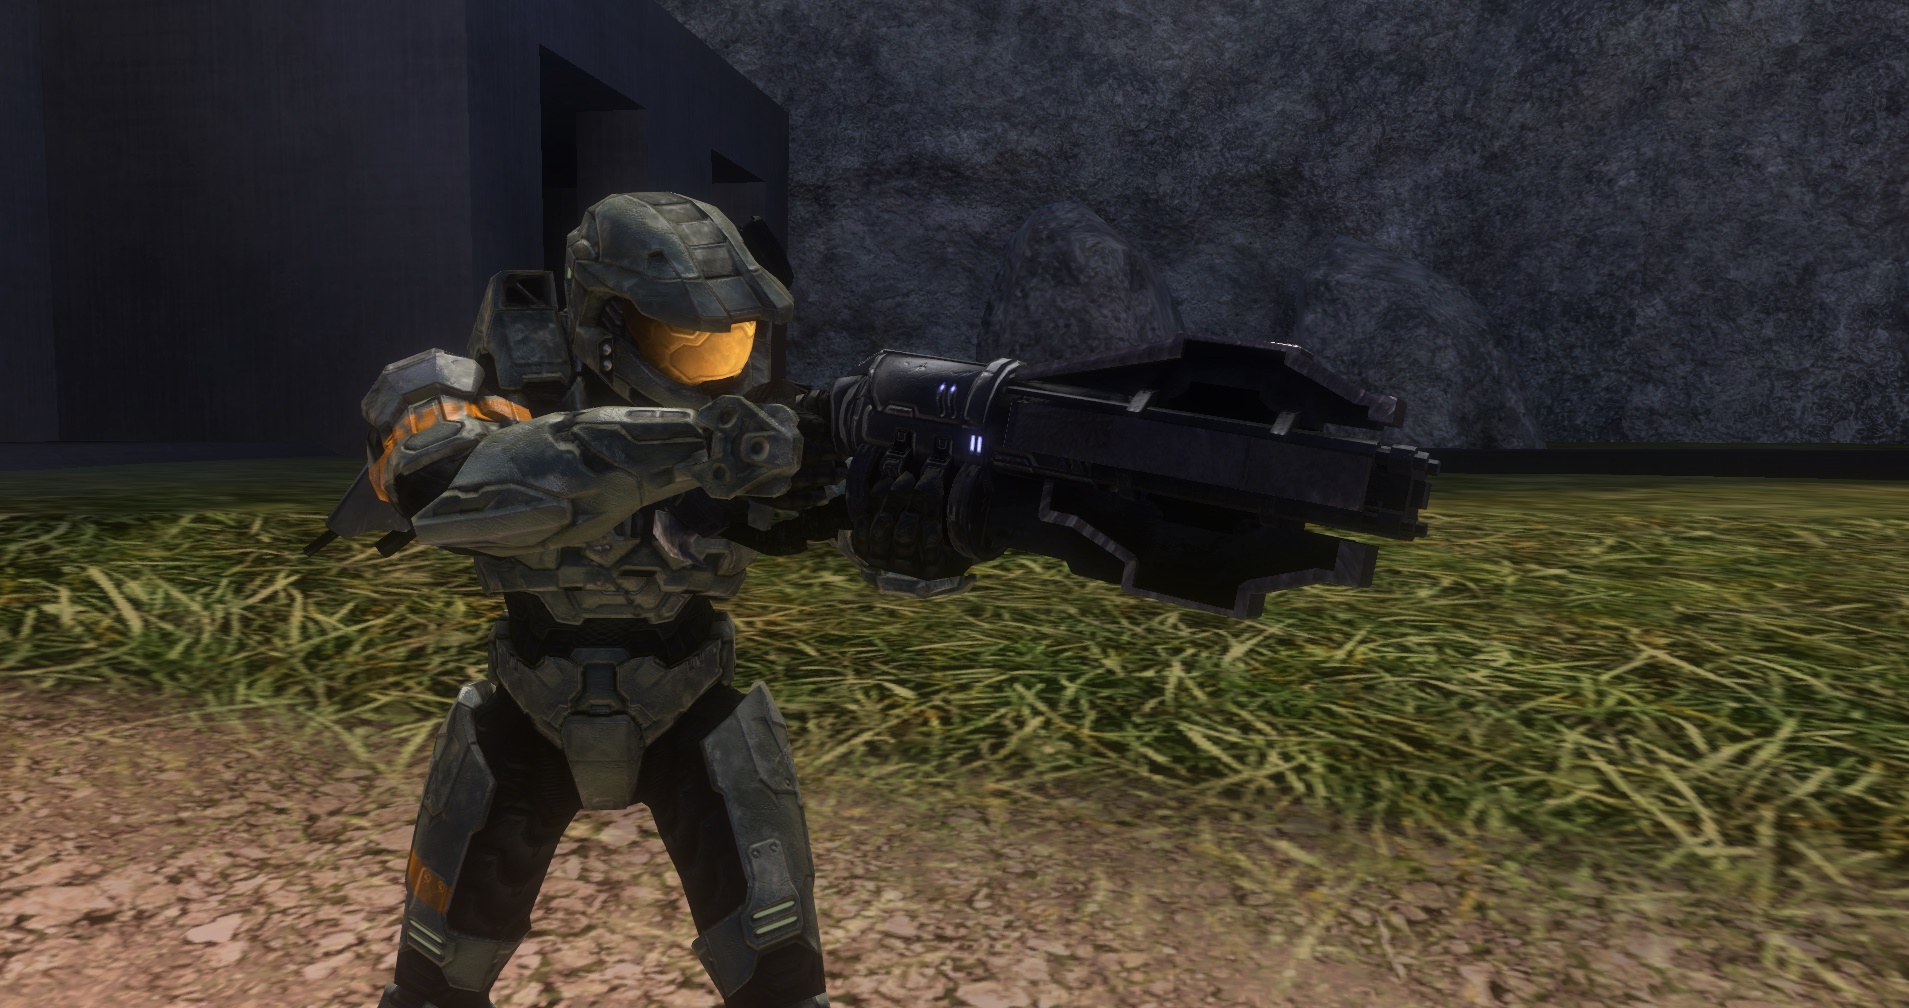
Spicy!
Medkit
An unreleased medkit for Halo 3 that would likely have been used in Crow’s Nest as a prop. The model for it has been shown before, so dedicated Halo fans may recognize it! We’re including this one particularly for creators that want to restore Health Packs in their mods.
Patch kit.
Heads-Up Displays
These are recreations of the early Halo 3 HUD, which had a different placement for Equipment, a compass created via code rather than tags, and featured a ring around the motion sensor. The Elite HUD was also much more green in color, and featured a triangular shield bar that was recreated using documentary footage (as those particular UI assets have not been found).
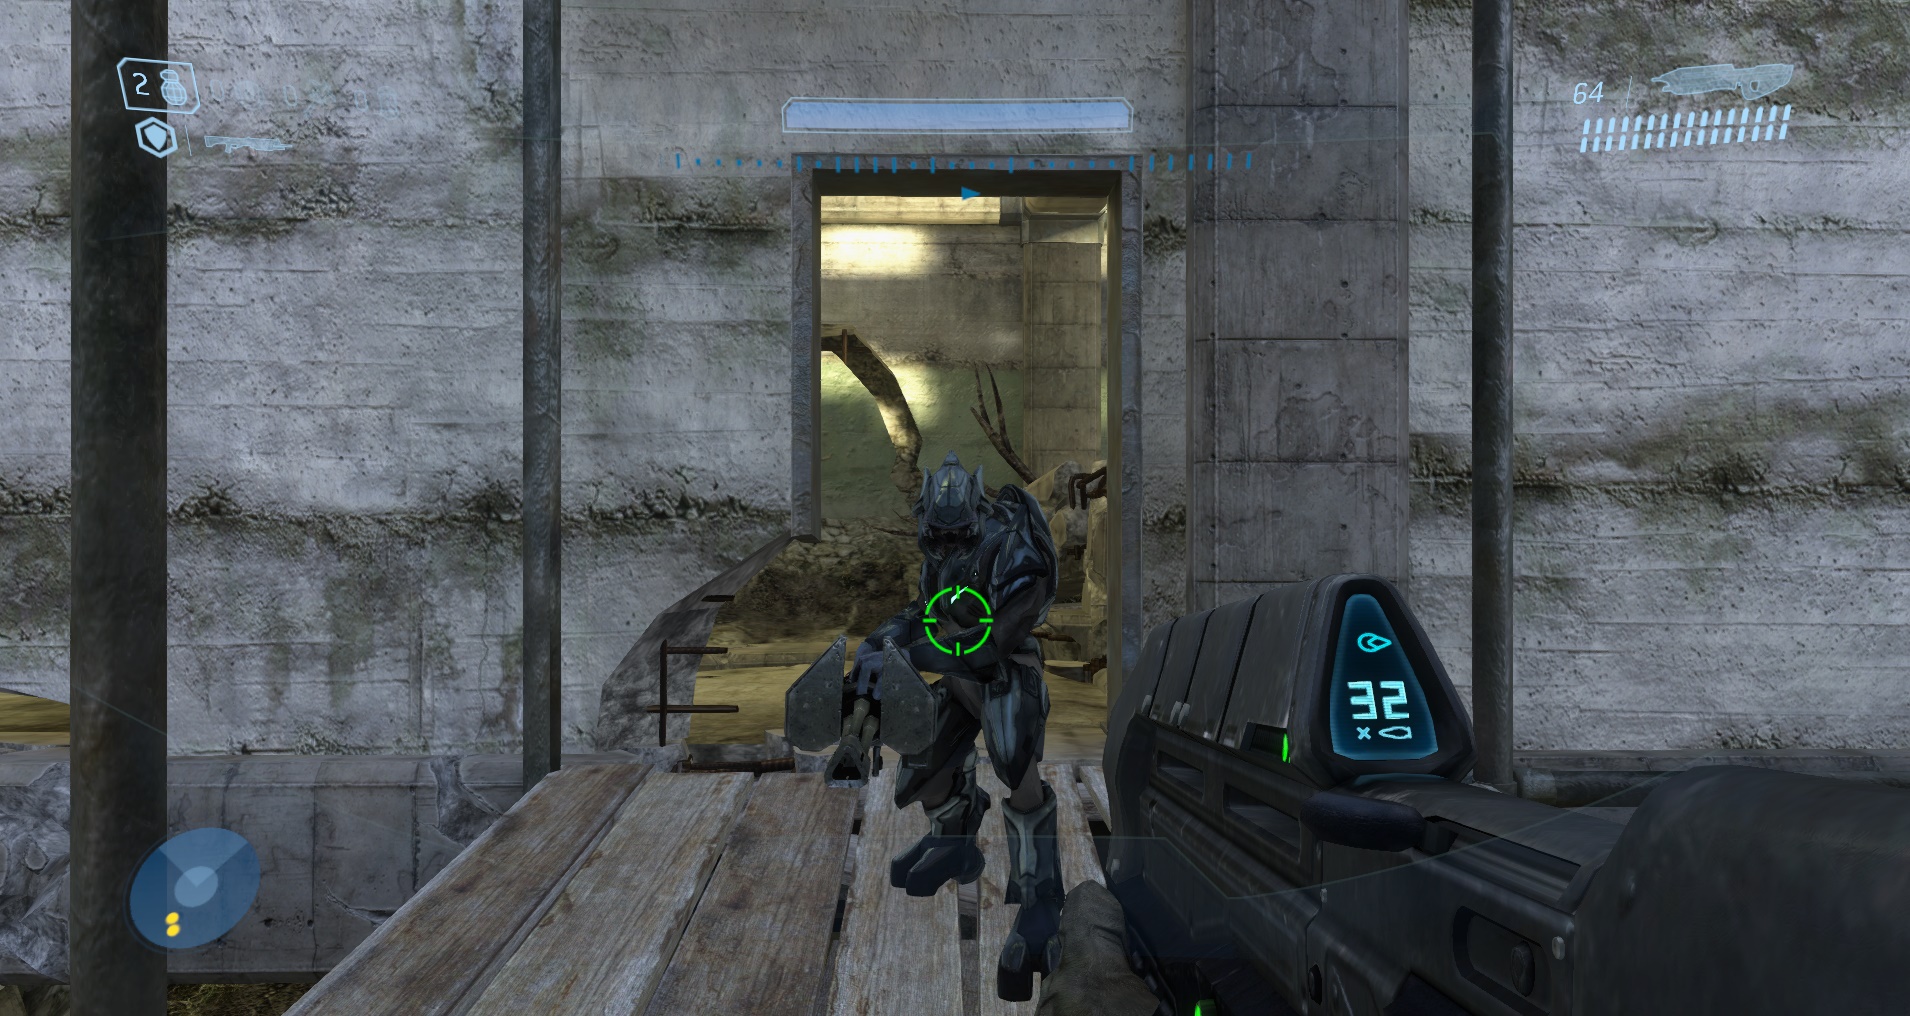
Old school cool.
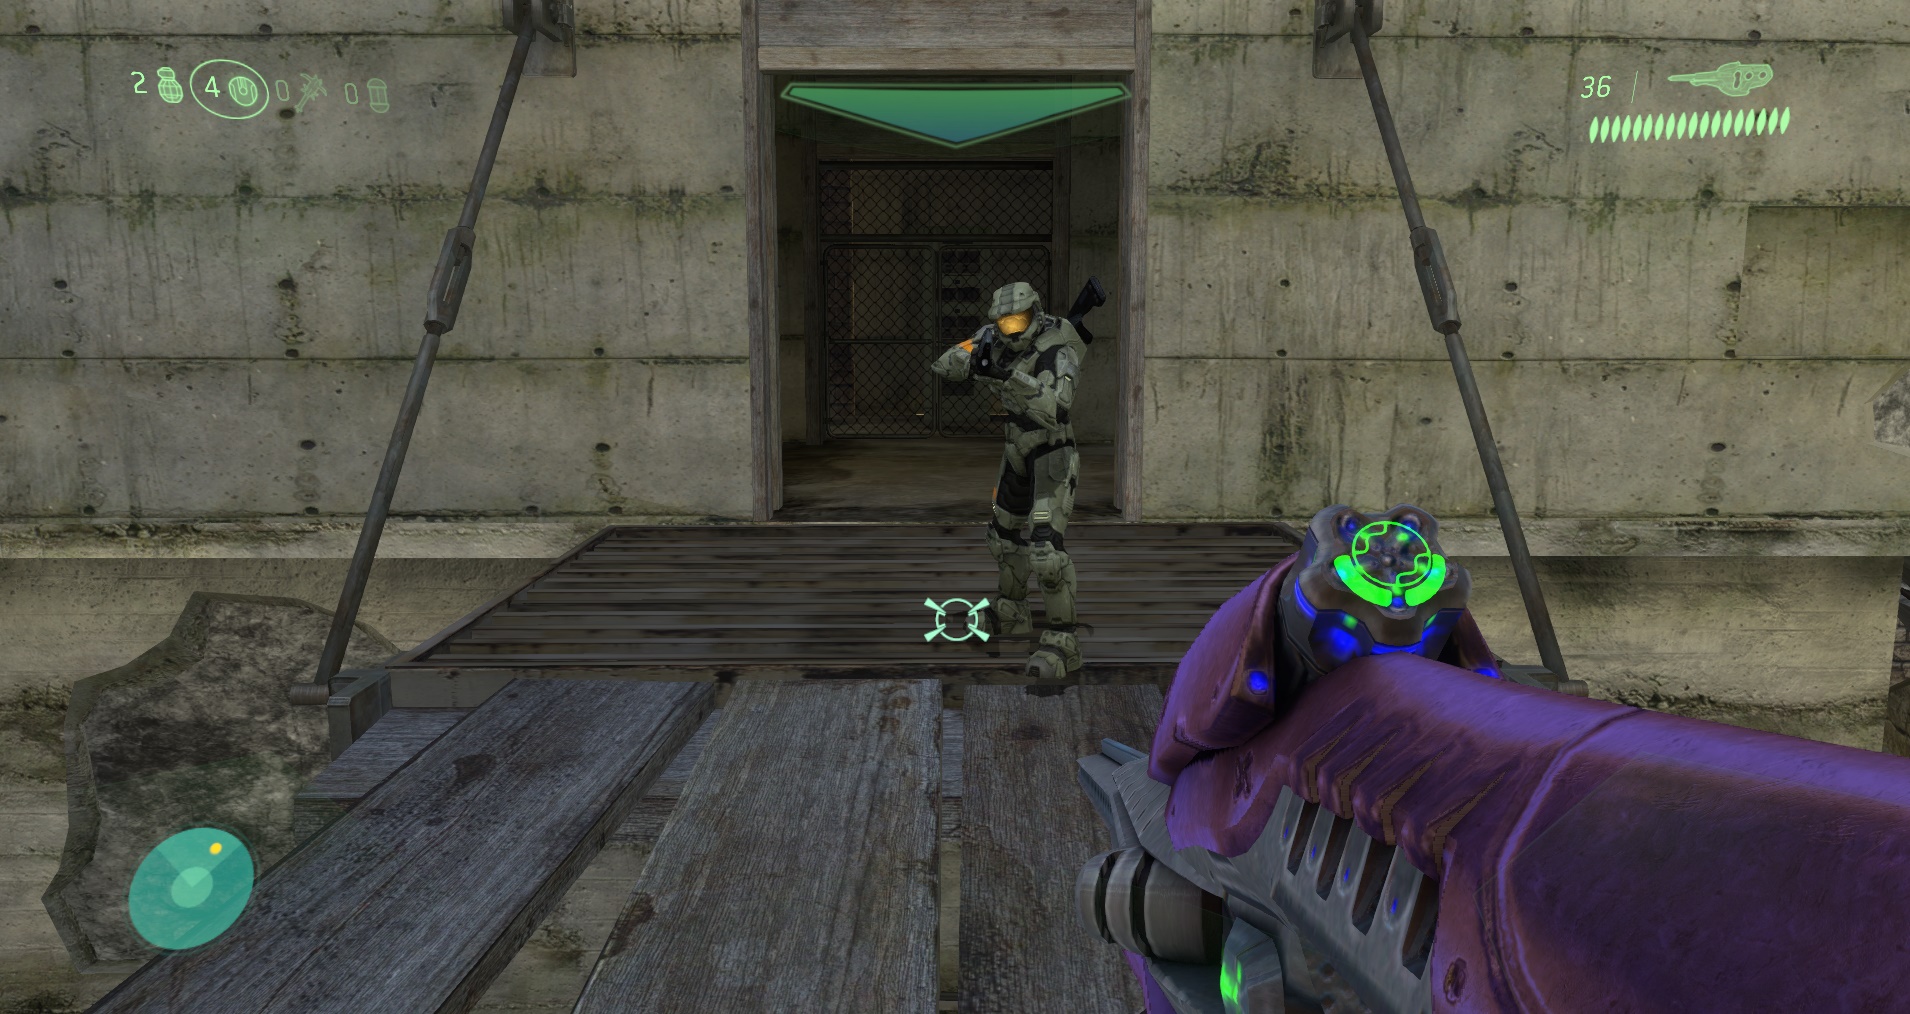
Wort it.
That brings us to the end of this Digsite deep dive, which is the start of your great journey into the ancient past of Halo’s cutting room floor content.
Download the latest Digsite release on GitHub!
Digsite - Halo: CE | Digsite - Halo 2 | Digsite - Halo 3
Curious to find out more about Digiste? You can also check out our other blogs on the fruits of this group’s labor and get hands-on with the previous content release from last year as well, which you can also find on the Steam Workshop.
- The Excavated Map Pack (Halo: CE), via Steam Workshop
- The Digtacular Map Pack (Halo 2), via Steam Workshop
- Crash Site, via Steam Workshop
If you’d like to follow public developments, you can scope the latest at our dedicated spaces, courtesy of YouTube, Halo Modding Reclaimers, and Halo Mods.